
Installation Instructions
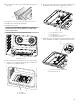
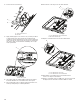

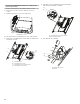
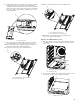

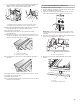
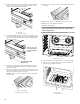
Table Of Contents
- Range Safety
- Installation Requirements
- Installation Instructions
- GAS CONVERSIONS
- Sécurité de la cuisinière
- Exigences d’installation
- Instructions d’installation
- Déballage de la cuisinière
- Retirer la porte
- Installation de la bride antibasculement
- Raccordement au gaz
- Vérification de l’emplacement de la bride antibasculement
- Ajustement de l’aplomb de la cuisinière
- Installer le plateau d’égouttement
- Système d’allumage électronique
- Installer la plinthe
- Terminer l’installation
- Conversions pour changement de gaz

29
9. Use a 1/8" x 4¼" (3mmx100mm) at-blade screwdriver to
adjust the ame height. Tighten screw to reduce ame
height. Loosen screw to increase ame height.
10. When nished adjusting the ame height, put a control knob
back onto the valve stem and turn off the burner.
11. Remove the control knob.
12. Repeat steps 6 through 13 for any other burners that
need adjustment.
13. Lift up on the control console and set it back into place. For
a proper t, the ange of the control console must hook over
the lip on the front of the range cooktop.
14. Check that the control console is ush with the top edge of
the range.
15. Replace the two screws on each side of the control console.
16. Replace the control knobs.
17. Replace burner grates.
18. Test the ame by turning the control from LO to HI, checking
the ame at each setting.
To Convert IR Grill Burner for Natural Gas
1. Unplug range or disconnect power.
2. Remove grill knob and bezel. The other surface knobs and
bezels should still be off the range.
3. Open the oven door and remove the two screws on each
side of the range that hold the control console in place.
NOTE: Make sure to leave oven door open or the control
console will not rest in the side brackets properly once it is
detached.
4. Pull up on the control console and let it drop forward into the
notched console brackets on each side.
5. Remove the two screws holding the grill orice holder
bracket.
A
B
A. Single ame burner adjustment screw (on right side of valve)
B. Dual ame burner adjustment screw (on left side of valve)
A
B
A. Control console ange
B. Front lip of range cooktop
A
A. Flush with range top
A
A. Control console bracket
A
B
A. Screws
B. Grill orice holder bracket