
Installation Instructions
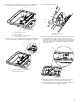
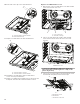
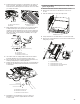

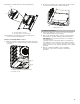

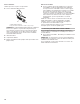
Table Of Contents
- Range Safety
- Installation Requirements
- Installation Instructions
- GAS CONVERSIONS
- Sécurité de la cuisinière
- Exigences d’installation
- Instructions d’installation
- Déballage de la cuisinière
- Retirer la porte
- Installation de la bride antibasculement
- Raccordement au gaz
- Vérification de l’emplacement de la bride antibasculement
- Ajustement de l’aplomb de la cuisinière
- Installer le plateau d’égouttement
- Système d’allumage électronique
- Installer la plinthe
- Terminer l’installation
- Conversions pour changement de gaz

32
10. Push down on the clip on the electrode bracket.
11. Replace oven bake burner electrode inside bracket.
12. Reinstall the oven bake burner and oven bake burner
screws. See Step 4 for illustration.
13. Replace oven bafe and oven bafe nuts. The front holes will
be aligned, and a click will sound when bafe is seated.
Replace Oven Bake Burner Cover
1. Align notches on the oven bake burner cover with shoulder
screws in the bottom of the oven.
2. Lower cover, and slide to left or right to slide shoulder
screws into the narrow ends of the notches, then lock
intoplace.
Convert Oven Broil Burner (30" [76.2 cm] and 36"
[91.4 cm] models and the right oven cavity on 48"
[121.9 cm] models)
1. Using a 1/4" (6.4 mm) nut driver, remove broil burner screw.
Set aside with side igniter positioned on the right.
A
B
A. Oven bake burner electrode bracket
B. Electrode bracket clip
A
B
A. Oven bake burner electrode
B. Oven bake burner electrode bracket
B
A
B
A
A. Cover notches (4)
B. Shoulder screws (4)
A
A. Bake burner cover
B
A
C
A. Broil burner screw
B. Broil burner
C. Broil burner orice hole