PRO-STYLE® GAS CONVECTION RANGES USE AND CARE GUIDE CUISINIÈRES À GAZ À CONVECTION PRO-STYLE® GUIDE D’UTILISATION ET D’ENTRETIEN Para una versión de estas instrucciones en español, visite www.jennair.com For questions about features, operation/performance, parts, accessories, or service in the U.S.A., call: 1-800-JENNAIR (1-800-536-6247) or visit our website at www.jennair.com. In Canada, call: 1-800-JENNAIR (1-800-536-6247) or visit our website at www.jennair.ca.
Table of Contents Table de matières SAFETY INFORMATION.................................................................3 The Anti-Tip Bracket..........................................................4 INFORMATIONS DE SÉCURITÉ..................................................40 Le pied antibasculement..................................................41 PARTS AND FEATURES.................................................................6 Range................................................................
SAFETY INFORMATION Your safety and the safety of others are very important. We have provided many important safety messages in this manual and on your appliance. Always read and obey all safety messages. This is the safety alert symbol. This symbol alerts you to potential hazards that can kill or hurt you and others. All safety messages will follow the safety alert symbol and either the word “DANGER” or “WARNING.
SAFETY INFORMATION THE ANTI-TIP BRACKET The range will not tip during normal use. However, the range can tip if you apply too much force or weight to the open door without the anti-tip bracket fastened down properly. WARNING Tip Over Hazard A child or adult can tip the range and be killed. Verify the anti-tip bracket has been properly installed and engaged per installation instructions. Re-engage the anti-tip bracket if the range is moved.
SAFETY INFORMATION IMPORTANT SAFETY INSTRUCTIONS ■ ■ ■ ■ ■ ■ ■ ■ Utensil Handles Should Be Turned Inward and Not Extend Over Adjacent Surface Units – To reduce the risk of burns, ignition of flammable materials, and spillage due to unintentional contact with the utensil, the handle of a utensil should be positioned so that it is turned inward, and does not extend over adjacent surface units.
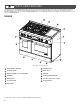
PARTS AND FEATURES This manual covers several different models. The range you have purchased may have some or all of the items listed. The locations and appearances of the features shown here may not match those of your model. Refer to this manual or the Frequently Asked Questions (FAQs) section of our website at www.jennair.com for more detailed instructions. In Canada, refer to the Customer Service Section at www.jennair.ca. RANGE 1 2 3 4 5 13 6 12 11 10 7 9 8 48" (121.
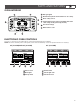
PARTS AND FEATURES OVEN INTERIOR C3 B 2 4 D 1 A A1 F 6 1 Halogen lights 2 Broil burner (electric broil element on 18" ovens) 3 Oven cavity sensor 4 Temperature probe jack (not available in the left oven cavity on 48" [121.9 cm] models) 5 Convection fan(s) 6 Bake burner cover E 5 ELECTRONIC OVEN CONTROLS The oven’s controls are accessed through its control panel and interactive-touch display.
COOKTOP FEATURES BURNERS Igniting Burners: WARNING Fire Hazard Do not let the burner flame extend beyond the edge of the pan. Turn off all controls when not cooking. Failure to follow these instructions can result in death or fire. BTU/Hr BURNER APPEARANCE FEATURES UltraPower stacked burner This burner has an upper and lower level of flame. The Power Hi setting uses both flame levels at full power to provide the highest heat.
COOKTOP FEATURES Sealed Surface Burners Sealed surface burners are designed to minimize gaps and seams that can allow liquids and spills to get under the cooktop. This design makes cleanup quick and easy. 1 Burner cap Stacked Power Burner 2 Burner base 3 Choke (for use with 1 CHROME ELECTRIC GRIDDLE (on some models) The chrome electric griddle provides the perfect cooking surface for grilled sandwiches, pancakes, eggs, burgers, sautéed vegetables, and many more family favorites.
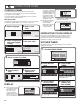
USING YOUR OVEN CONTROL PANEL ■■ The control panel houses the control menu and function controls. The control keypads are very sensitive and require only a light touch to activate. For more information about the individual controls, see their respective sections in this manual. Welcome Guide This appears on the display the first time the oven is powered up. The Welcome Guide allows you to set up your new oven. 1. Select language. 3. Select clock Welcome! Please Select your language.
USING YOUR OVEN To unlock keypads/screens: To Add Extra Time when Time Expires: 1. Touch ADD MORE TIME. Home Mode Temperature Most Used Modes: 00:00:00 HR:MIN:SEC Bake OK Convect Bake and then touch START TIMER. Cook Timer Gourmet Guides 1 6 2 3 4 7 8 9 Broil Keep Warm Conversion Probe Home Mode Temperature Most Used Modes: Auto5Convection Add More Time 0 Slide up bar. 2.
USING YOUR OVEN Setting Screen Appearance To clear clock to 00:00: 1. Touch the down Touch CLEAR. Back 09:13 HR:MIN AM arrow keypad, and then touch SCREEN APPEARANCE. Enter Clock Time: PM 1 2 3 4 5 6 7 8 9 0 Clear Cancel Cancel Left Kitchen Timer Setting Date Back Save Light Cancel Right 1. Touch SET DATE. 2. Choose date, and 2. Select screen appearance, and then touch SAVE.
USING YOUR OVEN Making Regional Settings 1. Touch the down arrow key, and then touch REGIONAL SETTINGS. Back 2. Select temperature units and daylight savings, and then touch SAVE. Back Setup Menu 2. Turn on Sabbath mode. Back Sabbath Mode: Sabbath Mode: Off When the oven is running in Sabbath mode: -The standard 12-hour shutoff is disabled. -All prompts, messages, and beeps will be deactivated. -The set temperature will be displayed, not the actual oven temperature.
USING YOUR OVEN WARNING Food Poisoning Hazard Do not let food sit in oven more than one hour before or after cooking. Doing so can result in food poisoning or sickness. To Change Temperature: The oven temperature can be changed when the oven(s) are in Sabbath mode. No tones will sound and the display will not change. Touch -25°F (-14°C) or +25°F (+14°C). 350° LEFT Sabbath Bake 00:01:00 Press Cancel to exit Sabbath mode. -25° -25° 6. (Optional) Set desired time.
USING YOUR OVEN Making Touchscreen Calibrations Resetting All Settings to Factory Defaults IMPORTANT: If the keypads on the screen are difficult to touch accurately, you may need to calibrate the touchscreen. 1. Touch TOUCHSCREEN CALIBRATION. Back Setup Menu Touchscreen Calibration Temperature Calibration Reset All Settings Service Information 1. Touch RESET ALL SETTINGS.
USING YOUR OVEN KNOW YOUR OVEN ■■ Closed and Engaged Position Odors and smoke are normal when the oven is used the first few times or when it is heavily soiled. During oven use, the heating elements will not remain on but will cycle on and off throughout oven operation. IMPORTANT: The health of some birds is extremely sensitive to the fumes given off. Exposure to the fumes may result in death to certain birds. Always move birds to another closed and well-ventilated room.
USING YOUR OVEN To Replace the Extendable Roller Rack: 1. Place on rack guide. Know your Racks ■■ To avoid damage to the sliding shelves, do not place more than 25 lbs (11.4 kg) on the rack. ■■ Do not clean the extendable roller rack in a dishwasher. It may remove the rack’s lubricant and affect its ability to slide. ■■ See the “Care and Cleaning” section for more information. Meat Thermometer Using 2 hands, grasp front of the closed rack and sliding shelf.
USING YOUR OVEN Changing a Mode, Temperature, or Cook Time while Oven Is Active COOKING MODES (BAKE, BROIL, KEEP WARM, CONV BAKE, CONV PASTRY, CONV ROAST, CONV/SLOW ROAST, CONV FROZEN PIZZA, PROOF, RAPID PROOF) The Home tab allows for easy access to the most-used modes and Culinary Assistants. Touch appropriate tab to make new selection, and then touch OK. Back 1. Touch Mode tab. Home Mode Temperature Adjust cook mode: Bake Keep Warm Broil Convect Bake Convect Roast Cvt.
USING YOUR OVEN BAKED GOODS Cakes RECOMMENDED MODE(S) Bake, Convect Bake RECOMMENDED RACK POSITION(S) Three racks — 1, 3, 5 Two racks — 2 and 4 One rack — 3 Cookies Bake, Convect Bake Three racks — 1, 3, 5 Two racks — 1 and 4, 2 and 4 (Convect Bake only) One rack — 3 BAKE The Bake mode relies primarily on heat from the lower bake element and radiant heat from the oven cavity to produce the perfect conditions for cakes, cookies, quick breads, yeast breads, meatloaf, and baked desserts.
USING YOUR OVEN Keep Warm™ Option The Keep Warm™ option allows hot cooked foods to stay at serving temperature. It can also be used at the end of a timed cook. To change the Keep Warm™ temperature during the Keep Warm™ cycle: 1. Touch programmed temperature. WARNING Use Left Oven Food Poisoning Hazard Preheating to: 170° Do not let food sit in oven more than one hour before or after cooking. 170° Broil RIGHT Doing so can result in food poisoning or sickness.
USING YOUR OVEN ■■ Use cookie sheets with no sides to allow air to move freely around the food. CONVECT PASTRY This mode provides progressive baking, first promoting maximum rise of flaky, delicate dough and finishing with the right balance of heat to promote golden browning. The recipe temperature does not need to be reduced for this mode. Convect Pastry is ideal for single- or multi-rack baking of cream puffs, turnovers, and croissants.
USING YOUR OVEN RAPID PROOF Rapid Proof is used to proof frozen dough. The Rapid Proof mode requires the oven be preheated and then canceled. 4. Proof for 10 minutes, and then touch CANCEL. Know Your Rapid Proof Mode ■■ The set temperature of 200° (93°C) cannot be changed. ■■ The Rapid Proof mode can be used even if the temperature is above the preset temperature for the Rapid Proof mode. Before Using Rapid Proof: 1. P lace frozen dough in a lightly greased bowl. Cover bowl with damp towel.
USING YOUR OVEN SPECIAL MODES If Timer Is Chosen: 6. Enter cook timer length, and then MY CREATIONS My Creations allows the customization of cooking processes. When My Creations is selected from the Main menu, a list of existing recipes is presented along with the ability to create more. touch NEXT. Back Home --:-- HR:MIN 1. Touch MY CREATIONS.
USING YOUR OVEN To Edit after Saving Settings: 2. Select Recipe Conversion mode. 1. Touch MY CREATIONS. Home Mode Temperature Most Used Modes: Back Cook Timer Broil Convect Bake Keep Warm Select an Automatic Convection Conversion mode: Convect Bake Gourmet Guides Bake Home This process will automatically update your standard recipe for convection cooking.
USING YOUR OVEN 2. Touch MODE, and then touch START. Home Mode 350° 3. Touch START TIMER. Timer Not Set Use Left Oven Bake Keep Warm Broil Convect Bake Convect Roast Cvt. Frozen Pizza Preheating to 350° Delay Start Self-Clean Start RIGHT Cancel Left Light Kitchen Timer Start Timer 170° Bake 00:00:10 Cancel Right 3. (Optional) Touch SET TIMER to enter a Cook Time, and then touch OK.
USING YOUR OVEN TEMPERATURE PROBE DELAY START The temperature probe accurately measures the internal temperature of meat, poultry, and casseroles and should be used in determining the doneness of food. It can be used during Bake, Convect Bake, and Convect Roast. The oven will beep when the food has reached the target temperature. Know Your Temperature Probe ■■ Always unplug and remove the temperature probe from the oven when removing food.
USING YOUR OVEN 3. Enter desired start and end times, and then touch SET DELAY. Back Select when cooking should begin: Begin: 3:10 pm -15 min 4:00 6:00 8:00 1. Touch CANCEL DELAY. End: 3:15 pm 10:00 To Cancel Delay Start Only: 12:00 +15 min 2:00 4:00 6:00 Cancel Delay 00:00:19 Setup Menu Oven Touch the 15Kitchen MinTimer keypad(s) or slideLightthe bar.Cancel The difference between the start and end times should equal the cook time.
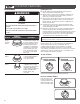
CARE AND CLEANING IMPORTANT: ■■ Before cleaning, make sure all controls are OFF and the oven and cooktop are cool. Do not use oven cleaners, bleach, or rust removers. ■■ Soap, water, and a soft cloth or sponge are suggested first unless otherwise noted. 3. Clean clogged burner ports. COOKTOP SURFACE After Each Use: 1. Wipe off cooktop, grates, and caps. Use a straight pin. Do not enlarge or distort the port. Do not use a wooden toothpick.
CARE AND CLEANING PORCELAIN-COATED GRATES AND CAPS Use 3. Scrape residue into drip tray. scrub and cleanser. lean with a nonabrasive nylon scrub pad and mildly C abrasive cleanser. Know Your Grates and Caps ■■ Food spills containing acids, such as vinegar and tomato, should be cleaned as soon as the cooktop, grates, and caps are cool. These spills may affect the finish. ■■ To avoid chipping, do not bang grates and caps against each other or hard surfaces such as cast iron cookware.
CARE AND CLEANING COOKTOP CONTROLS CONTROL PANEL 1. Remove knobs. 1. Activate LOCK BUTTONS NOW. Back Pull the knobs straight away from the control panel to remove. Lock Buttons Now Automatic Lock Self-clean Sound Volume Set Time Set Date Cancel Left Light Timer Cancel Right Locking buttons avoidsKitchen touch screen activation during cleaning. 2. Clean with warm, soapy water. Know Your Cooktop Controls Setup Menu 2. Apply cleaner.
CARE AND CLEANING DOOR INTERIOR SELF-CLEANING THE OVEN WARNING 1. Wipe away any deposits. Burn Hazard Do not touch the oven during the Self-Cleaning cycle. Use a damp sponge. Keep children away from oven during Self-Cleaning cycle. 2. Use Self-Cleaning cycle. See the “Self-Cleaning the Oven” section. OVEN RACKS 1. Empty out oven and remove racks. Failure to follow these instructions can result in burns.
CARE AND CLEANING 2. Remove any foil from oven. How the Cycle Works IMPORTANT: ■■ The heating and cooling of porcelain on steel in the oven may result in discoloring, loss of gloss, hairline cracks, and popping sounds. ■■ The Self-Cleaning cycle uses very high temperatures, burning soil to a powdery ash. The oven is preset for a 3-hour 30-minute Self-Cleaning cycle; however, the time can be changed.
CARE AND CLEANING To Stop Self-Clean Any Time: 3. Touch NEXT. Back Home Touch CANCEL OVEN. Before cleaning the oven: Home 1. Remove all oven racks and pans from the oven. Racks could discolor and not slide easily after a self- clean cycle. 2. Clean oven frame and door frame with a non-abrasive cleaning agent because they are not exposed to cleaning temperatures. Do not clean gasket.
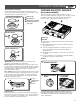
CARE AND CLEANING To Replace Oven Bake Burner Cover: 2. Remove oven door. 1. Align notches. 1A See the “Oven Door” section in Installation Instructions. 3. Remove burner cover. A 1 B2 B 2 1 Cover notches (4) 2 Shoulder screws (4) Align the notches on the oven bake burner cover with the shoulder screws in the bottom of the oven. 2. Replace burner cover. A 1 1 Bake burner cover Slide the bake burner cover to the right or left, lift up, and remove. To Replace Oven Bake Burner Cover: 1.
CARE AND CLEANING 2. Replace cover. 3. Remove bulb from socket. 1 A 1 Bake burner cover Drop the cover and slide it to the left or right. This will slide the shoulder screws into the narrow ends of the keyholes and lock the cover in place. 4. Replace bulb. 3. Replace oven door. See the “Oven Door” section in Installation Instructions. OVEN LIGHTS The oven lights are 120-volt, 25-watt maximum halogen bulbs. They will come on when the oven door is opened. On 48" (121.
TROUBLESHOOTING First try the solutions suggested here. If you need further assistance or more recommendations that may help you avoid a service call, refer to the “Warranty” section in this manual and scan the code there with your mobile device, or visit https://jennair.custhelp.com. In Canada, visit http://www.jennair.ca. If you experience Possible Causes Solution Nothing will operate. A household fuse has blown or a circuit breaker has tripped. Replace the fuse or reset the circuit breaker.
TROUBLESHOOTING First try the solutions suggested here. If you need further assistance or more recommendations that may help you avoid a service call, refer to the “Warranty” section in this manual and scan the code there with your mobile device, or visit https://jennair.custhelp.com. In Canada, visit http://www.jennair.ca. If you experience Gas range noises during Bake and Broil operations.
ASSISTANCE OR SERVICE Before calling for assistance or service, please check the “Troubleshooting” section. It may save you the cost of a service call. If you still need help, follow the instructions below. When calling, please know the purchase date and the complete model and serial numbers of your appliance. This information will help us to better respond to your request. If You Need Replacement Parts If you need to order replacement parts, we recommend that you use only factory specified parts.
JENN-AIR® COOKING LIMITED WARRANTY ATTACH YOUR RECEIPT HERE. PROOF OF PURCHASE IS REQUIRED TO OBTAIN WARRANTY SERVICE. Please have the following information available when you call the Customer eXperience Center: ■■ Name, address and telephone number ■■ Model number and serial number ■■ A clear, detailed description of the problem ■■ Proof of purchase including dealer or retailer name and address IF YOU NEED SERVICE: 1.
INFORMATIONS DE SÉCURITÉ Votre sécurité et celle des autres est très importante. Nous donnons de nombreux messages de sécurité importants dans ce manuel et sur votre appareil ménager. Assurez-vous de toujours lire tous les messages de sécurité et de vous y conformer. Voici le symbole d’alerte de sécurité. Ce symbole d’alerte de sécurité vous signale les dangers potentiels de décès et de blessures graves à vous et à d’autres.
INFORMATIONS DE SÉCURITÉ LE PIED ANTIBASCULEMENT La cuisinière ne basculera pas pendant une utilisation normale. Cependant, la cuisinière peut basculer, si vous appliquez trop de force ou de poids à la porte de la cuisinière, sans avoir adéquatement fixé le pied antibasculement. AVERTISSEMENT Risque de basculement Un enfant ou une personne adulte peut faire basculer la cuisinière, ce qui peut causer un décès.
INFORMATIONS DE SÉCURITÉ IMPORTANTES INSTRUCTIONS DE SÉCURITÉ ■ ■ ■ N’utiliser que des mitaines de four sèches – Des mitaines de four mouillées ou humides sur des surfaces chaudes peuvent provoquer des brûlures provenant de la vapeur. Ne pas laisser les mitaines de four toucher les éléments chauffants. Ne pas utiliser une serviette ou un tissu épais. NE PAS TOUCHER LES ÉLÉMENTS DE SURFACE OU L’ESPACE PRÈS DES ÉLÉMENTS – Les éléments de surface peuvent être chauds même lorsqu’ils ont une teinte foncée.
PIÈCES ET CARACTÉRISTIQUES Ce manuel couvre plusieurs modèles différents. La cuisinière que vous avez achetée peut comporter l’ensemble des éléments énumérés ou seulement certains d’entre eux. L’emplacement et l’apparence des caractéristiques illustrées peuvent ne pas correspondre à ceux de votre modèle. Se reporter à ce manuel ou à la section Foire aux questions (FAQ) de notre site Web sur www.jennair.com pour des instructions plus détaillées.
PIÈCES ET CARACTÉRISTIQUES INTÉRIEUR DU FOUR C3 B 2 4 D 1 A A1 F 6 1 Lampes à halogène 2 Brûleur du four (élément de cuisson électrique dans les fours de 18") 3 Capteur de la cavité du four 4 Prise de sonde thermométrique (non disponible sur la cavité du four de gauche pour les modèles de 48" [121,9 cm]) 5 Ventilateurs de convection 6 Couvercle du brûleur de cuisson au four E 5 COMMANDES ÉLECTRONIQUES DU FOUR On peut accéder aux commandes du four au moyen du tableau de commande et de l’affi
CARACTÉRISTIQUES DE LA TABLE DE CUISSON BRÛLEURS ■■ Vérifier visuellement que le brûleur est allumé. Si le brûleur ne s’allume pas, écouter pour savoir si un déclic se produit. Si l’allumeur n’émet aucun déclic, éteindre le brûleur. Vérifier si le disjoncteur ne s’est pas déclenché ou si un fusible n’est pas grillé. ■■ Vérifier que le bouton de commande est complètement enfoncé sur la tige de la soupape. Si l’allumeur ne fonctionne toujours pas, appeler un technicien de réparation qualifié.
CARACTÉRISTIQUES DE LA TABLE DE CUISSON Brûleurs de surface scellés Les brûleurs de surface scellés sont conçus pour réduire les espaces et joints qui pourraient permettre aux liquides et éclaboussures d’atteindre l’espace sous la table de cuisson. Cette conception rend le nettoyage simple et rapide.
CARACTÉRISTIQUES DE LA TABLE DE CUISSON PLAQUE À FRIRE CHROMÉE (sur certains modèles) La plaque à frire électrique chromée offre la surface de cuisson par excellence pour les sandwichs grillés, les crêpes, les œufs, les hamburgers, les sautés de légume et plusieurs autres plats préférés de la famille. La surface à faible adhérence de belle apparence est conçue pour faciliter le nettoyage. 1 A Utilisation : 1. Placer le plateau d’égouttement. B2 2. Pousser et tourner dans le bouton. 3.
UTILISATION DU FOUR TABLEAU DE COMMANDE AFFICHAGE Le tableau de commande regroupe le menu de commande et les commandes des différentes fonctions. Les touches de commande sont très sensibles et il suffit d’un léger toucher pour les activer. Pour plus d’information sur chaque commande, voir leurs sections respectives dans ce manuel. ■■ Home ■■ les unités de l’horloge. Welcome! Please Select your language. Regional Settings: Select clock units: English AM/PM Bienvenue! Sʼil vous plaît...
UTILISATION DU FOUR MINUTERIE DE CUISINE Pour ajouter du temps lorsque la minuterie a expiré : La minuterie de cuisine est une minuterie indépendante sans lien avec les minuteries de cuisson. 1. Toucher ADD 1. Appuyer sur KITCHEN TIMER (minuterie de cuisine). Home Mode Temperature Most Used Modes: Broil Convect Bake Keep Warm Home Auto Convection Mode 00:00:00 Probe Convect Bake Light désirée.
UTILISATION DU FOUR MENU DE RÉGLAGE Verrouillage automatique Le four offre la possibilité de commander plusieurs des réglages par défaut et d’accéder à des informations au moyen de l’affichage à l’écran. 1. Appuyer sur SETUP MENU (menu de réglage). Mode Home Temperature Most Used Modes: Gourmet Guides Bake Broil Convect Bake Probe Cancel Left Cook Timer Setup Menu My Creations Light Kitchen Timer Cancel Right Modèle de 48" illustré 1.
UTILISATION DU FOUR Régler les options de l’horloge Pour remettre l’horloge à 00:00 : 1. Appuyer sur la Appuyer sur CLEAR (effacer). Back 09:13 HR:MIN AM flèche vers le bas, puis sur CLOCK OPTIONS (options d’horloge). Enter Clock Time: PM 1 2 3 4 5 6 7 8 9 0 Clear Cancel Back Save 2. Sélectionner les unités de temps, puis toucher SAVE (sauvegarder).
UTILISATION DU FOUR Choisir la langue 1. Appuyer sur la flèche vers le bas, puis sur LANGUAGE (langue). Back puis appuyer sur SAVE (sauvegarder). Back Setup Menu Clock Options Sabbath Mode Screen Brightness Screen Appearance Language Regional Settings Cancel Left 2. Choisir la langue, Light Kitchen Timer Utilisation du mode Sabbat : 1. Sélectionner SABBATH MODE (mode Sabbat).
UTILISATION DU FOUR 4. Sélectionner la température du four désiré, puis appuyer sur NEXT (suivant). 7. Éteindre le four. LEFT Sabbath Bake Back Sabbath Mode - Select oven temperature: 200° 250° 300° 350° 400° 00:01:00 Press Cancel to exit Sabbath mode.
UTILISATION DU FOUR Calibration de la température 1. Toucher TEMPERATURE CALIBRATION 2. Appuyer sur NEXT (suivant). Back (calibration de la température). Back Touchscreen Calibration If buttons on the screen are difficult to press accurately, you may need to calibrate the touchscreen. You will be asked to press and hold three targets to calibrate.
UTILISATION DU FOUR Restaurer le paramétrage usine de tous les réglages 1. Toucher RESET ALL SETTINGS (réinitialiser tous les réglages). Back Setup Menu Touchscreen Calibration Temperature Calibration Reset All Settings Service Information CONNAÎTRE VOTRE FOUR ■■ Des odeurs et de la fumée sont normales lorsque le four est utilisé les premières fois et lorsqu’il est très sale.
UTILISATION DU FOUR Grille coulissante déployable Pour enlever la grille coulissante déployable : Cette grille coulissante déployable offre un accès facile à l’utilisateur pour le positionnement et le retrait des aliments. Elle peut être utilisées sur les positions de grille 1 à 4. La grille coulissante déployable ne peut être placée en position 5. 1. Soulever l’avant de la grille/du support et glisser vers l’intérieur.
UTILISATION DU FOUR Pour remettre en place la grille coulissante déployable : 1. Placer sur les guides de grille. CONNAÎTRE VOS GRILLES ■■ Afin d’éviter d’endommager les supports coulissants, ne pas placer plus de 25 lb (11,4 kg) sur la grille. ■■ Ne pas nettoyer la grille coulissante déployable au lavevaisselle. Ceci pourrait enlever le lubrifiant de la grille et nuire à ses facultés de glissement. ■■ Voir la section “Entretien et nettoyage” pour plus d’informations.
UTILISATION DU FOUR Changer le mode, la température ou le temps de cuisson pendant l’utilisation du four. MODES DE CUISSON (CUISSON AU FOUR, GRIL, MAINTIEN AU CHAUD, CUISSON AU FOUR PAR CONVECTION, CUISSON DE PÂTISSERIES PAR CONVECTION, RÔTISSAGE PAR CONVECTION, RÔTISSAGE LENT PAR CONVECTION, CUISSON PAR CONVECTION DE PIZZA SURGELÉE, LEVÉE, LEVÉE RAPIDE) L’onglet Accueil permet d’accéder facilement aux Modes les plus utilisés et aux Assistants culinaires. 1. Onglet MODE (mode) tactile.
UTILISATION DU FOUR PRODUITS DE BOULANGERIE Gâteaux MODES RECOMMANDÉES Cuisson au four, cuisson au four par convection POSITIONS DE GRILLE RECOMMANDÉES Trois grilles — 1, 3, 5 Deux grilles — 2 et 4 Une grille — 3 Biscuits Cuisson au four, cuisson au four par convection Trois grilles — 1, 3, 5 Deux grilles — 1 et 4, 2 et 4 (Cuisson au four par convection seulement) Une grille — 3 CONSEILS Pour des résultats optimaux lors de la cuisson d’un gâteau sur 2 grilles, placer les gâteaux sur les grilles, tel q
UTILISATION DU FOUR Utilisation de la cuisson au gril : 3. Saisir le temps de cuisson, puis 1. Préchauffer le four. toucher START (démarrer). Use Left Oven Home Bake --:--:-- HR:MIN:SEC Insert food and Set Timer, if desired.
UTILISATION DU FOUR CUISSON AU FOUR PAR CONVECTION RÔTISSAGE PAR CONVECTION Le mode de cuisson par convection utilise plusieurs éléments et un ventilateur pour faire circuler l’air chaud dans le four, ce qui permet de faire cuire des aliments de 10 % à 20 % plus rapidement qu’avec une méthode traditionnelle.
UTILISATION DU FOUR CUISSON PAR CONVECTION DE PIZZA SURGELÉE La cuisson par convection de pizza surgelée est utilisée pour la cuisson au four de pizzas surgelées à croûte épaisse ou fine. Durant la cuisson par convection de pizza surgelée, les éléments de cuisson par convection et de cuisson au four s’allument et s’éteignent par intermittence à intervalles réguliers pour maintenir la température du four.
UTILISATION DU FOUR LEVÉE RAPIDE Le mode Levée rapide est utilisé pour la levée des pâtes surgelées. Le mode Levée rapide nécessite que le four soit préchauffé, puis que cette fonction soit annulée. 4. Faire lever pendant 10 minutes, puis appuyer sur CANCEL (annuler). Connaître votre mode de levée rapide ■■ ■■ La température est réglée à 200°F (93°C) et ne peut pas être modifiée. Le mode Levée rapide peut être utilisé même si la température est supérieure à celle préréglée pour ce mode.
UTILISATION DU FOUR MODES SPÉCIAUX 5. Sélectionner le mode de surveillance MES CRÉATIONS Mes créations permet de personnaliser les processus de cuisson. Lorsque l’on sélectionne Mes créations à partir du menu principal, une liste des recettes existantes apparaît et la possibilité d’en créer d’autres est offerte. REMARQUE : S’il s’agit d’un four double, sélectionner d’abord le four. 1. Toucher MY CREATIONS (mes créations).
UTILISATION DU FOUR 10. Saisir le nom de l’aliment, puis toucher OK. Back Name the creation: - < ABC DEF GHI JKL MNO PQRS TUV WXYZ 40 Delete space 0-9 Clear All OK Appuyer plusieurs sur une Cancel Leftfois Kitchen Light de clavier Timer touche Cancel Rightpour alterner entre les lettres. Par exemple, appuyer une fois sur “ABC” pour entrer “a,” deux fois pour entrer “b” et trois fois pour entrer “c.” Après 2 secondes, la lettre est acceptée et le curseur se place à la position suivante.
UTILISATION DU FOUR 4. Saisir un temps de cuisson normal. Back Home --:--:-- HR:MIN:SEC Enter standard cooking time in your recipe: 1 2 3 4 5 6 7 8 9 0 Clear Skip Timer Next > Cancel Left(suivant) LightTIMER Kitchen Timer Cancel Right Appuyer sur NEXT ou SKIP (passer la minuterie). 5. Choisir le réglage de rappel.
UTILISATION DU FOUR Pour remettre à zéro le temps déjà saisi : 3. Appuyer sur START TIMER 5. Toucher RESTART FOR (redémarrer (démarrer minuterie). pour). Use Left Oven Use Left Oven Preheating to 350° Start Timer 170° Bake RIGHT 00:00:10 Cancel Left Light Kitchen Timer Cancel Right Lorsque le signal de préchauffage se fait entendre, placer les aliments dans le four et fermer la porte. Si une mise en marche différée est programmée, placer les aliments dans le four au moment du réglage du mode.
UTILISATION DU FOUR Utilisation de la sonde thermométrique : CONVECT BAKE (cuisson au four par convection), CONVECT ROAST (rôtissage par convection) ou BAKE (cuisson au four). (sonde).
UTILISATION DU FOUR 2. Sélectionner le temps de cuisson désiré, puis toucher DELAY START (mise en marche différée). Home 350o Bake 00:00:19 HR:MIN:SEC Pour annuler la mise en marche différée seulement : 1. Appuyer sur CANCEL DELAY (annuler différer). Cook Timer 1 2 3 4 5 Keep Warm 6 7 8 9 0 Clear Delay Start Off Cancel Delay Cancel Left Light Kitchen Timer Cancel Right 3. Saisir les heures de départ et de fin souhaitées, puis toucher SET DELAY (mise en marche différée).
ENTRETIEN ET NETTOYAGE IMPORTANT : Avant le nettoyage, s’assurer que toutes les commandes sont éteintes et que le four et la table de cuisson sont froids. Ne pas utiliser de nettoyants à four, d’agent de blanchiment ou de décapants à rouille. ■■ 3. Nettoyer les orifices de brûleur obstrués. L’usage de savon, d’eau et d’un chiffon doux ou d’une éponge est suggéré en priorité, sauf indication contraire. ■■ SURFACE DE LA TABLE DE CUISSON Après chaque utilisation : 1.
ENTRETIEN ET NETTOYAGE GRILLES ET CHAPEAUX ÉMAILLÉS Utiliser un tampon à récurer et un détergent. ettoyer à l’aide d’outils de récurage en nylon non abrasif et N nettoyant légèrement abrasif : Connaître vos grilles et chapeaux. ■■ Les renversements d’aliments contenant des produits acides, tels que vinaigre et tomates, doivent être nettoyés dès que la table de cuisson, les grilles et les chapeaux ont refroidi. Ces salissures peuvent endommager le fini.
ENTRETIEN ET NETTOYAGE 5. Éteindre la plaque et la laisser refroidir. COMMANDES DE LA TABLE DE CUISSON 1. Retirer les boutons. 6. Essuyer la plaque à frire. Tirer les boutons directement hors du tableau de commande pour les enlever. 2. Nettoyer à l’aide d’eau chaude et savonneuse. Une fois refroidie, essuyer la plaque à frire avec un linge en ratine humide et propre. Polir ensuite avec un tissu en microfibres.
ENTRETIEN ET NETTOYAGE ACIER INOXYDABLE (sur certains modèles) Utiliser un nettoyant ou des lingettes. EXTÉRIEUR DE LA PORTE Ajouter le nettoyant. Utiliser le nettoyant pour acier inoxydable affresh® ou les lingettes nettoyantes pour acier inoxydable affresh®. (vendus séparément) Frotter dans la direction du grain pour éviter tout dommage de la surface en acier.
ENTRETIEN ET NETTOYAGE GRILLES DU FOUR AUTONETTOYAGE DU FOUR AVERTISSEMENT 1. V ider le four et retirer les grilles. Risque de brûlures Ne pas toucher le four au cours du programme d'autonettoyage. Sortir du four la lèchefrite, la grille et les ustensiles de cuisson au four et, sur certains modèles, la sonde thermométrique. IMPORTANT : Enlever les grilles avant d’effectuer le programme d’autonettoyage pour éviter de les décolorer et de rendre le mouvement de coulissement difficile. 2.
ENTRETIEN ET NETTOYAGE 2. Enlever tout le papier aluminium du four. Comment fonctionne le programme IMPORTANT : ■■ Le chauffage et le refroidissement de la porcelaine sur l’acier dans le four peuvent causer une décoloration, une perte de lustre, des fissures minuscules et des craquements. ■■ Le programme d’autonettoyage utilise des températures très élevées, brûlant les saletés pour les réduire en cendre.
ENTRETIEN ET NETTOYAGE Utilisation de l’autonettoyage : Nettoyage différé : 1. Toucher SELF-CLEAN (autonettoyage). Back Setup Menu 5. Appuyer sur DELAY START (mise en marche différée). Back Lock Buttons Now Automatic Lock Self-clean Sound Volume Set Time Set Date Home Light Medium Heavy 2 hours of cleaning 3 hours of cleaning 4 hours of cleaning Note: The oven will cool for an additional 30 minutes after cleaning completes.
ENTRETIEN ET NETTOYAGE COUVERCLE DU BRÛLEUR DE CUISSON AU FOUR Lors du nettoyage des traces d’un liquide qui se serait infiltré sous le couvercle du brûleur de cuisson au four, retirer puis réinstaller le couvercle conformément aux instructions ci-dessous. Remplacement du couvercle du brûleur de cuisson au four : 1. Aligner les encoches.
ENTRETIEN ET NETTOYAGE Pour retirer le couvercle du brûleur de cuisson au four (cavité du four de gauche sur les modèles de 48" [121,9 cm]) : 1. Ôter les grilles du four. Remplacement du couvercle du brûleur de cuisson au four : 1. Aligner les trous. A1 B2 2. Retirer la porte du four. Consulter la section “Porte du four” des Instructions d’installation. 3. Enlever le couvercle de brûleur.
ENTRETIEN ET NETTOYAGE LAMPES DU FOUR Les lampes du four sont des ampoules à halogène de 120 V, 25 W maximum. Elles s’allument à l’ouverture de la porte du four. Sur les cuisinières de 48" (121,9 cm), les lampes du four de gauche et de droite s’éteignent lorsqu’on appuie sur OVEN LIGHT (lampe du four). Les lampes du four ne fonctionnent pas durant le programme d’autonettoyage. Tandis que la porte du four est fermée, appuyer sur OVEN LIGHT (lampe du four) pour allumer ou éteindre la lampe. 3.
DÉPANNAGE Essayez d’abord les solutions suggérées ici. Pour obtenir de l’aide ou des conseils qui permettront peut-être d’éviter une intervention de dépannage, consulter la page de garantie de ce manuel et balayer le code QR avec votre appareil mobile, ou visiter le site Web http://jennair.custhelp.com. Au Canada, visiter le http://www.jennair.ca. Si vous rencontrez les problèmes suivants Causes possibles Solution Rien ne fonctionne. Un fusible est grillé ou un disjoncteur est déclenché.
DÉPANNAGE Essayez d’abord les solutions suggérées ici. Pour obtenir de l’aide ou des conseils qui permettront peut-être d’éviter une intervention de dépannage, consulter la page de garantie de ce manuel et balayer le code QR avec votre appareil mobile, ou visiter le site Web http://jennair.custhelp.com. Au Canada, visiter le http://www.jennair.ca. Si vous rencontrez les problèmes suivants Causes possibles Bruits émis par la cuisinière à gaz lors des opérations de cuisson au four et de cuisson au gril.
ASSISTANCE OU SERVICE Avant de faire un appel pour assistance ou service, vérifier la section “Dépannage”. Cette vérification peut vous faire économiser le coût d’une intervention de dépannage. Si vous avez encore besoin d’aide, suivez les instructions ci-dessous. Avant d’appeler, vous devez connaître la date d’achat et les numéros de modèle et de série complets de votre appareil. Ces renseignements nous aideront à mieux répondre à votre demande.
GARANTIE LIMITÉE DES APPAREILS DE CUISSON JENN-AIR® ATTACHEZ ICI VOTRE REÇU DE VENTE. UNE PREUVE D’ACHAT EST OBLIGATOIRE POUR OBTENIR L’APPLICATION DE LA GARANTIE.
CLAUSE D’EXONÉRATION DE RESPONSABILITÉ AU TITRE DES GARANTIES IMPLICITES LES GARANTIES IMPLICITES, Y COMPRIS LES GARANTIES APPLICABLES DE QUALITÉ MARCHANDE OU D’APTITUDE À UN USAGE PARTICULIER, SONT LIMITÉES À UN AN OU À LA PLUS COURTE PÉRIODE AUTORISÉE PAR LA LOI. Certains États et provinces ne permettent pas de limitation sur la durée des garanties implicites de qualité marchande ou d’aptitude à un usage particulier, de sorte que la limitation ci-dessus peut ne pas être applicable dans votre cas.