27" AND 30" (68.6 CM AND 76.2 CM) BUILT-IN MICROWAVE/OVEN COMBINATION DES FOURS ENCASTRÉS (MICRO-ONDES/FOUR) 27 PO ET 30 PO (68,6 CM ET 76,2 CM) Use & Care Guide For questions about features, operation/performance, parts, accessories, or service in the U.S.A., call: 1-800-JENNAIR (1-800-536-6247) or visit our website at www.jennair.com. In Canada, call: 1-800-JENNAIR (1-800-536-6247) or visit our website at www.jennair.ca.
TABLE OF CONTENTS TABLE DES MATIÈRES BUILT-IN MICROWAVE OVEN SAFETY ........................................3 Electrical Requirements................................................................4 PARTS AND FEATURES.................................................................5 Turntable........................................................................................5 Convection Grid............................................................................6 Coated Crisper Pan and Handle.....
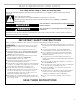
BUILT-IN MICROWAVE OVEN SAFETY Your safety and the safety of others are very important. We have provided many important safety messages in this manual and on your appliance. Always read and obey all safety messages. This is the safety alert symbol. This symbol alerts you to potential hazards that can kill or hurt you and others. All safety messages will follow the safety alert symbol and either the word “DANGER” or “WARNING.
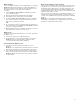
IMPORTANT SAFETY INSTRUCTIONS ■ Liquids, such as water, coffee, or tea are able to be overheated beyond the boiling point without appearing to be boiling. Visible bubbling or boiling when the container is removed from the microwave oven is not always present. THIS COULD RESULT IN VERY HOT LIQUIDS SUDDENLY BOILING OVER WHEN THE CONTAINER IS DISTURBED OR A SPOON OR OTHER UTENSIL IS INSERTED INTO THE LIQUID. To reduce the risk of injury to persons: – Do not overheat the liquid.
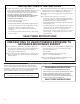
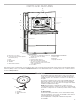
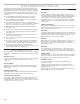
PARTS AND FEATURES K A J B I C, D E F G H A. Electronic oven control B. Convection element and fan (hidden behind back panel) C. Light D. Broil element E. Turntable F. Metal shielded window G. Lower oven (on combination models. See separate Use and Care Guide.) H. Bottom vent I. Dual microwave emission J. Model and serial number plate (on center vent under control panel. NOTE: On single microwave oven models, on the right side trim.) K.
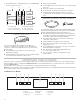
1. From the Microwave Cooking Mode menu, touch TURNTABLE to turn the rotation On or Off. A B C 02 02 Rehe Reh Re heatt Reheat 01 01 00 00 MIN SEC S C Popc Popc Po p or orn n Popcorn 89 59 Bake Bak Ba ked Potato ked Pota Pot Po tato tat to Baked 88 58 A. Cooking mode B. Time – minute selection C. Time – second selection Always use the turntable. ■■ To avoid damage to the microwave oven, do not store the grid in the oven. ■■ Two-level cooking is not recommended.
Dedicated Microwave Oven Models A B C A. Power B. Kitchen Timer C. Tools Touch Panel The touch panel houses the control menu and function controls. The touch pads are very sensitive and require only a light touch to activate. For more information about the individual controls, see their respective sections in this manual. Welcome Guide This appears on your display the first time the microwave is powered up. The Welcome Guide allows you to set up your new microwave oven.
Drop-down Message Demonstration MODE MODE AVAILABLE SELECTIONS Clock Theme ■■ Textures ■■ Celebration ■■ Culinary ■■ Clock Only ■■ Animation (Default) ■■ Spring ■■ Summer ■■ Fall ■■ Winter ■■ Daylight Saving ■■ Clock Style ■■ Set Clock (Default) ■■ Set Date Button Lock ■■ Press Lock to lock controls. Number Entry ■■ Number Pad ■■ Scroll (Default) Touch Calib. ■■ Use to calibrate touch screen Service Info. ■■ Model Number and Serial Number Legal Info.
Kitchen Timer Wi-Fi Connectivity (on some models) This is an independent timer not associated with the cook timers. NOTE: The Kitchen Timer appears as a drop-down display. To dismiss the timer message, swipe the message arrow up. The timer will continue to count down even though it is not visible. 1. Touch TIMER (KITCHEN TIMER for dedicated microwave ovens) anytime needed. 2. Enter the desired time (00:00:00) using the tumbler. 3. Touch Back next to Cancel Timer or touch START. 4.
BUILT-IN MICROWAVE OVEN USE A magnetron in the oven produces microwaves that reflect off the metal floor, walls, and ceiling and pass through the turntable and appropriate cookware to the food. Microwaves are attracted to and absorbed by fat, sugar, and water molecules in the food, causing them to move, producing friction and heat which cooks the food. ■■ To avoid damage to the microwave oven, do not lean on or allow children to swing on the microwave oven door.
Cookware and Dinnerware Cookware and dinnerware must fit on the turntable. Always use oven mitts or pot holders when handling because any dish may become hot from heat transferred from the food. Do not use cookware and dinnerware with gold or silver trim. Use the following chart as a guide, and then test before using. MATERIAL RECOMMENDATIONS Aluminum Foil, Metal See “Aluminum Foil and Metal” section. Browning Dish Bottom must be at least 3/16" (5 mm) above the turntable.
Cook Sensor During the Sensor Cook function, a sensor automatically adjusts for the cook time and power level. The microwave oven display will show the time countdown once the sensor identifies the cooking duration. If the microwave oven door is opened during a sensor function, the microwave oven will turn off and any additional operations will be canceled.
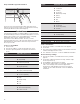
MODE RANGE MODE RANGE Convect Roast 170–450°F (77–232°C) Reheat Manual (Default @ 100% Power) Convect Bake Convert Recipe For Convection Default 325°F (163°C) @ 0% Power Casserole Power: 0–30% (Default 0%) Dinner Plate 170–450°F (77–232°C) Pizza Slice Default 325°F (163°C) Sauce Roast Bake (Default) Soup Cook 170–450°F (77–232°C) Steam Cook 00:01–89:59 10–100% (Default 100%) Default 325°F (163°C) Popcorn 1.75 ~ 3.
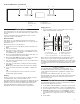
5. Touch START. The display will count down the cook time. When the stop time is reached, the oven will shut off automatically. If enabled, end-of-cycle tones will sound. 6. Touch MICROWAVE CANCEL (CANCEL MICROWAVE on combination oven models), or open the door to clear the display. NOTE: The microwave-cooling fan may continue to run for several minutes after the cooking cycle has been completed. The microwave cooking does not continue beyond the end of cooking cycle. Auto Convection Conversion A B C D A.
Convect Roast The Roast function uses the convection element with or without microwave power. The Roast function requires that a time and temperature (and microwaves if desired) be entered. The highest microwave power level that can be used is 30%. ■■ Use the convection grid. Place on turntable. ■■ Use oven mitts as the door and grids will become hot. To Use Convect Roast: 1. Touch POWER or MICROWAVE (on combination oven models). 2. From the Cooking mode menu, select Convect Roast. 3.
SETTING QUANTITY Poultry SETTING QUANTITY Convenience Food Frozen Chicken Tenders 5-20 pieces Bagel bites 9 pieces Chicken breast 0.2-2.0 lb (0.1-0.9 kg) Cheese sticks 4-16 pieces Chicken nuggets 6-24 pieces Frozen egg rolls 1-8 pieces Chicken pieces - with skin 0.5-2.0 lb (0.2-0.9 kg) Frozen french toast 1-4 pieces Frozen fried chicken 4-8 pieces Frozen sausage links 2-10 pieces Turkey breast 3.0 lb (1.4 kg) Frozen sausage patties 2-8 pieces Whole chicken 3.0-5.5 lb (1.4-2.
Beverage Use a microwave safe container. Do not cover. To Use Beverage Mode: NOTE: For combination units, touch the MICROWAVE to access the microwave menu. 1. From the Mode menu, select BEVERAGE. 2. Select quantity. 3. (Optional) To adjust the doneness, touch DONENESS, read the on-screen information, and then touch DONENESS. Select More Done, Suggested, or Less Done, and then touch SET. 4. Touch START. 5. Touch Microwave Cancel to turn off the oven.
Melt To Use Programmed Reheat: 8 oz For Combination Ovens, begin by touching the MICROWAVE button. 1. Scroll to REHEAT in the cooking mode menu. 2. Scroll to the desired food category and touch NEXT. If you choose DINNER PLATE, skip to step 4. 3. Scroll to select one of the preset quantities, and then touch NEXT. 4. Touch START. OR Touch DONENESS and scroll to select between More Done, Suggested, or Less Done and touch SET to return to the previous screen, and then touch START to begin the cooking cycle.
Boil & Simmer Manual Simmer Chart FOOD INSTRUCTIONS Pasta* Use a microwave-safe dish with a loose-fitting lid. Use the following chart as a guide. Add 1 tbs (15 mL) oil to water. Place the dish containing water in oven. Enter 1 second of simmer time. The water will heat to a boil and then the oven will turn off. Place the pasta in the water and cover the dish. Repeat steps 1–4 under “To Use Manual Simmer,” then enter the actual simmer time desired. Rice and Vegetables Place water and food in dish.
Browning Pan The Browning Pan feature uses the crisper pan, the broil element and microwaves to crisp and brown foods. While microwaves heat food from above, they also heat the pan from below to brown and crisp the food. Browning Pan can be used to saute meats and vegetables, pan fry bacon and eggs, and to crisp and brown pizza and french fries. Some Browning Pan cycles are programmed to preheat the empty pan for 3 minutes before cooking begins.
BUILT-IN MICROWAVE OVEN CARE General Cleaning IMPORTANT: Before cleaning, make sure all controls are off and the microwave oven is cool. Always follow label instructions on cleaning products. For additional information, you can visit the Frequently Asked Questions (FAQs) section of our website at www.jennair.com. In Canada, reference the Customer Service section at www.jennair.ca. Activate the Button Lock to avoid touch screen activation during cleaning. See “Button Lock” in the “Tools Menu” section.
TROUBLESHOOTING First try the solutions suggested here. If you need further assistance or more recommendations that may help you avoid a service call, refer to the warranty, or visit https://jennair.custhelp.com. In Canada, visit http://www.jennair.ca. Contact us by mail with any questions or concerns at the address below: In the U.S.A.: In Canada: JennAir Brand Home Appliances JennAir Brand Home Appliances Customer eXperience Center Customer eXperience Centre 553 Benson Road 200 – 6750 Century Ave.
ASSISTANCE OR SERVICE If you need service In Canada Please refer to the warranty. If you need replacement parts If you need to order replacement parts, we recommend that you use only factory specified parts. These factory specified parts will fit right and work right because they are made with the same precision used to build every new JennAir® appliance. To locate factory specified parts in your area, call us or your nearest JennAir designated service center. In the U.S.A.
/™ ©2018 All rights reserved. Used under license in Canada. Tous droits réservés. Utilisé sous licence au Canada. ® W11235344A 10/18 Printed in U.S.A.