
Installation Sheet

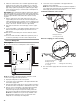
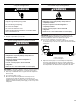
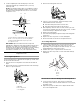
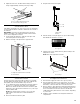
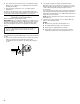


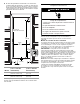
Table Of Contents
- Table of Contents
- Índice
- Table des matières
- Refrigerator Safety
- 48" Models
- Installation requirements
- Tools and Parts
- Location Requirements
- Electrical Requirements
- Water Supply Requirements
- Tipping Radius
- Product Dimensions
- Door Swing Dimensions
- Custom Side Panels
- Unpack the Refrigerator
- Reduce Tipping Radius
- Move the Refrigerator into House
- Install Anti-Tip Boards
- Connect the Water Supply
- Plug in Refrigerator
- Move Refrigerator to Final Location
- Level and Align Refrigerator
- Adjust Doors
- Install Side Panel
- Install Base Grille
- Complete Installation
- Water System Preparation
- Herramientas y piezas
- Requisitos de ubicación
- Requisitos eléctricos
- Requisitos del suministro de agua
- Arco de vuelco
- Medidas del producto
- Medidas de oscilación de las puertas
- Paneles laterales a la medida
- Desempaque el refrigerador
- Cómo reducir el arco de vuelco (si es necesario)
- Cómo hacer entrar el refrigerador en la casa
- Cómo instalar los tableros antivuelco
- Conexión del suministro de agua
- Cómo mover el refrigerador a su ubicación final
- Nivelación y alineamiento del refrigerador
- Ajuste las puertas
- Cómo instalar el panel lateral
- Cómo instalar la rejilla de la base
- Cómo terminar la instalación
- Preparación del sistema de agua
- Outillage et pièces
- Exigences d’emplacement
- Spécifications électriques
- Spécifications de l’alimentation en eau
- Rayon de basculement
- Dimensions du produit
- Dimensions pour le pivotement des portes
- Panneaux latéraux personnalisés
- Déballage du réfrigérateur
- Réduction du rayon de basculement
- Faire entrer le réfrigérateur dans le domicile
- Installation de planches antibasculement
- Raccordement à l’alimentation en eau
- Branchement du réfrigérateur
- Faire entrer le réfrigérateur dans le domicile
- Réglage de l'aplomb et alignement du réfrigérateur
- Ajustement des portes
- Installation du panneau latéral
- Achever l’installation
- Préparation du système d’eau

14
3. Continue adjusting all of the leveling legs to raise the
refrigerator until the top is within at least 1" (2.54
cm)
of the top soffit.
NOTE: If an anti-tip board has been used, adjust the leveling
legs until the top of the refrigerator is within ¹⁄₄" (6.35
mm) of
the bottom of the anti-tip board as shown. Do not crush the
compressor cover.
IMPORTANT: Adjust in small increments to keep from
damaging the cabinet trim and causing problems with the door
alignment or top grille fit. To avoid damage to the cabinet or
leveling legs, do not apply more than 50 inch-pounds (5.65
Nm)
of torque to the leveling bolts. The leveling legs can be
extended to a maximum of 1¹⁄₄" (3.18
cm) below the rollers.
Adjust Doors
Door Height Adjustment
Use the following steps to adjust the door height, up or down, after
the doors have been leveled.
1. Open the freezer or refrigerator door and locate the bottom
hinge.
2. Remove the door stop screw from the bottom side of the hinge
with a ³⁄₈" open end wrench.
3. Remove the locking plate as shown.
4. Using a ¹⁄₂" open end wrench, turn the bushing located
underneath the bottom of the hinge.
■ Turn the bushing to the left to lower the door.
■ Turn the bushing to the right to raise the door.
5. After adjusting, check the doors to make sure they are even
across the top and bottom. If the doors are not even, continue
to turn the bushing to adjust the door height.
6. Replace the locking plate.
7. Turn the bushing slightly to align the hinge and locking plate
screw holes.
8. Replace the door stop screw or screws and tighten.
9. Recheck to make sure the doors are aligned and even.
Door Swing Adjustment
1. Check that the refrigerator door can open freely. If the door
opens too wide, remove the door stop screw or screws
(depending on your model) from the bottom hinge. See “Door
Height Adjustment” earlier in this section.
2. Hold the door open to a position that is less than 90°.
3. Replace the door stop screw or screws in the bottom hinge
and tighten.
Door-to-Door or Door-to-Refrigerator Trim Adjustment
1. Loosen, but do not remove, the four Torx
®†
27 flat-head
mounting screws. Remove and discard the two ¹⁄₄" hex-head
mounting screws.
2. Adjust the top hinge of either door to align it with the other
door or the refrigerator trim.
A. Center board
¹⁄₄
" (6.35 mm) max. above refrigerator
B. Two 2" x 4" x 32" (5 cm x 10 cm x 81 cm) boards
C. Attach to studs with six #8 x 3" (7.6 cm) screws
D. Compressor cover
A. Bushing
B. Door stop screw
C. Locking plate
BA
C
2" (5 cm)
D
¹⁄₄" (6 mm)
max.
A BC
A. 130°
B. 110°
C. 90°
AB C