
Installation Sheet

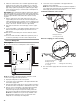
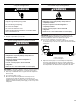
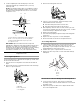
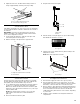
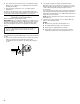


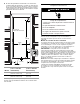
Table Of Contents
- Table of Contents
- Índice
- Table des matières
- Refrigerator Safety
- 48" Models
- Installation requirements
- Tools and Parts
- Location Requirements
- Electrical Requirements
- Water Supply Requirements
- Tipping Radius
- Product Dimensions
- Door Swing Dimensions
- Custom Side Panels
- Unpack the Refrigerator
- Reduce Tipping Radius
- Move the Refrigerator into House
- Install Anti-Tip Boards
- Connect the Water Supply
- Plug in Refrigerator
- Move Refrigerator to Final Location
- Level and Align Refrigerator
- Adjust Doors
- Install Side Panel
- Install Base Grille
- Complete Installation
- Water System Preparation
- Herramientas y piezas
- Requisitos de ubicación
- Requisitos eléctricos
- Requisitos del suministro de agua
- Arco de vuelco
- Medidas del producto
- Medidas de oscilación de las puertas
- Paneles laterales a la medida
- Desempaque el refrigerador
- Cómo reducir el arco de vuelco (si es necesario)
- Cómo hacer entrar el refrigerador en la casa
- Cómo instalar los tableros antivuelco
- Conexión del suministro de agua
- Cómo mover el refrigerador a su ubicación final
- Nivelación y alineamiento del refrigerador
- Ajuste las puertas
- Cómo instalar el panel lateral
- Cómo instalar la rejilla de la base
- Cómo terminar la instalación
- Preparación del sistema de agua
- Outillage et pièces
- Exigences d’emplacement
- Spécifications électriques
- Spécifications de l’alimentation en eau
- Rayon de basculement
- Dimensions du produit
- Dimensions pour le pivotement des portes
- Panneaux latéraux personnalisés
- Déballage du réfrigérateur
- Réduction du rayon de basculement
- Faire entrer le réfrigérateur dans le domicile
- Installation de planches antibasculement
- Raccordement à l’alimentation en eau
- Branchement du réfrigérateur
- Faire entrer le réfrigérateur dans le domicile
- Réglage de l'aplomb et alignement du réfrigérateur
- Ajustement des portes
- Installation du panneau latéral
- Achever l’installation
- Préparation du système d’eau

15
3. Tighten the four Torx
®†
27 flat-head mounting screws to a
torque of approximately 100 inch-pounds (11.3 Nm).
Install Side Panel
If the built-in area depth is 25" (63.5 cm) or more, the side panels
can be installed inside the side trim or attached to the outside of
the side trim.
IMPORTANT: Jenn-Air is not responsible for the removal or
addition of molding or decorative panels that would not allow
access to the refrigerator for service.
1. For the inside side trim piece, slide the front edge of the
routed side panel into the trim piece.
2. Nail the rear edge of the panel to the support board.
Install Base Grille
There are two pieces to the base grille to allow for a custom fit:
the base grille itself and the skirt. The skirt can be added to the
base grille in order to extend it all the way to the floor.
1. To see whether the skirt is needed, place the base grille into
position. Do not attach the base grille to the refrigerator.
Measure the distance between the bottom of the base grille
and the floor. The gap must be a minimum of ¹⁄₂" (1.27
cm) in
order to add the skirt.
NOTE: If the gap measures less than ¹⁄₂" (1.27 cm), skip
steps 3 and 4 of the instructions, and install the base
grille only.
2. Remove the film from the base grille.
3. Snap the skirt onto the base grille.
4. Trim the skirt by scoring the proper “V” groove with a utility
knife. Break the skirt at the score line.
5. Using the two screws, attach the base grille assembly to the
refrigerator as shown.
NOTE: Drive in the right side screw first.
Complete Installation
1. Turn the water supply line valve to the “Open” position.
2. Turn the refrigerator switch to the ON position. See “Power
On/Off Switch” in the Use & Care Guide for instructions. Wait a
few minutes. Check the water line connections for leaks.
3. Remove all boxes, parts packages and packing materials from
the interior of the refrigerator. See the “Cleaning” section in the
Use & Care Guide for instructions. Remove the film and
cardboard from the grille and doors or door frame, depending
on your model.
4. Install the shelves and bins in the refrigerator and freezer
compartments.
A. Torx
®
27 flat-head mounting screws
B.
¹⁄₄
" hex-head mounting screws
A. Support board (mounted to back wall)
B. Cab side trim
†®TORX is a registered trademark of Acument Intellectual Properties, LLC
A
B
A
B
A. Base grille
B. Skirt
A. “V” groove
A. Screws (2)
A
B
A
A