
Installation Sheet

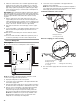
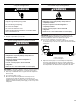
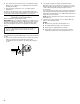


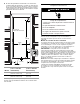
Table Of Contents
- Table of Contents
- Índice
- Table des matières
- Refrigerator Safety
- 48" Models
- Installation requirements
- Tools and Parts
- Location Requirements
- Electrical Requirements
- Water Supply Requirements
- Tipping Radius
- Product Dimensions
- Door Swing Dimensions
- Custom Side Panels
- Unpack the Refrigerator
- Reduce Tipping Radius
- Move the Refrigerator into House
- Install Anti-Tip Boards
- Connect the Water Supply
- Plug in Refrigerator
- Move Refrigerator to Final Location
- Level and Align Refrigerator
- Adjust Doors
- Install Side Panel
- Install Base Grille
- Complete Installation
- Water System Preparation
- Herramientas y piezas
- Requisitos de ubicación
- Requisitos eléctricos
- Requisitos del suministro de agua
- Arco de vuelco
- Medidas del producto
- Medidas de oscilación de las puertas
- Paneles laterales a la medida
- Desempaque el refrigerador
- Cómo reducir el arco de vuelco (si es necesario)
- Cómo hacer entrar el refrigerador en la casa
- Cómo instalar los tableros antivuelco
- Conexión del suministro de agua
- Cómo mover el refrigerador a su ubicación final
- Nivelación y alineamiento del refrigerador
- Ajuste las puertas
- Cómo instalar el panel lateral
- Cómo instalar la rejilla de la base
- Cómo terminar la instalación
- Preparación del sistema de agua
- Outillage et pièces
- Exigences d’emplacement
- Spécifications électriques
- Spécifications de l’alimentation en eau
- Rayon de basculement
- Dimensions du produit
- Dimensions pour le pivotement des portes
- Panneaux latéraux personnalisés
- Déballage du réfrigérateur
- Réduction du rayon de basculement
- Faire entrer le réfrigérateur dans le domicile
- Installation de planches antibasculement
- Raccordement à l’alimentation en eau
- Branchement du réfrigérateur
- Faire entrer le réfrigérateur dans le domicile
- Réglage de l'aplomb et alignement du réfrigérateur
- Ajustement des portes
- Installation du panneau latéral
- Achever l’installation
- Préparation du système d’eau

16
5. The controls are preset at the factory to the midpoint setting.
Make sure the compressor is operating properly and that all
the lights are working.
6. Flush the water system before use. See “Water System
Preparation.”
To get the most efficient use from your new built-in refrigerator,
read the Use & Care Guide. Keep Installation Instructions and Use
& Care Guide near the built-in refrigerator for easy reference.
Water System Preparation
Please read before using the water system.
IMPORTANT: After connecting the refrigerator to a water source or
replacing the water filter, follow the steps below to make sure that
the water system is properly cleaned. This will flush air from the
filter and water dispensing system, and prepare the water filter
for use.
NOTE: If your model has a base grille filter system, make sure the
base grille filter is properly installed and the cap is in the horizontal
position.
1. Open the freezer door and turn off the ice maker. The On/Off
switch is located on the top right side of the freezer
compartment. Move the switch to the OFF (right) setting as
shown.
2. Use a sturdy container to depress and hold the water
dispenser lever for 5 seconds, then release it for 5
seconds.
Repeat until water begins to flow. Once water begins to flow,
continue depressing and releasing the dispenser lever
(5
seconds on,
5 seconds off) until a total of 3 gal. (12 L) has been dispensed.
This will flush air from the filter and water dispensing system,
and prepare the water filter for use. Additional flushing may be
required in some households.
NOTE: As air is cleared from the system, water may spurt out
of the dispenser.
3. Open the freezer door and turn on the ice maker. Move the
switch to the ON (left) position.
NOTES:
■ Allow 24 hours to produce the first batch of ice.
■ Discard the first three batches of ice produced.
■ Allow 3 days to completely fill ice container.
■ Depending on your model, you may want to select the
maximum ice feature to increase the production of ice.
Do not use with water that is microbiologically unsafe or of
unknown quality without adequate disinfection before or
after the system.