
Installation Sheet
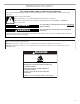
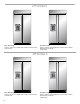


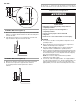

Table Of Contents
- Table of Contents
- Índice
- Table des matières
- Refrigerator Safety
- 48" Models
- Installation requirements
- Tools and Parts
- Location Requirements
- Electrical Requirements
- Water Supply Requirements
- Tipping Radius
- Product Dimensions
- Door Swing Dimensions
- Custom Side Panels
- Unpack the Refrigerator
- Reduce Tipping Radius
- Move the Refrigerator into House
- Install Anti-Tip Boards
- Connect the Water Supply
- Plug in Refrigerator
- Move Refrigerator to Final Location
- Level and Align Refrigerator
- Adjust Doors
- Install Side Panel
- Install Base Grille
- Complete Installation
- Water System Preparation
- Herramientas y piezas
- Requisitos de ubicación
- Requisitos eléctricos
- Requisitos del suministro de agua
- Arco de vuelco
- Medidas del producto
- Medidas de oscilación de las puertas
- Paneles laterales a la medida
- Desempaque el refrigerador
- Cómo reducir el arco de vuelco (si es necesario)
- Cómo hacer entrar el refrigerador en la casa
- Cómo instalar los tableros antivuelco
- Conexión del suministro de agua
- Cómo mover el refrigerador a su ubicación final
- Nivelación y alineamiento del refrigerador
- Ajuste las puertas
- Cómo instalar el panel lateral
- Cómo instalar la rejilla de la base
- Cómo terminar la instalación
- Preparación del sistema de agua
- Outillage et pièces
- Exigences d’emplacement
- Spécifications électriques
- Spécifications de l’alimentation en eau
- Rayon de basculement
- Dimensions du produit
- Dimensions pour le pivotement des portes
- Panneaux latéraux personnalisés
- Déballage du réfrigérateur
- Réduction du rayon de basculement
- Faire entrer le réfrigérateur dans le domicile
- Installation de planches antibasculement
- Raccordement à l’alimentation en eau
- Branchement du réfrigérateur
- Faire entrer le réfrigérateur dans le domicile
- Réglage de l'aplomb et alignement du réfrigérateur
- Ajustement des portes
- Installation du panneau latéral
- Achever l’installation
- Préparation du système d’eau

5
Tools and Parts
IMPORTANT:
■ Installer: Leave Installation Instructions with the homeowner.
■ Homeowner: Keep Installation Instructions for future reference.
Save these Installation Instructions for the local electrical
inspector’s use.
Tools Needed
Gather the required tools and parts before starting installation.
Read and follow the instructions provided with any tools listed
here
.
Parts Needed
■ #8 x 3" (7.6 cm) wood screws (longer screws may be needed) (6)
■ 2" x 4" x 32" (5 cm x 10 cm x 81 cm) wood board(s) (1 or 2)
■ If you are connecting the water line directly to copper tubing
and not to a shutoff valve, you need a ferrule, a union, and a
¹⁄₄" (6.35 mm) compression fitting.
Location Requirements
The refrigerator can be recessed in an opening between cabinets
or installed at the end of a cabinet run using a side panel to enclose
the refrigerator.
IMPORTANT:
■ Observe all governing codes and ordinances.
■ It is recommended that you do not install the refrigerator near
an oven, radiator, or other heat source.
■ Do not install in a location where the temperature will fall below
55°F (13°C).
■ Floor must support the refrigerator weight, more than
600 lbs (272 kg), door panels and contents of the refrigerator.
■ Ceiling height must allow for side tipping radius. See “Tipping
Radius.”
■ Location should permit door to open fully. See “Door Swing
Dimensions.”
■ Location must permit top grille removal. See “Opening
Dimensions.”
Opening Dimensions
■ To avoid tipping during use, the solid soffit must be within
1" (2.5 cm) maximum above the refrigerator. If the solid soffit
is higher than 1" (2.5 cm) or one is not available, then the
refrigerator must be braced.
If anti-tip boards are needed, they must be installed to the
rear wall studs so that the bottom of the anti-tip board is
84" (213 cm) from the floor. See “Install Anti-Tip Boards” for
more information.
NOTES:
■ A clearance of ¹⁄₂" (1.3 cm) must be maintained above the
top grille in order for the top grille to be removed.
■ Do not remove the foam gasket on top of the compressor
cover unless removal is necessary to fit the unit under
a soffit. Removal of the gasket will cause loss in cooling
efficiency.
■ If installing under a solid soffit, after installation raise the
leveling legs so that the gasket is pressed snugly against
the soffit.
■ A grounded 3 prong electrical outlet should be located within
a specified number of inches from the right-hand side cabinets
or end panel. See the chart following the graphic for the
number of inches required for your model. For more
information, see “Electrical Requirements.”
INSTALLATION REQUIREMENTS
■ Cordless drill
■ Drill bits
■ Adjustable wrenches (2)
■ Phillips screwdriver
■ Small level
■ Appliance dolly
■ Torx
®†
T27 screwdriver
■ ¹¹⁄₃₂" nut driver
■ ³⁄₈" and ¹⁄₂" open-end wrenches
■ ⁵⁄₃₂" hex key
■ ¹⁄₄" and ⁵⁄₁₆" socket drivers
■ Tape measure
■ Utility knife
†®TORX is a registered trademark of Acument Intellectual Properties, LLC
WARNING
Explosion Hazard
Keep flammable materials and vapors, such as
gasoline, away from refrigerator.
Failure to do so can result in death, explosion, or fire.
A. Gasket
B. Compressor cover
¹⁄₂"
(1,3 cm)
B
A