
Installation Sheet
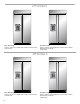


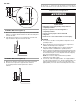

Table Of Contents
- Table of Contents
- Índice
- Table des matières
- Refrigerator Safety
- 48" Models
- Installation requirements
- Tools and Parts
- Location Requirements
- Electrical Requirements
- Water Supply Requirements
- Tipping Radius
- Product Dimensions
- Door Swing Dimensions
- Custom Side Panels
- Unpack the Refrigerator
- Reduce Tipping Radius
- Move the Refrigerator into House
- Install Anti-Tip Boards
- Connect the Water Supply
- Plug in Refrigerator
- Move Refrigerator to Final Location
- Level and Align Refrigerator
- Adjust Doors
- Install Side Panel
- Install Base Grille
- Complete Installation
- Water System Preparation
- Herramientas y piezas
- Requisitos de ubicación
- Requisitos eléctricos
- Requisitos del suministro de agua
- Arco de vuelco
- Medidas del producto
- Medidas de oscilación de las puertas
- Paneles laterales a la medida
- Desempaque el refrigerador
- Cómo reducir el arco de vuelco (si es necesario)
- Cómo hacer entrar el refrigerador en la casa
- Cómo instalar los tableros antivuelco
- Conexión del suministro de agua
- Cómo mover el refrigerador a su ubicación final
- Nivelación y alineamiento del refrigerador
- Ajuste las puertas
- Cómo instalar el panel lateral
- Cómo instalar la rejilla de la base
- Cómo terminar la instalación
- Preparación del sistema de agua
- Outillage et pièces
- Exigences d’emplacement
- Spécifications électriques
- Spécifications de l’alimentation en eau
- Rayon de basculement
- Dimensions du produit
- Dimensions pour le pivotement des portes
- Panneaux latéraux personnalisés
- Déballage du réfrigérateur
- Réduction du rayon de basculement
- Faire entrer le réfrigérateur dans le domicile
- Installation de planches antibasculement
- Raccordement à l’alimentation en eau
- Branchement du réfrigérateur
- Faire entrer le réfrigérateur dans le domicile
- Réglage de l'aplomb et alignement du réfrigérateur
- Ajustement des portes
- Installation du panneau latéral
- Achever l’installation
- Préparation du système d’eau

6
■ The water shutoff should be located in the base cabinet on
either side of the refrigerator or some other easily accessible
area. If the water shutoff valve is not in the cabinets, the
plumbing for the water line can come through the floor or
the back wall. See “Water Supply Requirements” for more
information.
NOTE: Flooring under refrigerator must be at same level as the
room. Face of cabinetry must be plumb.
Electrical Requirements
Before you move your refrigerator into its final location, it is
important to make sure you have the proper electrical connection.
Recommended Grounding Method
A 115 volt, 60 Hz., AC only, 15- or 20-amp fused, grounded
electrical supply is required. It is recommended that a separate
circuit serving only your refrigerator be provided. Use an outlet that
cannot be turned off by a switch. Do not use an extension
cord.
IMPORTANT: If this product is connected to a GFCI (Ground Fault
Circuit Interrupter) protected outlet, nuisance tripping of the power
supply may occur, resulting in loss of cooling. Food quality and
flavor may be affected. If nuisance tripping has occurred, and if
the condition of the food appears poor, dispose of it.
NOTE: Before performing any type of installation or cleaning,
remove the top grille and turn the master power switch to OFF
or disconnect power at the circuit breaker box.
When you are finished, turn ON the master power switch or
reconnect power at the circuit breaker box. Then reset the
control to the desired setting.
Water Supply Requirements
■ All installations must meet local plumbing code requirements.
■ The water shutoff should be located in the base cabinet on
either side of the refrigerator or some other easily accessible
area. The right-hand side is recommended. The access hole
through the cabinet must be within ¹⁄₂" (1.3 cm) of the rear wall.
NOTE: If the water shutoff valve is in the back wall behind the
refrigerator, it must be at an angle so that the tube is not kinked
when the refrigerator is pushed into its final location.
Model
Width A
(as shown above)
Dimension B
(as
shown above)
42 41¹⁄₂" to 41³⁄₄"
(105.4 cm to 106.1 cm)
7¹⁄₂"
(19.1 cm)
48 47¹⁄₂" to 47³⁄₄"
(120.7 cm to 121.3 cm)
13¹⁄₂"
(34.3 cm)
80" - 90"
(203-229 cm)
6"
(15.2 cm)
83¹⁄₂" (212.1 cm) min.
84
³⁄₄" (215 cm) max.
to bottom of solid soffit
24"
(60.96 cm) min.
1"
(2.54 cm)
77"
(196 cm)
6"
(15.2 cm)
6"
(15.2 cm)
A
Width
(see chart following)
B
Dimension
Electrical Shock Hazard
Plug into a grounded 3 prong outlet.
Do not remove ground prong.
Do not use an adapter.
Do not use an extension cord.
Failure to follow these instructions can result in death,
fire, or electrical shock.
WARNING
24"
(60.96 cm) min.
1"
(2.54 cm)
6"
(15.2 cm)
6"
(15.2 cm)
6"
(15.2 cm)