RANGE ModeJ Number: Manufactu wet Number: Size: HOOD ]X[9030CDP MK7030 30" JXT9048CDP MK7048 48" JX[9036CDP MK7036 36" GUIDE TABLE OF CONTENTS Satet_ Instructions .................................................... 1 Mountin¢ 2 Heights Ducting .................................................................... Specifications ........................................................... Installation ............................................................
IVIODEL$:JXT9030 JXT9036 JXT9048 Installation Theinstallationin this manuaris intendedfor quarifiedinstallers,servicetechniciansor persons with similarqualifiedbackground. DONOTattemptto instarlthis applianceyourserf,rniurycourd resurtfrom installingthe unitdueto rackof appropriateerectricaland technicalbackground. Air erectricar wiring must be properly installed, insulated and grounded.
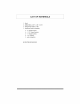
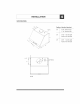
LiST OF MATERIALS 1 - Hood 2 - Baffle filters (2°30", 3°36", 4-48") 2 - Halogenlight bulbs (3°48") 1 - Hardware packet containing: 44443- 2" drywall screws 1 1/2" drywall screws 1" drywall screws 1/2" washers wire connectors NO DUOTINGIS INCLUDED H
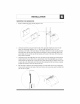
MOUNTINGHEIGHTS Minimum mounting height between range top to hood bottom shouM be no tess than 24". 12 _' Maximum mounting height shouM be no higher than 32". \ 1_ Min 24"-Max 32" rt is important to instarl the hood at the proper mounting height. Hoods mounted too row courd result in heat damage and fire hazard; while hoods mounted too high will be hard to reach and will roose performance and efficiency.
DUCTJNG NEVERexhaust air or terminate duct work into spaces between walls, crawl spaces, ceiling, attics or garages. AIrexhaust must be ducted to the outside. UseMetal ductwork only. FastenaHconnections with sheet metal screws and tape aHjoints w/certified SHyerTapeor DuctTape. SomeDucting Options: I \\ Sidewailcap w/gravitydamper RoofPitch w/ Flashing& Cap ] :ydamper
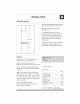
SPECIFICATIONS Position of electrical knockout 4-5/8" 1/2" ElecK,0.
MOUNTINGTHE RANGEHOOD ELECTRICAL All Electricalwork mustby performedby qualifiedelectricianor personwith similar technical know how and background. Forpersonalsafety,removehousefuse or opencircuitbreakerbeforebeginninginstallation+ Donot useextensioncordor adapterplugwith this appliance+ FollowNationalelectricalcodesor prevaifinglocal codesand ordinances.
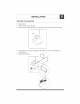
MOUNTINGTHE RANGEHOOD Begin by determining hood mounting height on wall. 2. Lever and mount the wood paneronto the wall at the appropriate height and secure it to the studs. This wood paner shourd be 1/2" x 3" and the width will either be 29", 35" or 47" depending on the width of the hood. Measure the distance between the wall mounting brackets and fasten them onto the wood panel.
MOUNTINGTHE RANGEHOOD 5. hstaHerectricaL 6. hstaHduct work andtapeaHioints. 7. Powerup hoodand checkfor teaksaroundductjoints,and if necessaryapprymoreducttape. tape 8. hstaH optional duct cover and/or backsprash. Note that the duct cover and backsprashare sold separately. 9. Reinstall the baffre filters.