
installation instructions


17
To Convert Gas Pressure Regulator from Natural Gas
to Propane
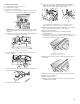
NOTE: Door must be removed in order to remove or replace kick
plate. Refer to the “Remove Door” section.
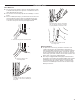
1. Lift the kick plate up and off of the kick plate tab.
2. Gently lay kick plate aside to avoid scratching.
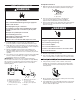
3. Locate the gas pressure regulator at the left rear of the
range.
4. Remove the gas pressure regulator cap by using a
large at-blade screwdriver, turning the regulator cap
counterclockwise.
NOTE: Do not remove the spring beneath the cap.
5. Turn over the gas pressure regulator cap, and reinstall on the
regulator so that the hollow end faces out and the letters
“LP” are visible.
6. Tighten the gas pressure regulator cap by using a large
at-blade screwdriver, turning the regulator cap clockwise.
7. Test the gas pressure regulator and gas supply line.
The regulator must be checked at a minimum 1" (2.5 cm)
water column above the set pressure. The inlet pressure to
the regulator should be as follows for operation and checking
the regulator setting:
Propane Gas:
Minimum pressure: 11" (27.9 cm) WCP
Maximum pressure: 14" (35.6 cm) WCP
Gas Supply Pressure Testing
Gas supply pressure for testing regulator must be at least 1"
(2.5 cm) water column pressure above the manifold pressure
shown on the model/serial/rating plate.
Line pressure testing above 1/2 psi (3.5 kPa) gauge
(14" [35.6cm] WCP)
The range and its individual shut-off valve must be
disconnected from the gas supply piping system during
anypressure testing of that system at test pressures in
excess of 1/2 psi (3.5 kPa).
Line pressure testing at 1/2 psi (3.5 kPa) gauge
(14" [35.6cm]WCP) orlower
The range must be isolated from the gas supply piping
system by closing its individual manual shut-off valve during
any pressure testing of the gas supply piping system at test
pressures equal to or less than 1/2 psi (3.5 kPa).
A
B
C
A. Kick plate
B. Kick plate tab
C. Kick plate slot
A
A. Gas pressure regulator