User Guide Electric Induction Range THANK YOU for purchasing this high-quality product. Register your range at www.jennair.com. In Canada, register your range at www.jennair.ca. For future reference, please make a note of your product model and serial numbers. These can be found on the label located on the oven frame behind the top right side of the oven door.
Range Safety Your safety and the safety of others are very important. We have provided many important safety messages in this manual and on your appliance. Always read and obey all safety messages. This is the safety alert symbol. This symbol alerts you to potential hazards that can kill or hurt you and others. All safety messages will follow the safety alert symbol and either the word “DANGER” or “WARNING.
IMPORTANT SAFETY INSTRUCTIONS WARNING: To reduce the risk of fire, electrical shock, Protective Liners – Do not use aluminum foil to line surface unit drip bowls or oven bottoms, except as suggested in the manual. Improper installation of these liners may result in a risk of electric shock, or fire.
This induction cooktop generates and uses ISM frequency energy that heats cookware by using an electromagnetic field. It has been tested and complies with Part 18 of the FCC Rules for ISM equipment. This induction cooktop meets the FCC requirements to minimize interference with other devices in residential installation. This induction cooktop may cause interference with television or radio reception.
Key Usage Tips AquaLift® Self-Cleaning Technology Ceramic Glass Cooktop Cleaning To avoid damaging the cooktop, do not use steel wool, abrasive powder cleansers, chlorine bleach, rust remover, or ammonia. 1. Remove food/residue with the Cooktop Scraper. AquaLift® Self-Cleaning Technology is a first-of-its-kind cleaning solution designed to minimize the time, temperature, and odors that ordinarily come with traditional self-cleaning methods.
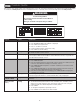
Feature Guide This manual covers several models. Your model may have some or all of the items listed. Refer to this manual or the Product Help section of our website at www.jennair.com for more detailed instructions. In Canada, refer to the Product Help Section at www.jennair.ca. WARNING Food Poisoning Hazard Do not let food sit for more than one hour before or after cooking. Doing so can result in food poisoning or sickness.
Keypad Feature Instructions BROIL Broiling 1. 2. 3. 4. 5. 6. MANUAL CONVECT MODES Convection cooking 1. Press MANUAL CONVECT MODES until the desired convection mode appears in the display. 2. Press START. 3. Press the number keypads to set the desired temperature. 4. Press START. 5. Insert food when prompted. 6. To change the temperature, repeat steps 3 and 4. 7. Press CANCEL UPPER when finished. AUTO CONVECT MODES Convection cooking 1.
Electronic Oven Controls Control Display Audible Tones Disable The display will flash when powered up or after a power loss. Press CANCEL UPPER to clear. When the oven is not in use, the time of day is displayed. If the range is in Energy Save mode, the display will be blank when not in use. Turns off all tones, including the end-of-cycle tone and keypress tones. Reminder tones are still active when all tones are disabled. 1. Press OPTIONS/CLOCK until “SOUND” is displayed. 2.
Sabbath Mode Languages - Scrolling Display Text The Sabbath mode sets the oven to remain ON in a bake setting until turned off. When the Sabbath mode is set, only the Bake cycle will operate. All other cooking and cleaning cycles are disabled. No tones will sound and the displays will not indicate temperature changes. When the oven door is opened or closed, the oven light will not turn on or off and the heating elements will not turn on or off immediately.
3. Select a heat setting from “1” through “9” by touching/sliding on the power slider. The heat setting will appear in the surface cooking area display. The power slider consists of 9 positions plus a “Boost” position. When the user slides to “0,” “0” will be displayed. The surface cooking area will not turn on but remains active/selected.
■■ Do not use a lid on a pot while using the Sensor Boil function. To Turn Off the Bridge: ■■ Do not use the Sensor Boil function if the surface cooking area is hot. “H” will appear in the display when the surface cooking area is hot. ■■ Do not change the power level or move the pot. ■■ Fill the pot at least one-third of the way full with at least 4 cups (946 mL) of water, but not up to the brim. Do not use Sensor Boil with more than approximately 7 qt (7 L) of water. 1. Touch BRIDGE.
If you attempt to use Performance Boost on more than 1 surface cooking area in the same zone, “P” will briefly flash in the display, and then the first surface cooking area selected for Performance Boost will automatically be set back to the highest available power level. The last surface cooking area selected will be set to Performance Boost. 1. Check that a surface cooking area has been selected. 2. Touch BOOST on the heat level slider. “P” will appear in the display. 3. Touch BOOST again when finished.
Cookware The number on the surface cooking area heat-setting display will flash if no pan is placed on the surface cooking area, the pan is not made of the right material, or it is not the right size. It will stop flashing once a suitable pan is placed on the surface cooking area. If you take longer than 30 seconds to place the correct pan on the surface cooking area, the surface cooking area will turn off. If there is no activity for 90 seconds, the cooktop will turn off.
Oven Odors and smoke are normal when the oven is used the first few times or when it is heavily soiled. IMPORTANT: The health of some birds is extremely sensitive to the fumes given off by the oven. Exposure to the fumes may result in death to certain birds. Always move birds to another closed and well-ventilated room. Aluminum Foil A IMPORTANT: To avoid permanent damage to the oven bottom finish, do not line the oven bottom with any type of foil or liner.
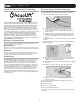
Roll-Out Rack 3. Lower the front of the rack assembly, and then gently slide rack assembly into oven, bypassing the “V” cutouts. Push the rack assembly into the oven until it stops at the ladder in the back of the oven. The roll-out rack allows easy access to position and remove food in the oven. It is not recommended to use the roll-out rack in the top rack, position 7, or the bottom rack, position 1. Open Position A B A B C A. B. C. D. A. Rack frame B.
Oven Vent Baking and Roasting Preheating When beginning a Bake, Convect Bake, or Convect Roast cycle, the oven will begin preheating after Start is pressed. The oven will take approximately 12 to 15 minutes to reach 350°F (177°C) with all of the oven racks provided with your oven inside the oven cavity. Higher temperatures will take longer to preheat. The preheat cycle rapidly increases the oven temperature.
Convection Cooking Proofing Bread In a convection oven, the fan-circulated hot air continually distributes heat more evenly than the natural movement of air in a standard thermal oven. This movement of hot air helps maintain a consistent temperature throughout the oven, cooking foods more evenly, crisping surfaces while sealing in moisture and yielding crustier breads. Proofing bread prepares the dough for baking by activating the yeast. Follow the recipe directions as a guide.
Cook Time IMPORTANT: Always use the Baking Drawer rack when using the Baking Drawer. WARNING C Food Poisoning Hazard Do not let food sit in oven more than one hour before or after cooking. Doing so can result in food poisoning or sickness. A B A. Baking Drawer B. Baking Drawer rack C. Baking Drawer rack handles To Set a Timed Cook: 1. Press BAKE or BROIL, or press AUTO CONVECT MODES or MANUAL CONVECT MODES until the desired convection mode appears on the display. 2.
Range Care Clean Cycle 6. Remove the residual water and loosened soils with a sponge or cloth immediately after the Clean cycle is complete. Much of the initial 2 cups (16 oz [500 mL]) of water will remain in the oven after the cycle is completed. If additional soils remain, leave a small amount of water in the oven bottom to assist with the cleaning. AquaLift® Technology is an innovative cleaning solution that utilizes heat and water to release baked-on spills from the oven in less than 1 hour.
General Cleaning IMPORTANT: Before cleaning, make sure all controls are OFF and the oven and cooktop are cool. Always follow label instructions on cleaning products. For additional information, you can visit our website at www.jennair.com. In Canada, visit our website at www.jennair.ca. Soap, water, and a soft cloth or sponge are suggested first, unless otherwise noted. 2. Apply a few dime-sized drops of affresh® Cooktop Cleaner to the affected areas.
OVEN RACKS To Replace: Cleaning Method: 1. Align the forward drawer notches with the notches in the drawer glides on both sides. Place the rear alignment tabs into the drawer glides on both sides. ■■ Steel-wool pad ■■ For racks that have discolored and are harder to slide, a light coating of vegetable oil applied to the rack guides will help them slide. BAKING DRAWER A Check that baking drawer is cool and empty before cleaning. Baking drawer can be removed for easier cleaning.
Troubleshooting First try the solutions suggested here. If you need further assistance or more recommendations that may help you avoid a service call, refer to the warranty page in this manual and scan the code there with your mobile device, or visit https://jennair.custhelp.com. In Canada, visit http://www.jennair.ca. Contact us by mail with any questions or concerns at the address below: In the U.S.A.
Problem Possible Causes and/or Solutions Is the display flashing “F” or “C” and numbers? If “F” or “C” and a number are alternately flashing on the display, refer to the following for possible solutions: Cooktop has turned off and is beeping every 10 seconds An object, liquids, or soils are putting pressure on the control panel - Thoroughly wipe or remove any object on touch keys. F42, F43 The power voltage is too low or too high - Turn off the cooktop. Wait 5 seconds, and then turn it back on.
Noises Problem Possible Causes and/or Solutions Operational cooktop sounds The following are some normal sounds with the explanations. These sounds are normal operational noises. Low humming This occurs when cooking at high power. The cause of this is the amount of energy that is transmitted from the appliance to the cookware - This sound will lessen or go away when the power is turned down. Crackling Cookware is used that consists of different materials.
Accessories For accessories in the U.S.A., you can visit our website at www.jennair.com or call us at 1-800-JENNAIR (1-800-536-6247). In Canada, visit our website at www.jennair.ca or call us at 1-800-JENNAIR (1-800-536-6247).
JENN-AIR® MAJOR APPLIANCE LIMITED WARRANTY ATTACH YOUR RECEIPT HERE. PROOF OF PURCHASE IS REQUIRED TO OBTAIN WARRANTY SERVICE. Please have the following information available when you call the Customer eXperience Center: ■■ Name, address and telephone number ■■ Model number and serial number ■■ A clear, detailed description of the problem ■■ Proof of purchase including dealer or retailer name and address IF YOU NEED SERVICE: 1.
Guide d’utilisation Cuisinière électrique à induction Nous vous REMERCIONS d’avoir acheté ce produit de haute qualité. Enregistrer votre nouvelle cuisinière www.jennair.com. Au Canada, enregistrer votre cuisinière sur www.jennair.ca. Pour référence ultérieure, consignez par écrit les numéros de modèle et de série de votre produit. Vous trouverez les numéros de modèle et de série sur la plaque signalétique située sur le châssis du four, derrière la partie supérieure droite de la porte du four.
Sécurité de la cuisinière Votre sécurité et celle des autres est très importante. Nous donnons de nombreux messages de sécurité importants dans ce manuel et sur votre appareil ménager. Assurez-vous de toujours lire tous les messages de sécurité et de vous y conformer. Voici le symbole d’alerte de sécurité. Ce symbole d’alerte de sécurité vous signale les dangers potentiels de décès et de blessures graves à vous et à d’autres.
IMPORTANTES INSTRUCTIONS DE SÉCURITÉ AVERTISSEMENT : Pour réduire le risque d’incendie, de choc électrique, de blessures ou de dommages lors de l’utilisation de la cuisinière, il convient d’observer certaines précautions élémentaires dont les suivantes : ■ AVERTISSEMENT : POUR MINIMISER LE RISQUE DE BASCULEMENT DE LA CUISINIÈRE, ELLE DOIT ÊTRE BIEN IMMOBILISÉE PAR DES DISPOSITIFS ANTIBASCULEMENT CORRECTEMENT INSTALLÉS.
IMPORTANTES INSTRUCTIONS DE SÉCURITÉ ■ ■ ■ ■ ■ ■ Nettoyer la table de cuisson avec prudence – Si une éponge ou un chiffon mouillé est utilisé pour essuyer les renversements sur une surface de cuisson chaude, éviter les brûlures causées par la vapeur chaude. Certains nettoyants peuvent produire des émanations désagréables lorsqu’ils sont utilisés sur une surface chaude.
Conseils élémentaires d’utilisation Technologie d’autonettoyage AquaLift® Nettoyage de la table de cuisson en vitrocéramique Afin d’éviter d’endommager la table de cuisson, ne pas utiliser de laine d’acier, de nettoyants en poudre abrasifs, d’eau de Javel, de produit antirouille ou d’ammoniaque. 1. Éliminer les salissures alimentaires avec le grattoir pour table de cuisson.
Guide des caractéristiques Ce manuel concerne plusieurs modèles. Le modèle que vous avez peut comporter toutes les caractéristiques énumérées ou seulement certaines d’entre elles. Se reporter à ce manuel ou à la section Foire Aux Questions (FAQ) de notre site Web sur www.jennair.com pour des instructions plus détaillées. Au Canada, consulter la section du service à la clientèle sur www.jennair.ca.
Touche Fonction Instructions BAKE (cuisson au four) (four supérieur et inférieur) Cuisson au four et rôtissage 1. Appuyer sur la touche BAKE (cuisson au four) du four souhaité. 2. Régler la température souhaitée entre 170°F et 500°F (75°C et 260°C) pour le four supérieur, ou entre 170°F et 451°F (75°C et 233°C) pour le four inférieur en utilisant les touches numériques. La température par défaut est de 350°F (180°C). 3. Appuyer sur START (mise en marche). 4.
Touche Fonction Instructions AQUALIFT SELF CLEAN (autonettoyage Aqualift) Programme de nettoyage Voir la section “Programme de nettoyage”. START (hold 3 sec. to lock) (mise en marche [appuyer pendant 3 secondes pour verrouiller]) Verrouillage des commandes du four 1. Vérifier que le four est éteint. 2. Appuyer pendant 3 secondes sur la touche START (hold 3 sec. to lock) (mise en marche [appuyer pendant 3 sec. pour verrouiller]). 3.
Désactivation des signaux sonores Horloge 12/24 heures Désactive tous les signaux sonores, y compris le signal sonore de fin de programme et les signaux sonores d’appui sur une touche. Les signaux sonores de rappel restent actifs lorsque tous les sons sont désactivés. 1. Appuyer sur OPTIONS/CLOCK (options/horloge) jusqu’à afficher “SOUND” (son). 2. Le réglage en cours s’affiche. 3. Appuyer sur la touche “1” pour changer le réglage. 4.
Arrêt au bout de 12 heures Commande de décalage de température du four Le four est configuré pour s’éteindre automatiquement 12 heures après avoir activé une fonction de cuisson ou de nettoyage. Cette fonction ne perturbe aucune fonction de cuisson minutée ou différée. 1. Appuyer sur OPTIONS/CLOCK (options/horloge) jusqu’à afficher “12Hr AUTO_OFF” (arrêt automatique après 12 heures). 2. Le réglage en cours s’affiche. 3. Appuyer sur la touche “1” pour changer le réglage. 4.
Pour allumer une surface de cuisson : 2. Toucher directement la zone d’affichage correspondant à la surface de cuisson que l’on souhaite utiliser. Voir D, E, I et J dans l’illustration précédente. Le niveau de puissance actuel et le témoin lumineux clignotent pendant 10 secondes, puis restent allumés. Si l’on ne touche pas une autre caractéristique, le curseur d’alimentation cesse de clignoter et les informations concernant la touche qui a été touchée s’affichent.
Indicateur de surface chaude Réglages de chaleur réduite Si le témoin lumineux d’alimentation de la table de cuisson est allumé, un “H” et un “0” clignotent sur l’affichage du réglage de chaleur de la surface de cuisson pour indiquer qu’elle est trop chaude pour être touchée. Si le témoin lumineux de la table de cuisson est éteint, un “H” apparaît sur l’affichage du réglage de chaleur de la surface de cuisson pour indiquer qu’elle est trop chaude pour être touchée.
REMARQUE : La fonction d’optimisation du rendement peut se désactiver automatiquement pour protéger les composants électroniques internes de la table de cuisson en les empêchant ainsi de surchauffer. Verrouillage des commandes Le verrouillage des commandes empêche l’utilisation involontaire des surfaces de cuisson.
■■ Ustensiles de cuisson Nettoyer dès que possible tous les renversements et toutes les saletés des aliments contenant du sucre sous n’importe quelle forme. Laisser la table de cuisson refroidir légèrement. Ensuite, tout en portant des mitaines de four, nettoyer tandis que la surface est encore tiède. Si on laisse le sucre refroidir sur la table de cuisson, il se peut que celui-ci adhère à la surface et entraîne de la corrosion et des marques permanentes.
Mise en conserve à la maison Choisir la taille d’ustensile appropriée pour chaque surface de cuisson. Le diamètre de la base de l’ustensile doit correspondre à la taille de la surface de cuisson. La mise en conserve peut se faire sur la table de cuisson à induction. Voir la section “Ustensiles de cuisson” pour vérifier si l’autoclave fonctionne sur la table de cuisson à induction.
Grille déployante Cette grille déployante offre un accès facile à l’utilisateur pour le positionnement et le retrait des aliments. Il n’est pas conseillé d’utiliser la grille déployante à la position supérieure (position 7) ou à la position inférieure (position 1). Position déployée A B A A. Bordures de grille en position 3 B. Aliments en position 2 B IMPORTANT : Ces positions de grille concernent les grilles plates.
Évent du four 3. Abaisser l’avant de la grille et l’introduire avec précaution dans le four en la faisant glisser au-delà des encoches en “V”. Enfoncer la grille à l’intérieur du four jusqu’à ce qu’elle bute sur l’échelle dans le fond du four. A B A C A. B. C. D. A. Évent du four D L’évent du four permet l’évacuation de l’air chaud et de l’humidité du four et ne doit pas être obstrué ou couvert.
Cuisson au four et rôtissage Cuisson par convection Dans un four à convection, l’air chaud que fait circuler le ventilateur répartit plus uniformément la chaleur que le mouvement naturel de l’air dans un four thermique standard. Ce déplacement d’air chaud contribue à maintenir une température constante dans tout le four, qui permet de cuire les aliments plus uniformément, de dorer leur surface tout en conservant leur humidité naturelle et de donner des pains plus croustillants.
Levée du pain Durée de cuisson La levée du pain prépare la pâte pour la cuisson en activant la levure. Suivre les instructions de la recette comme guide. La levée doit être utilisée pour les pâtes fraîches, les pâtes surgelées et pour la première et la deuxième levée. AVERTISSEMENT Risque d'empoisonnement alimentaire Ne pas laisser des aliments dans un four plus d'une heure avant ou après la cuisson.
Tiroir de cuisson Cuisson avec le tiroir de cuisson : 1. Appuyer sur LOWER OVEN BAKE (cuisson au four inférieur). 2. Régler la température souhaitée entre 170°F et 451°F (75°C et 233°C) en utilisant les touches numériques. La température par défaut est de 350°F (180°C). 3. Appuyer sur START (mise en marche). 4. Pour modifier la température, répéter les étapes 2 et 3. 5. Appuyer sur CANCEL LOWER (annulation four inférieur) après avoir terminé. 6. Retirer les aliments du tiroir.
Entretien de la cuisinière Programme de nettoyage 5. Appuyer sur CANCEL UPPER (annulation du four supérieur) à la fin du programme. On peut appuyer sur Cancel Upper (annulation du four supérieur) à tout moment pour arrêter le programme de nettoyage. 6. Enlever l’eau résiduelle et les saletés délogées avec une éponge ou un chiffon immédiatement après la fin du programme de nettoyage.
■■ VITROCÉRAMIQUE Le nettoyant pour appareils ménagers de cuisine affresh® et le nettoyant pour table de cuisson affresh® peuvent être utilisés pour nettoyer le fond du four, ses parois et sa porte lorsque le four a terminé le programme de nettoyage et que sa température est redevenue ambiante. Si l’on utilise le nettoyant pour table de cuisson affresh®, il est recommandé d’essuyer aussi la cavité avec de l’eau distillée. Consulter la section “Accessoires” pour obtenir des renseignements sur la commande.
Dépose et réinstallation du tiroir COMMANDES DE LA TABLE DE CUISSON Afin d’éviter d’endommager les commandes de la table de cuisson, ne pas utiliser de laine d’acier, de nettoyants abrasifs ou de nettoyant pour four. Afin d’éviter toute détérioration, ne pas laisser tremper les boutons de commande. Lors de la réinstallation des boutons, s’assurer que chacun d’entre eux est en position Off (arrêt). Sur certains modèles, ne pas enlever les joints sous les boutons.
Dépannage Essayer d’abord les solutions suggérées ici. Pour obtenir de l’aide ou des conseils qui permettront peut-être d’éviter une intervention de dépannage, consulter la page de garantie de ce manuel et scanner le code QR avec votre appareil mobile, ou visiter le site Internet https://jennair.custhelp.com. In Canada, visit http://www.jennair.ca.
Problème Causes et/ou solutions possibles “F” ou “C” ainsi que des chiffres clignotent-ils sur l’affichage? Si “F” ou “C” ainsi qu’un chiffre clignotent en alternance sur l’affichage, consulter la section suivante pour trouver une éventuelle solution : La table de cuisson s’est éteinte et émet un signal sonore toutes les 10 secondes Un objet, des liquides ou des saletés exercent une pression sur le tableau de commande Bien essuyer les touches ou retirer tout objet qui pourrait gêner.
Bruits Problème Causes et/ou solutions possibles Sons liés au fonctionnement de la table de cuisson Voici quelques bruits normaux avec des explications. Ces sons correspondent à des bruits de fonctionnement normaux. Faible bourdonnement Ceci se produit en cas de cuisson à puissance élevée. Il est dû à la quantité d’énergie transmise de l’appareil à l’ustensile de cuisson - Le bourdonnement faiblit ou cesse lorsque l’alimentation est interrompue.
Accessoires Aux É.-U., pour les accessoires, consulter notre site Web www.jennair.com ou nous contacter au 1-800-JENNAIR (1-800-536-6247). Au Canada, consulter notre site Web www.jennair.ca ou appelez-nous au 1-800-JENNAIR (1-800-536-6247).
GARANTIE LIMITÉE DES GROS APPAREILS MÉNAGERS JENN-AIR® ATTACHEZ ICI VOTRE REÇU DE VENTE. UNE PREUVE D’ACHAT EST OBLIGATOIRE POUR OBTENIR L’APPLICATION DE LA GARANTIE.
Notes 55
W10665267D SP PN W10665270 /™ © 2016. Used under license in Canada. All rights reserved. Utilisé sous licence au Canada. Tous droits réservés.