
Instruction Sheet


8
10. Once you have completed converting all of the cooktop
burners, test the cooktop for leaks by brushing on an
approved noncorrosive leak-detection solution. If bubbles
appear, a leak is indicated. Correct any leaks found.
11. Plug in cooktop or reconnect power.
12. Adjust valve according to “Flame Height Adjustment” section.
Lighting the Electronic Igniters
The cooktop burners use electronic igniters in place of standing
pilots. When the cooktop control knob is pushed in and turned to
the HI position, the system creates a spark to light the burner.
This sparking continues until a flame is present.
To Check Operation of the Cooktop Burners:
1. Push in and turn knobs to the HI position. The cooktop
burner flame should light within 4 seconds.
2. If burners do not light properly, turn the control knob to the
Off position. Make sure the burner cap is in the proper
position.
3. Check that the power supply cord is plugged in and circuit
breaker has been tripped or household fuse has not blown.
4. Check that the shutoff valve is in the ON position.
5. Check burner operation again.
If one or all of the burners do not light at this point, see
“Assistance or Service” section in the Use and Care Guide.
Low Flame Height Adjustment
Each burner flame has been factory set to the lowest position
available to provide reliable and constant reignition of the burner;
however, each burner can be adjusted.
To Adjust:
The flame can be adjusted using the adjustment screws
underneath the control knob.
1. Set the burner flame to LO.
2. Remove the control knob.
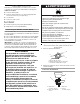
3. Hold knob stem with a pair of pliers. Use a ³⁄₃₂" (#0 [2.0 mm])
flat-blade screwdriver to turn the screw located within the
shaft of the control knob stem until the flame is the proper
size.
For LP gas conversion:
Completely tighten (clockwise) screw “C” to set the minimum
flame height.
For Natural gas conversion:
Tighten (clockwise) screw “C” to reduce flame height. Loosen
(counterclockwise) screw to increase flame height.
4. Replace the control knob.
5. Repeat steps 1-5 for each burner.
6. Check burner flame(s) for proper size and shape. The
cooktop “low” burner flame should be a steady blue flame
approximately ¹⁄₄" (0.64 cm) high.
7. Completely fill out the conversion label and attach label to
bottom of the cooktop next to the rating tag. Do not cover the
rating tag with the conversion label.
8. Save the orifices removed from the cooktop along with these
instructions for future reference.
Read “Sealed Surface Burners” section in the Use and Care
Guide supplied with your cooktop.
A. Incorrect
B. Correct
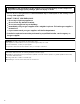
Electrical Shock Hazard
Plug into a grounded 3 prong outlet.
Do not remove ground prong.
Do not use an adapter.
Do not use an extension cord.
Failure to follow these instructions can result in death,
fire, or electrical shock.
WARNING
A
B
A.
³⁄₃₂
" (2.0 mm) - #0 flat-blade screwdriver (shaft
must be a minimum of 2½" [6.4 cm] long)
B. Control knob stem opening
C. Adjustment screw location
A. Low flame
B. High flame
B
C
A
A
B