
Installation Instructions


5
Parts Supplied
Check that all parts are included.
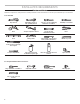
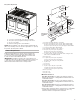
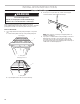
■ Anti-tip bracket kit
NOTE: Anti-tip bracket must be securely mounted to
suboor. Thickness of ooring may require longer screws
toanchor bracket to suboor. Longer screws are available
from your local hardware store. See the “Install Anti-Tip
Bracket” section.
■ Burner grates
■ Burner caps
■ Griddle drip tray (on griddle models)
Parts Needed
■ All models must be installed with a backguard if installing
at zero clearance to a combustible back wall surface such
as drywall. Alternatively, zero clearance to a back wall is
acceptable provided the surface of the entire back wall
above the range and below the hood is covered with a
non-combustible material such as tile or stainless steel.
See “Cabinet Dimensions” in the “Location Requirements”
section for installation requirements.
Check local codes and consult gas supplier. Check existing gas
supply and electrical supply. See the “Electrical Requirements”
and “Gas Supply Requirements” sections.
It is recommended that all electrical connections be made by
alicensed, qualied electrical installer.
High Altitude Conversion
To convert the range for elevations above 6,560 ft (2000 m),
order a High Altitude Conversion Kit.
■ Part Number W11238043: High altitude kit
NOTE: Both propane and natural gas conversions are included
in the high altitude kit.
To order, see the “Assistance or Service” section of the Use
andCare Guide.
A
B
A. Anti-tip bracket
B. #8-18 x 1" (2.5cm) Phillips head screws (4)