
Use and Care Guide


9
8. Display will show RINSING PLEASE WAIT and hot water will
empty from the spouts.
9. When the fresh water has run out, empty the container used
to collect the fresh water from the spouts.
10. INSERT FILTER INTO ITS HOUSING will be displayed.
Press
NEXT
and remove the water tank. Reinsert the water
lter if it had been removed previously.
NOTE: Water lter not available on this model.
11. RINSE AND FILL WATER TANK UP TO MAX LEVEL will
display. Fill tank up to MAX level with fresh water. Next,
INSERT WATER TANK will be displayed. Place the water tank
back into the coffee system.
12. PLACE 2.5 L (3 qt) CONTAINER UNDER OUTLET PRESS
OK TO START RINSING: Place the empty container used to
collect the descaling solution under the spouts and
press
OK
. Hot water is dispensed and RINSING PLEASE
WAIT is displayed.
13. EMPTY DRIP TRAY: At the end of the rinsing cycle, remove,
empty and replace the drip tray, along with the grounds
container. Replace and press
NEXT
.
14. For a few seconds, DESCALE COMPLETE PRESS OK will be
displayed, then the coffee system will turn off. The descaling
process is complete.
NOTE: If you would like to postpone the descaling process until
a later time, press
ESC
. On the display the symbol will
remain as a reminder.
To access the descaling menu when ready:
1. Press to enter the menu.
2. Press or until the display shows DESCALE. Press
to start the descaling cycle. Follow the instructions on the
display until cycle is complete.
Auto-Start
The auto-start time can be set to have the coffee maker ready at
a certain time.
NOTE: To enable this function, the time must be set correctly. To
set the time, see "Setting the Clock."
1. Press to enter the menu.
2. Press or until the display shows AUTO-START .
Select the function by pressing . The time setting panel
will be displayed.
3. Press or corresponding to the hours and minutes until the
required auto-start time is displayed. Press or
to enable or disable auto-start.
4. To conrm, press
OK
. To cancel and return to the home
page, press
ESC
twice.
The auto-start is now set and the symbol will be displayed
next to the time to indicate that the function has been
enabled.
NOTE: When the coffee system is turned off using the main
switch, the auto-start setting will be lost if it had been enabled.
Set Language
1. Press to enter the menu.
2. Press or until the display shows
Hola
Bonjour
Ciao
SET LANGUAGE.
3. Press
Hola
Bonjour
Ciao
. Press or until the ag corresponding to the
required language is shown and select it. Press
ESC
twice
to return to the home page.
Set Time
1. Press to enter the menu.
2. Press or until the display shows SET TIME.
3. Press . The time setting panel will appear.
4. Press or corresponding to the hours and minutes until the
current time is displayed. To conrm, press
OK
. To cancel,
press
ESC
, then press again to return to the home page.
Cup Lighting
1. Press to enter the menu.
2. Press or until the display shows CUP LIGHTING.
3. Press to enable or disable the lights.
Press
ESC
to return to the home page.
Drink Settings
In this section, you can consult your customized settings and
reset the default values for each beverage.
1. Press to enter the menu. Press or until DRINK
SETTINGS appears on the display.
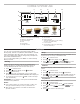
2. The reference user prole is highlighted on the display. The
values are shown on the vertical bars. The manufacturer
default value is indicated by the symbol while the current
set value is highlighted by the lled part of the vertical bar.
3. To go back to the settings menu, press
ESC
. To scroll and
display the beverages, press
NEXT
. To return to the default
manufacturer values for the beverage shown on the display,
press RESET. CONFIRM RESET will be displayed. To
conrm, press
OK
. To cancel, press
ESC
.
4. RETURN TO FACTORY will display. Press
OK
.
The beverage has been reset to the default values. Continue
with the other beverage, or go back to the settings menu.
NOTE: To change the beverages for another prole, go back
to the homepage, select the required prole and repeat the
procedure.
To reset all the beverages in the prole to the default values, see
the "Default Values" section.
Energy Saving
Use this function to enable or disable energy saving mode. When
enabled, the function guarantees reduced energy consumption.
When it is disabled, warming time is reduced.
1. Press to enter the menu. Press or until ENERGY
SAVING appears on the display.
2. Press to enable or disable energy saving.
Press
ESC
to go back to the homepage.
Demo Mode
By using this setting, the main functions of the coffee system are
shown on the display.
1. Press to enter the menu. Press or until the display
shows DEMO MODE. Press to start the demo.
2. To exit DEMO MODE, rst turn the coffee system off by
pressing the . Press the again to go back to the
homepage.