
Cycle Guide

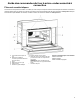

Table Of Contents
- Parts and Features_CG_W11423738
- Turntable_W11506069
- Convection Grid_W11506069
- Coated Crisper Pan and Handle_W11506069
- Microwave Oven Control_W11423738
- Touch Panel_CG_W11423738
- Display_CG_W11423738
- Main Menu_W11506069
- Menu Demonstration_CG_W11423738
- Tools Menu_CG_W11423738
- Built-In Microwave Oven Use_W11423738
- Food Characteristics_W11506069
- Cooking Guidelines_W11506069
- Cookware and Dinnerware_W11506069
- Aluminum Foil and Metal_W11506069
- Microwave Cooking Power_W11506069
- Cook Sensor_W11506069
- My Creations_W11506069
- Cooking Functions_W11506069
- Auto Convection Conversion_W11506069
- Convect Bake_CG_W11423738
- Convect Roast_CG_W11423738
- Defrost_CG_W11423738
- SpeedCook Foods_W11506069
- Cook_W11506069
- Popcorn_W11506069
- Beverage_W11506069
- Broil & Grill_W11506069
- Steam_W11506069
- Melt_W11506069
- Reheat_W11506069
- Soften_W11506069
- Boil & Simmer_W11506069
- Keep Warm_W11506069
- Browning Pan_W11506069
- Pieces et caracteristiques_CG_W11423738
- Plateau rotatif_W11506069
- Grille de convection_W11506069
- Plat antiadhesif a croustiller et poignee_W11506069
- Commandes du four a micro-ondes_W11423738
- Panneau tactile_CG_W11423738
- Affichage_CG_W11423738
- Menu principal_W11506069
- Demonstration du menu_CG_W11423738
- Menu outils_CG_W11423738
- Utilisation du four a micro-ondes encastre_W11423738
- Caracteristiques des aliments_W11506069
- Guide de cuisson_W11506069
- Ustensiles de cuisson et vaisselle_W11506069
- Papier d'aluminium et metal_W11506069
- Puissance de cuisson du four a micro-ondes_W11506069
- Capteur de cuisson_W11506069
- Mes creations_W11506069
- Fonctions de cuisson_W11506069
- Conversion automatique pour convection_W11506069
- Cuisson au four par convection_CG_W11423738
- Rotissage par convection_CG_W11423738
- Decongelation_CG_W11423738
- Aliments pour cuisson rapide_W11506069
- Cuisson_W11506069
- Maõs a eclater_W11506069
- Boisson_W11506069
- Griller et rotir_W11506069
- Cuisson a la vapeur_W11506069
- Faire fondre_W11506069
- Rechauffage_W11506069
- Faire ramollir_W11506069
- Faire bouillir et mijoter_W11506069
- Maintien au chaud_W11506069
- Plat brunisseur_W11506069
- Piezas y caracterõsticas_CG_W11423738
- Plato giratorio_W11506069
- Rejilla de conveccion_W11506069
- Bandeja doradora y manija_W11506069
- Control del horno microondas_W11423738
- Panel tactil_CG_W11423738
- Pantalla_CG_W11423738
- Menu principal_W11506069
- Demostracion de menu_CG_W11423738
- Menu de herramientas_W11423738
- Uso del Horno de Microondas Integrado_W11423738
- Caracterõsticas de los alimentos_W11506069
- Pautas para cocinar_W11506069
- Utensilios de cocina y vajilla_W11506069
- Papel de aluminio y metal_W11506069
- Potencia de coccion del microondas_W11506069
- Sensor de coccion_W11506069
- Mis creaciones_W11506069
- Funciones de coccion_W11506069
- Conversion a conveccion automatica_W11506069
- Hornear por conveccion_CG_W11423738
- Asar por conveccion_CG_W11423738
- Descongelar_CG_W11423738
- Alimentos de coccion veloz_W11506069
- Coccion_W11506069
- Palomitas_W11506069
- Bebida_W11506069
- Asar_W11506069
- Vapor_W11506069
- Derretir_W11506069
- Recalentar_W11506069
- Ablandar_W11506069
- Hervir a fuego lento_W11506069
- Mantener caliente_W11506069
- Bandeja de tostado_W11506069

12
Cook
To Use Manual Cook:
NOTE: For combination units, touch the MICROWAVE to access
the microwave menu.
1. From the Mode menu, select Cook (Default Mode). NOTE:
The default power setting is 100%.
2. Scroll to enter a Cook Time (–:–). The maximum length is
89:59.
3. (Optional) To adjust the power level, touch “Power 100%”,
scroll to select the desired power level, and then touch SET.
The range is between 10% and 100%.
4.
5.
Touch START.
When the stop time is reached, the oven will shut off
automatically.
NOTE: The microwave-cooling fan may continue to run for
several minutes after the cooking cycle has been completed.
The microwave cooking does not continue beyond the end of
cooking cycle.
(Optional) After the cooking cycle ends, touch the ADD
30 SEC button. This will automatically add 30 seconds to the
cook time.
6. Touch Microwave Cancel to turn off the oven.
Popcorn
Pop only 1 package at a time.
Listen for popping to slow to 1 pop every 1 or 2 seconds, and then
stop the cycle.
To Use Popcorn Mode:
1. From the Mode menu, select Popcorn.
2. (Optional) To adjust the doneness, touch DONENESS, read
the onscreen information, and then touch DONENESS. Select
More Done, Suggested, or Less Done, and then touch SET.
3. Touch START.
4. Touch Microwave Cancel to turn off the oven.
When the stop time is reached, the oven will shut off
automatically.
NOTE: The microwave-cooling fan may continue to run for several
minutes after the cooking cycle has been completed. The
microwave cooking does not continue beyond the end of cooking
cycle.
Beverage
Use a microwave safe container.
Do not cover.
To Use Beverage Mode:
NOTE: For combination units, touch the MICROWAVE to access
the microwave menu.
1. From the Mode menu, select BEVERAGE.
2. Select quantity.
3. (Optional) To adjust the doneness, touch DONENESS, read
the on-screen information, and then touch DONENESS.
Select More Done, Suggested, or Less Done, and then touch
SET.
4. Touch START.
5. Touch Microwave Cancel to turn off the oven.
When the stop time is reached, the oven will shut off
automatically.
NOTE: The microwave-cooling fan may continue to run for several
minutes after the cooking cycle has been completed. The
microwave cooking does not continue beyond the end of cooking
cycle.
Broil & Grill
The Grill function uses the broil element and microwaves to grill
your food.
■ Microwave oven cavity and door will become very hot during
the Grill cycle. Use oven mitts.
■ The grilling grid and convection grid will become very hot. Use
oven mitts to grasp and remove the grid from the microwave
oven.
■ For large pieces like chicken, use the crisper pan beneath the
convection grid or grilling grid to catch drippings.
■ For best results, apply light amount of cooking oil to grilling grid
or convection grid.
■ When the broil element is in use, the cooling fan turns on and
stays on for up to 10 minutes after the cycle is over.
Use the following chart as a guide.
Grill Chart
FOOD QUANTITY
Manual*
Chicken pieces - bone-in 1-2 pieces
*Manual Grill requires that a cook time be entered.
To Use Programmed Broil & Grill:
NOTE: For combination units, touch the MICROWAVE to access
the microwave menu.
1. From the Mode menu, select Broil & Grill.
2. Select Chicken Pieces and then touch NEXT.
3. Scroll to select the serving size and then touch NEXT.
4. (Optional) To adjust the doneness, touch DONENESS, read
the on-screen information, and then touch Doneness. Select
More Done, Suggested, or Less Done, and then touch SET.
5. Read the on-screen recommendations and then touch
START.
6. Touch Microwave Cancel to turn off the oven.
7. (Optional) After the cooking cycle ends, touch the ADD
30 SEC button. This will automatically add 30 seconds to the
cook time.
NOTE: The microwave-cooling fan may continue to run for several
minutes after the cooking cycle has been completed. The
microwave cooking does not continue beyond the end of cooking
cycle.
To Use Manual Broil & Grill:
1. From the Mode menu, select Broil & Grill.
2. Select Manual and then touch NEXT.
NOTE: The default power level is 0%.
3. Enter a Cook Time (–:–). The maximum length is 89:59.
4. (Optional) To adjust the power level, touch Power 0% and
scroll to select a range between 0-40%, then touch SET.
5. Touch START.
6. (Optional) After the cooking cycle ends, touch the ADD 30
SEC button. This will automatically add 30 seconds to the
cook time.
7. Touch Microwave Cancel to turn off the oven.
NOTE: The microwave-cooling fan may continue to run for several
minutes after the cooking cycle has been completed. The
microwave cooking does not continue beyond the end of cooking
cycle.