
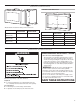
Installation Instructions

6
INSTALLATION INSTRUCTIONS
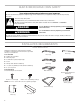
WARNING
Excessive Weight Hazard
Use two or more people to move and install
microwave oven.
Failure to do so can result in back or other injury.
IMPORTANT: To prevent damage, do not remove protective film
on the frame.
1. Empty microwave oven cavity of any loose contents,
including turntable.
2. Ensure floor of cabinet is level.
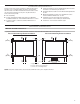
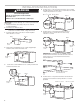
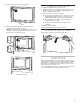
Install Rear and Top Ducts
1. Insert the edge of duct 1 into duct 2. Fasten together
with 1 #8-14 x Z\x" screw.
2. Remove the 2 existing #8-18 x C\," screws at upper right
and left corners of the microwave oven.
3. Secure ducts 1 and 2 with #8-18 x C\," screws just removed
from the microwave oven.
Duct 1
Duct 2
#8-14 x
1
\x"
screw
#8-18 x
3
⁄,"
screw
#8-18 x
3
⁄,"
screw
Duct 1
Duct 2
#8-18 x
3
⁄,"
screw
#8-18 x
3
⁄,"
screw
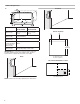
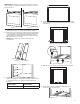
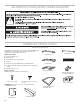
4. Position duct 3 on the top of the microwave oven, inserting
the edge of ducts 1 and 2 into duct 3. Secure duct 3 to ducts
1 and 2 using 2 #8-14 x Z\x" screws.
5. Position duct 4 on top of the microwave oven and
insert it into duct 3. Secure duct 4 to duct 3 using
2 #8-14 x Z\x" screws.
IMPORTANT: The double holes on duct 4 go toward
the back of the microwave oven. On each side of duct 4,
screw 1 #8-14 x Z\x" screw into the front-most hole
of the double hole.
6. Position duct 5 on top of the microwave oven and insert
it into duct 4. Secure duct 5 using 3 #8-14 x Z\x" screws
provided.
Duct 3
Ducts 1 and 2
#8-14 x
1
\x"
screw
#8-14 x
1
\x" screw
#8-14 x
1
\x"
screw
Duct 4
#8-14 x
1
\x"
screw
Duct 3
Use hole closest to front
of microwave oven.
#8-14 x
1
\x"
screw
#8-14 x
1
\x" screw
#8-14 x
1
\x" screw
Duct 4
Duct 5