
Installation Instructions

8
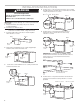
Install Microwave Oven and Trim Kit Frame
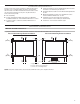
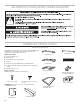
1. Moving from right to left, remove the third and sixth screws
from the front of the microwave bottom plate.
NOTE: Do not remove screws from door.
2. Use the screws just removed to install the Bottom Duct
Attachment Brackets in the same holes the screws were
removed from.
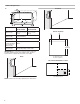
3. With the microwave oven near the opening, plug the
microwave oven into the grounded 3 prong outlet.
NOTE: To avoid pinching of the power cord, make sure
it is away from the bottom duct.
Plug into a
grounded
3 prong outlet.
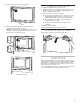
4. Place the microwave oven in the cabinet on the risers.
Make sure the feet are firmly seated in embossments
located on risers. Verify that microwave oven is level.
5. Secure the microwave oven to the bottom duct. Using 2
#10-C\v" x B\zn" self-drilling screws, fasten the Bottom Duct
Attachment Brackets to the first and fourth holes in the
front of the bottom duct.
Embossment
Riser
Bottom Duct Attachment Brackets
Bottom Duct Attachment Brackets
Holes for Bottom Duct Attachment Brackets