
Installation Instructions

9
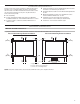
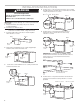
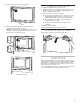
6. Remove protective film from trim kit frame.
7. Align trim kit frame studs with corresponding holes
in mounting rails and snap into place.
NOTE: Top and bottom studs are different distances from
the edge, so the trim kit frame will install in only 1 way.
Ensure notch is in lower-left corner.
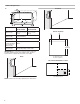
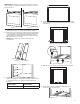
Installed Microwave Oven
Complete Installation
1. Install the turntable in the microwave oven.
2. Check the operation of microwave oven by placing 1 cup
(250 mL) of water on the turntable and programming cook
time of 1 minute at 100% power.
3. If the microwave oven does not operate:
■ Check that a household fuse has not blown or a circuit
breaker tripped. Replace the fuse or reset the circuit
breaker. If the problem continues, call an electrician.
■ Check that the power supply cord is plugged into
a grounded 3 prong outlet.
■ See the Use and Care Guide for troubleshooting
information.
Installation is now complete.
Save these Installation Instructions for future use.
To Remove Trim Kit Frame
Firmly grasp top of trim at vent area and pull away.
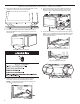
ASSISTANCE
Call your authorized dealer or service center. When you call, you
will need the microwave oven model number and serial number.
Both numbers can be found on the model and serial number
plate, which is located behind the microwave oven door on the
front frame of the microwave oven.
If you need additional assistance, call us at our toll-free number
or visit our website listed in the Use and Care Guide.
Notch