
Owner's Manual


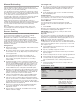


Table Of Contents
- Microwave Oven Safety
- Unpacking
- Location Requirements
- Electrical Requirements
- Turntable
- Low Convection Rack (on some models)
- High Convection Rack (on some models)
- Display
- Menu Demonstration
- Help
- Timer
- Microwave Oven Use
- Cooking Guidelines
- Cookware and Dinnerware
- Aluminum Foil and Metal
- Before Operating
- Setting the Clock
- Stop/Clear
- Microwave Cooking Power
- Time Cooking
- Convection and Automatic Mix Cooking
- Broil Cooking
- Slow Cooking
- Sensor Defrosting
- Manual Defrosting
- Sensor Cooking
- Convect Bake/Roast/Broil
- Multiple Sequence Cooking
- More or Less Time Adjustment
- Add Minute
- Touch On
- Sécurité du four à micro-ondes
- Jenn-Air® Major Appliance Limited Warranty
- Accessories
- Troubleshooting
- Microwave Oven Care
- Déballage
- Exigences d’emplacement
- Spécifications électriques
- Plateau rotatif
- Grille inférieure de cuisson par convection (sur certains modèles)
- Grille supérieure de cuisson par convection (sur certains modèles)
- Affichage
- Démonstration de menu
- Aide
- Minuterie
- Utilisation du four à micro-ondes
- Guide de cuisson
- Ustensiles de cuisson et vaisselle
- Papier d'aluminium et métal
- Avant l'utilisation
- Réglage de l’horloge
- Arrêt/annulation
- Puissance de cuisson des micro-ondes
- Cuisson minutée
- Cuisson mixte à convection et automatique
- Cuisson sur le gril
- Cuisson lente
- Décongélation par détection
- Décongélation manuelle
- Cuisson par détection
- Cuisson/Rôtissage/Grillage par convection
- Cuisson à séquences multiples
- Ajustement de plus ou moins de temps
- Minutes supplémentaires
- Marche
- Garantie Limitée des Gros Appareils Ménagers Jenn-Air®
- Accessoires
- Dépannage
- Entretien du four à micro-ondes

17
Convect Broil
To set:
1. Touch CONVECT BROIL.
2. Touch a number keypad corresponding to the desired setting.
For example, touch “1” for hamburgers.
3. Touch the number keypad to enter the quantity. For example,
touch “2” for 2 patties. Follow information in display for
cooking information.
4. Touch START.
5. After Broil Preheating cycle ends, the microwave oven will stop
and directions will be displayed. Open the door, place
hamburgers in the microwave oven, and close the door.
Convect Broil Chart
SETTING/FOOD AMOUNT RACK PROCEDURE
1. Hamburgers
1–8 pieces
Z\v lb each
Low Place directly on the low rack.
2. Chicken pieces
0.5–3.5 lbs
(0.3–1.5 kg)
Low Place directly on the low rack. After cooking, let stand 3-5 minutes.
Dark meat should be 180°F (82°C) and white meat should be 170°F (77°).
3. Steaks
0.5–2.0 lbs
(0.3–0.9 kg)
Low Steaks should be C\v"-1" thick. Place directly on the low rack. For well done, touch
POWER LEVEL once; for less than well-done, touch POWER LEVEL twice.
4. Fish steaks
0.5–2.0 lbs
(0.3–0.9 kg)
Low Fish steaks should be C\v"-1" thick. Place directly on the low rack.
Multiple Sequence Cooking
The microwave oven can be programmed for up to 4 automatic
cooking sequences for the Microwave mode and 2 automatic
cooking sequences with preheat for Convection/Mix mode,
switching from one lower level setting to another automatically.
Sometimes cooking directions tell you to start on one power level
and then change to a different power level. Your microwave oven
can do this automatically.
To set:
1. Touch POWER LEVEL.
2. Touch the number keypads to enter the cooking time.
For example, touch “5,” “0,” and “0” for 5 minutes.
3. Touch POWER LEVEL, followed by a number keypad to enter
the Power Level. For example, touch “5” for 50% power.
4. Touch the number keypads to enter the second cooking time.
For example, touch “3,” “0,” “0,” and “0” for 30 minutes.
5. Touch START.
NOTES:
■ If POWER LEVEL is touched twice, “HIGH” will be displayed.
■ To display the Power Level, touch and hold POWER LEVEL.
More or Less Time Adjustment
More
To cook foods slightly more done for Instant Sensor, Sensor Cook,
Defrost, Convect Bake, Convect Roast, or Convect Broil, touch
POWER LEVEL once after touching the other keypads.
Less
To cook foods slightly less done for Instant Sensor, Sensor Cook,
Defrost, Convect Bake, Convect Roast, or Convect Broil, touch
POWER LEVEL twice after touching the other keypads.
1. Touch START.
For well-done hamburgers, touch Power Level keypad once; for
less than well-done, touch Power Level keypad twice. See the
“More or Less Time Adjustment” section.
NOTES:
■ Convect Broil can be programmed with More/Less Time
Adjustment. See the “More or Less Time Adjustment” section.
■ If you attempt to enter more or less than the allowed amount
as indicated in the chart below, an error message will appear
in the display.
■ A microwave- and heat-safe dish may be placed under the
rack to catch the drippings.
Add Minute
Add Minute allows you to cook for a minute at 100% by touching
only the Add Minute keypad. You can also extend cooking time
in multiples of 1 minute by repeatedly touching the Add Minute
keypad during manual cooking.
To set:
Touch ADD MINUTE.
NOTES:
■ To use Add Minute, touch the keypad within 1 minute after
cooking, closing the door, touching Stop/Clear, or during
cooking.
■ Add Minute cannot be used with Sensor or Convect features.
Touch On
Touch On allows you to cook at 100% power by touching START
continuously. Touch On is ideal for melting cheese, bringing milk
to just below boiling, etc. The maximum cooking time is 3 minutes.
To set for melting cheese on a slice of toast:
1. Touch and hold START. The cooking time will begin counting
down.
2. When cheese is melted to the desired amount, release the
Start keypad. The microwave oven will stop immediately.
NOTES:
■ Note the time it takes for frequently used foods and program
that time in the future.
■ To use Touch On, touch the Start keypad within 1 minute
after cooking, opening and closing the door, or touching
STOP/CLEAR.
■ Touch On can only be used 3 times in a row. If more times
are needed, open and close the door or touch STOP/CLEAR.