
Installation Instructions


10
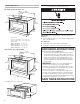
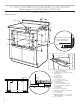
9. Install four 1" (2.5 cm) screws to secure the Microwave
Drawer in place, then close the drawer.
Install the Deflector Vent For Flush
Installation
1. Position deector vent and mark holes.
2. Pre-drill using a 1/8" (3.17 mm) bit before mounting.
Refer to illustrations below for vent positioning.
³/₄" (19.0
5
mm)
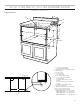
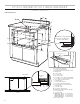
3. Place the drawer adjacent to the wall or cabinet opening.
Plug the power supply cord into the grounded 3 prong outlet.
4. Guide the drawer into the prepared opening. Avoid contact
with the sides of the cutout opening and also pinching the
cord between the oven and the wall.
5. Slide the drawer all the way back until the mounting anges
touch the cleats mounted in the cabinet opening.
6. Open the drawer. Using the 4 holes on the drawer as a
template, pre drill the cabinet using a 1/8" (3.17 mm) bit.
See illustration below.
flange
Mounting
flange
7. Secure the drawer with the 4 screws supplied.
Complete Installation
1. Check the operation of Microwave Drawer by placing 1 cup
(250 mL) of water in the Microwave Drawer and programming
cook time of 1 minute at 100% power.
2. If the Microwave Drawer does not operate:
■ Check that a household fuse has blown, or a circuit
breaker tripped. Replace the fuse or reset the circuit
breaker. If the problem continues, call an electrician.
■ Check that the power supply cord is plugged into a
grounded 3 prong outlet.
■ See the Use and Care Guide for troubleshooting
information.
Installation is now complete.
Save these Installation Instructions for future use.
ASSISTANCE
Call your authorized dealer or service center. When you call,
you will need the microwave drawer model number and serial
number, both of which can be found on the model and serial
number plate.
If you need additional assistance, call us at our toll-free number
or visit our website listed in the Use and Care Guide.
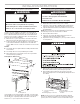
To access the model and serial number plate, fully open the
microwave drawer. The plate is located on a at surface just
beyond the back wall of the drawer.
Shelf detail showing the deector vent during installation.
Shelf detail showing the deector vent installed.