
Cycle Guide

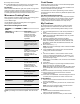
Table Of Contents
- Parts and Features_W11506069
- Turntable_W11506069
- Convection Grid_W11506069
- Coated Crisper Pan and Handle_W11506069
- Microwave Oven Control_W11506069
- Touch Panel_W11506069
- Display_W11506069
- Display Navigation_W11506069
- Menu Demonstration_W11506069
- Kitchen Timer_W11506069
- Tones/Sounds_W11506069
- Tools_W11506069
- Button Lock_W11506069
- Oven Temperature Control_W11506069
- Sabbath Mode_W11506069
- Main Menu_W11506069
- Tools Menu_W11506069
- Oven Use_W11506069
- Aluminum Foil_W11506069
- Position Racks and Bakeware_W11506069
- Roll-Out Extension Rack_W11506069
- Bakeware_W11506069
- Oven Vents_CG_W11506069
- Preheating nd Oven Temperature_W11506069
- Baking and Roasting_W11506069
- Broiling_W11506069
- Convection_W11506069
- Convect Bake_W11506069
- Convect Roast_W11506069
- Convection Broil_W11506069
- Broil & Grill_W11506069
- Proofing Bread_W11506069
- Temperature Probe_W11506069
- Timed Cooking_W11506069
- Combo Microwave Use_W11506069
- Food Characteristics_W11506069
- Cooking Guidelines_W11506069
- Cookware and Dinnerware_W11506069
- Aluminum Foil and Metal_W11506069
- Microwave Cooking Power_W11506069
- Cook Sensor_W11506069
- My Creations_W11506069
- Cooking Functions_W11506069
- Auto Convection Conversion_W11506069
- Defrost_W11506069
- SpeedCook Foods_W11506069
- Cook_W11506069
- Popcorn_W11506069
- Beverage_W11506069
- Steam_W11506069
- Melt_W11506069
- Reheat_W11506069
- Soften_W11506069
- Boil & Simmer_W11506069
- Keep Warm_W11506069
- Browning Pan_W11506069
- Pieces et caracteristiques_W11506069
- Plateau rotatif_W11506069
- Grille de convection_W11506069
- Plat antiadhesif a croustiller et poignee_W11506069
- Commande du four a micro-ondes_W11506069
- Panneau tactile_W11506069
- Affichage_W11506069
- Affichage du menu_W11506069
- Demonstration du menu_W11506069
- Minuterie de cuisine_W11506069
- Tonalites/sons_W11506069
- Outils_W11506069
- Verrouillage des commandes_W11506069
- Commande de temperature du four_W11506069
- Mode Sabbat_W11506069
- Menu principal_W11506069
- Menu Outils_W11506069
- Utilisation du four_W11506069
- Papier aluminium_W11506069
- Positionnement des grilles et des ustensiles de cuisson au four_W11506069
- Grille coulissante deployante_W11506069
- Ustensiles de cuisson au four_W11506069
- Events du four_CG_W11506069
- Prechauffage et temperature du four_W11506069
- Cuisson et rotissage au four_W11506069
- Cuisson au gril_W11506069
- Convection_W11506069
- Cuisson au four par convection_W11506069
- Rotissage par convection_W11506069
- Cuisson au gril par convection_W11506069
- Griller et rotir_W11506069
- Levee du pain_W11506069
- Sonde thermometrique_W11506069
- Cuisson minutee_W11506069
- Utilisation du four a micro-ondes combine_W11506069
- Caracteristiques des aliments_W11506069
- Guide de cuisson_W11506069
- Ustensiles de cuisson et vaisselle_W11506069
- Papier d'aluminium et metal_W11506069
- Puissance de cuisson du four a micro-ondes_W11506069
- Capteur de cuisson_W11506069
- Mes creations_W11506069
- Fonctions de cuisson_W11506069
- Conversion automatique pour convection_W11506069
- Decongelation_W11506069
- Aliments pour cuisson rapide_W11506069
- Cuisson_W11506069
- Maõs a eclater_W11506069
- Boisson_W11506069
- Cuisson a la vapeur_W11506069
- Faire fondre_W11506069
- Rechauffage_W11506069
- Faire ramollir_W11506069
- Faire bouillir et mijoter_W11506069
- Maintien au chaud_W11506069
- Plat brunisseur_W11506069
- Piezas y caracterõsticas_W11506069
- Plato giratorio_W11506069
- Rejilla de conveccion_W11506069
- Bandeja doradora y manija_W11506069
- Cuidado del horno microondas_W11506069
- Panel tactil_W11506069
- Pantalla_W11506069
- Navegacion por la pantalla_W11506069
- Demostracion de menu_W11506069
- Temporizador de la cocina_W11506069
- Tonos/sonidos_W11506069
- Herramientas_W11506069
- Bloqueo de botones_W11506069
- Control de temperatura del horno_W11506069
- Modo Sabbat_W11506069
- Menu principal_W11506069
- Menu de herramientas_W11506069
- Uso del horno_W11506069
- Papel aluminio_W11506069
- Posicion de las parrillas y los utensilios para hornear_W11506069
- Parrilla deslizable extensible_W11506069
- Utensilios de cocina_W11506069
- Ventilaciones del horno_W11506069
- Precalentado y puerta del horno_W11506069
- Hornear y asar_W11506069
- Asar a la parrilla_W11506069
- Conveccion_W11506069
- Horneado por conveccion_W11506069
- Asar por conveccion_W11506069
- Asar a la parrilla por conveccion_W11506069
- Asar_W11506069
- Como leudar pan_W11506069
- Sonda de temperatura_W11506069
- Coccion programada_W11506069
- Uso de combinacion de microondas_W11506069
- Caracterõsticas de los alimentos_W11506069
- Pautas para cocinar_W11506069
- Utensilios de cocina y vajilla_W11506069
- Papel de aluminio y metal_W11506069
- Potencia de coccion del microondas_W11506069
- Sensor de coccion_W11506069
- Mis creaciones_W11506069
- Funciones de coccion_W11506069
- Conversion a conveccion automatica_W11506069
- Descongelacion_W11506069
- Alimentos de coccion veloz_W11506069
- Coccion_W11506069
- Palomitas_W11506069
- Bebida_W11506069
- Vapor_W11506069
- Derretir_W11506069
- Recalentar_W11506069
- Ablandar_W11506069
- Hervir a fuego lento_W11506069
- Mantener caliente_W11506069
- Bandeja de tostado_W11506069

14
■ Always use the turntable.
■ To avoid damage to the microwave oven, do not allow contact
with another metal object during microwave cooking.
Do Not Use
Metal cookware and bakeware, gold, silver, pewter, non-approved
meat thermometers, skewers, twist ties, foil liners such as
sandwich wrappers, staples, and objects with gold or silver trim or
a metallic glaze should not be used in the microwave oven.
Microwave Cooking Power
Many recipes for microwave cooking specify which cooking power
to use by percent, name or number. For example,
70%=7=Medium-High.
Use the following chart as a general guide for the suggested
cooking power of specific foods.
Microwave Cooking Power Chart
PERCENT/
NAME
NUMBER USE
100%, High
(default setting)
10 Quick heating
convenience foods and
foods with high water
content, such as soups,
beverages, and most
vegetables.
90% 9 Cooking small, tender
pieces of meat, ground
meat, poultry pieces, and
fish fillets. Heating cream
soups.
80% 8 Heating rice, pasta or
casseroles.
Cooking and heating foods
that need a cook power
lower than high. For
example, whole fish and
meat loaf.
70%,
Medium-High
7 Reheating a single serving
of food.
60% 6 Cooking sensitive foods
such as cheese and egg
dishes, pudding and
custards. Cooking non-
stirrable casseroles, such
as lasagna.
50%, Medium
5
Cooking ham, whole
poultry and pot roasts.
Simmering stews.
40% 4 Melting chocolate. Heating
bread, rolls, and pastries.
30%, Medium-
Low, Defrost
30 Defrosting bread, fish,
meats, poultry, and
precooked foods.
20% 2 Softening butter, cheese,
and ice cream.
10%, Low 1 Taking chill out of fruit.
NOTE: A percentage of 0% is also acceptable. This will not heat
up.
Cook Sensor
During the Sensor Cook function, a sensor automatically adjusts
for the cook time and power level.
The microwave oven display will show the time countdown once
the sensor identifies the cooking duration.
If the microwave oven door is opened during a sensor function,
the microwave oven will turn off and any additional operations will
be canceled.
For Best Cooking Performance:
Before using a sensor cook function, make sure power has been
supplied to the microwave oven for at least 2 minutes, the room
temperature is not above 95°F (35°C), and the outside of the
cooking container and the microwave oven cavity are dry.
My Creations
My Creations allows the customization of cooking processes.
When My Creations is selected from the main menu a list of
existing creations is presented along with the ability to create
more.
1. From the Cooking Mode menu, scroll until “My Creations” is
shown.
2. Select between Create New, Use Saved, or Delete/Edit.
NOTE: The first time MY CREATIONS is used, only “Create
New” will be displayed.
3. Touch the Create New pad, and then touch NEXT.
4. Select the desired Cook mode. Choose between Convect
Roast, Convect Bake, Steam Cook, Defrost, Reheat, Cook,
Keep Warm, Soften, Melt, Boil & Simmer, Broil & Grill, and
Browning Pan.
5. Enter a Cook Time (–:–:–).
NOTE: The maximum total length of time of all three available
stages is 12:00:00.
6. Touch POWER to adjust cooking power, touch the desired
cooking power, and then touch SET.
or
7. If the "Convect Bake" or “Convect Roast” mode is chosen,
choose a cook temperature between 170° and 450°F (77°C
and 232°C), touch NEXT, enter a Cook Time (–:–), and then
touch SET and go to step 9.
NOTE: In the “Convect Bake” mode, the Power Level selection
is unavailable.
8. Touch NEXT.
9. Review your settings. If any extra stage is needed, touch the
Stage you wish to set, and then touch ADD.
NOTE: Each stage set shows the following information: Mode,
Power/Temperature, and Cook Time. It is possible to have 3
stages.
10. Enter the information into each stage, and then touch SAVE.
11. Use the tumbler to select the shortcut menu where the
creation will be stored.
12. Touch SAVE or OVERWRITE. Overwrite will appear if there is
a creation previously stored in the chosen shortcut menu.
To Use Saved
1. Use the tumbler to select Use Saved from the menu selection,
and then touch NEXT.
2. Select the cooking creation you desire to use, and then touch
START.
NOTE: You may be prompted to open and close the door
before the creation can begin cooking.
To Delete
1. Use the tumbler to select Delete / Edit from the menu
selection, and then touch NEXT.
2. Using the tumbler, select the creation you wish to delete.