
Cycle Guide
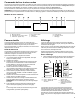
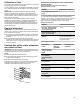
Table Of Contents
- Parts and Features_W11506069
- Turntable_W11506069
- Convection Grid_W11506069
- Coated Crisper Pan and Handle_W11506069
- Microwave Oven Control_W11506069
- Touch Panel_W11506069
- Display_W11506069
- Display Navigation_W11506069
- Menu Demonstration_W11506069
- Kitchen Timer_W11506069
- Tones/Sounds_W11506069
- Tools_W11506069
- Button Lock_W11506069
- Oven Temperature Control_W11506069
- Sabbath Mode_W11506069
- Main Menu_W11506069
- Tools Menu_W11506069
- Oven Use_W11506069
- Aluminum Foil_W11506069
- Position Racks and Bakeware_W11506069
- Roll-Out Extension Rack_W11506069
- Bakeware_W11506069
- Oven Vents_CG_W11506069
- Preheating nd Oven Temperature_W11506069
- Baking and Roasting_W11506069
- Broiling_W11506069
- Convection_W11506069
- Convect Bake_W11506069
- Convect Roast_W11506069
- Convection Broil_W11506069
- Broil & Grill_W11506069
- Proofing Bread_W11506069
- Temperature Probe_W11506069
- Timed Cooking_W11506069
- Combo Microwave Use_W11506069
- Food Characteristics_W11506069
- Cooking Guidelines_W11506069
- Cookware and Dinnerware_W11506069
- Aluminum Foil and Metal_W11506069
- Microwave Cooking Power_W11506069
- Cook Sensor_W11506069
- My Creations_W11506069
- Cooking Functions_W11506069
- Auto Convection Conversion_W11506069
- Defrost_W11506069
- SpeedCook Foods_W11506069
- Cook_W11506069
- Popcorn_W11506069
- Beverage_W11506069
- Steam_W11506069
- Melt_W11506069
- Reheat_W11506069
- Soften_W11506069
- Boil & Simmer_W11506069
- Keep Warm_W11506069
- Browning Pan_W11506069
- Pieces et caracteristiques_W11506069
- Plateau rotatif_W11506069
- Grille de convection_W11506069
- Plat antiadhesif a croustiller et poignee_W11506069
- Commande du four a micro-ondes_W11506069
- Panneau tactile_W11506069
- Affichage_W11506069
- Affichage du menu_W11506069
- Demonstration du menu_W11506069
- Minuterie de cuisine_W11506069
- Tonalites/sons_W11506069
- Outils_W11506069
- Verrouillage des commandes_W11506069
- Commande de temperature du four_W11506069
- Mode Sabbat_W11506069
- Menu principal_W11506069
- Menu Outils_W11506069
- Utilisation du four_W11506069
- Papier aluminium_W11506069
- Positionnement des grilles et des ustensiles de cuisson au four_W11506069
- Grille coulissante deployante_W11506069
- Ustensiles de cuisson au four_W11506069
- Events du four_CG_W11506069
- Prechauffage et temperature du four_W11506069
- Cuisson et rotissage au four_W11506069
- Cuisson au gril_W11506069
- Convection_W11506069
- Cuisson au four par convection_W11506069
- Rotissage par convection_W11506069
- Cuisson au gril par convection_W11506069
- Griller et rotir_W11506069
- Levee du pain_W11506069
- Sonde thermometrique_W11506069
- Cuisson minutee_W11506069
- Utilisation du four a micro-ondes combine_W11506069
- Caracteristiques des aliments_W11506069
- Guide de cuisson_W11506069
- Ustensiles de cuisson et vaisselle_W11506069
- Papier d'aluminium et metal_W11506069
- Puissance de cuisson du four a micro-ondes_W11506069
- Capteur de cuisson_W11506069
- Mes creations_W11506069
- Fonctions de cuisson_W11506069
- Conversion automatique pour convection_W11506069
- Decongelation_W11506069
- Aliments pour cuisson rapide_W11506069
- Cuisson_W11506069
- Maõs a eclater_W11506069
- Boisson_W11506069
- Cuisson a la vapeur_W11506069
- Faire fondre_W11506069
- Rechauffage_W11506069
- Faire ramollir_W11506069
- Faire bouillir et mijoter_W11506069
- Maintien au chaud_W11506069
- Plat brunisseur_W11506069
- Piezas y caracterõsticas_W11506069
- Plato giratorio_W11506069
- Rejilla de conveccion_W11506069
- Bandeja doradora y manija_W11506069
- Cuidado del horno microondas_W11506069
- Panel tactil_W11506069
- Pantalla_W11506069
- Navegacion por la pantalla_W11506069
- Demostracion de menu_W11506069
- Temporizador de la cocina_W11506069
- Tonos/sonidos_W11506069
- Herramientas_W11506069
- Bloqueo de botones_W11506069
- Control de temperatura del horno_W11506069
- Modo Sabbat_W11506069
- Menu principal_W11506069
- Menu de herramientas_W11506069
- Uso del horno_W11506069
- Papel aluminio_W11506069
- Posicion de las parrillas y los utensilios para hornear_W11506069
- Parrilla deslizable extensible_W11506069
- Utensilios de cocina_W11506069
- Ventilaciones del horno_W11506069
- Precalentado y puerta del horno_W11506069
- Hornear y asar_W11506069
- Asar a la parrilla_W11506069
- Conveccion_W11506069
- Horneado por conveccion_W11506069
- Asar por conveccion_W11506069
- Asar a la parrilla por conveccion_W11506069
- Asar_W11506069
- Como leudar pan_W11506069
- Sonda de temperatura_W11506069
- Coccion programada_W11506069
- Uso de combinacion de microondas_W11506069
- Caracterõsticas de los alimentos_W11506069
- Pautas para cocinar_W11506069
- Utensilios de cocina y vajilla_W11506069
- Papel de aluminio y metal_W11506069
- Potencia de coccion del microondas_W11506069
- Sensor de coccion_W11506069
- Mis creaciones_W11506069
- Funciones de coccion_W11506069
- Conversion a conveccion automatica_W11506069
- Descongelacion_W11506069
- Alimentos de coccion veloz_W11506069
- Coccion_W11506069
- Palomitas_W11506069
- Bebida_W11506069
- Vapor_W11506069
- Derretir_W11506069
- Recalentar_W11506069
- Ablandar_W11506069
- Hervir a fuego lento_W11506069
- Mantener caliente_W11506069
- Bandeja de tostado_W11506069

21
5. Touch START.
NOTE: When cooking pasta, the oven will pause for adding
pasta to the water. Then the oven will restart.
If enabled, end-of-cycle tones will sound.
6. (Optional) After the cooking cycle ends, touch the ADD 30
SEC button. This will automatically add 30 seconds to the
cook time.
7. Touch Microwave Cancel to turn off the oven.
To Use Manual Boil & Simmer:
To begin the function on combination ovens, touch MICROWAVE.
1. Scroll to Boil & Simmer in the cooking mode menu.
2. Scroll to Manual and touch NEXT.
3. Enter a Cook Time (–:–). The maximum length is 89:59.
NOTE: In the Boil & Simmer mode, the microwave controls
power. After water is brought to a boil, the food will simmer for
the length of the Cook Time.
4. Touch START. Once the boiling point is reached, the display
will count down the cook time.
If enabled, end-of-cycle tones will sound.
5. (Optional) After the cooking cycle ends, touch the ADD
30 SEC button. This will automatically add 3 seconds to the
cook time.
6. Touch Microwave Cancel to turn off the oven.
Manual Simmer Chart
FOOD INSTRUCTIONS
Pasta* Add 1 tablespoon (15 mL) oil to
water. Place the dish containing
water in oven. Enter 1 second of
simmer time. The water will heat to
a boil and then the oven will turn
off. Place the pasta in the water
and cover the dish. Repeat steps
1–4 under “To Use Manual
Simmer,” then enter the actual
simmer time desired.
Rice and Vegetables Place water and food in dish. Place
dish in oven. Set simmer time.
Soup and liquid foods Place food in dish and place dish in
oven. Set simmer time.
*Use a dish large enough to completely cover food with water.
(Optional) Modify the food doneness by touching the Doneness
pad. Select More Done, Suggested, or Less Done, then touch
SET, review the cook settings, and then touch START.
Keep Warm
WARNING
Food Poisoning Hazard
Do not let food sit for more than one hour before or after
cooking.
Doing so can result in food poisoning or sickness.
Hot cooked food can be kept warm in the microwave oven.
Keep Warm™ setting can be used by itself or can be
preprogrammed to follow a cooking cycle.
■ Cover plates of food.
■ Cover foods that were covered while being cooked.
■ For best results, do not cover baked goods such as pastries,
pies, turnovers, etc.
To Use Keep Warm:
1. Touch POWER or MICROWAVE (on combination oven
models).
2. From the Cooking mode menu, touch KEEP WARM.
NOTE: The default power level is 10%.
3. Select a Keep Warm time (–:–:–). The maximum length is
01:29:59.
4. Touch START. The oven display will count down the cook
time.
When the stop time is reached, the microwave oven will shut
off automatically.
If enabled, end-of-cycle tones will sound.
5. Touch MICROWAVE CANCEL to turn off the oven.
NOTE: The microwave-cooling fan may continue to run for several
minutes after the cooking cycle has been completed. The
microwave cooking does not continue beyond the end of cooking
cycle.
Browning Pan
The Browning Pan feature uses the crisper pan, the broil element
and microwaves to crisp and brown foods. While microwaves heat
food from above, they also heat the pan from below to brown and
crisp the food.
Browning Pan can be used to saute meats and vegetables, pan
fry bacon and eggs, and to crisp and brown pizza and french fries.
Some Browning Pan cycles are programmed to preheat the empty
pan for 3 minutes before cooking begins. When the preheating
cycle is complete, the microwave oven will stop and prompt you to
add the food to the crisper pan. The microwave oven may prompt
you to turn over the food during the cycle.
■ Always use the crisper pan.
■ See the “Coated Crisper Pan and Handle” section before
using.
■ Microwave oven cavity and door will become very hot during
broil element use. The use of oven mitts is recommended.
■ The crisper pan will become very hot. Use the handle to grasp
and remove the pan from the oven. Do not place hot crisper
pan directly on heat-sensitive surfaces. Damage may occur.
■ To avoid damage to plastic utensils, do not use them with the
crisper pan as it becomes very hot and could melt the utensils.
■ Do not use metal utensils, as they can scratch the pan.
■ For best cooking results, do not use the pan in any other
microwave oven or in a thermal oven.
■ For best cooking results, do not place the crisper pan on the
grilling grid or convection grid. Always use the turntable as a
support for the pan.
■ For best results, coat pan lightly with cooking oil to make
removing food and cleaning easier.
Use the following chart as a guide when using the browning
function.
Preprogrammed Browning Pan
Times and cooking powers have been preprogrammed for
browning several food types.
Browning Pan Cooking Chart
FOOD QUANTITY
Manual*
Bacon 2–4 slices
Poultry breast, boneless 1–3 pieces
French fries 1–3 servings