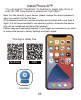
Model:P31 User Manual Wireless Camera (T-Series) Website: www.jennov.com Email: support@jennov.com US-Direct Line: 0013239021978 Please read this manual instruction carefully before use T.0021.
Ethernet Cable Connection Way Wireless(Hotspot) Connection Way Please scan above QR code,and watch operation video 01
Contents 1. Ethernet Cable Connection Way P04-P10 2. Wireless(Hotspot) Connection Way P11-P18 3. CamHipro Interface Instruction P19-P21 4. Motion Detection Setting P22-P24 5. SD Card Plan Recording P25-P27 6.
Install Phone APP You can search “CamHipro" in Android or Apple App store or scan the QR code below to download "CamHipro". Note: For the security of your device, please change the device password when you watch it for the first time. (The password must be a mixture of letters and numbers with more than 8 digits. It is not recommended to use special symbols, otherwise the device may not be recognized and cannot be viewed) Please keep your password properly.
Ethernet Cable Connection Way Sketches The following sketches are only for reference.The camera appearance may be different from the camera model you have ordered,but it will not make any difference to the settings.If you choose wireless connection way,please ignore "Ethernet cable connection way" part,and refer to "Wireless connection way" directly. Ethernet cable connection way:1.Power on your wifi camera 2.Connect your router and camera by Ethernet cable.
Ethernet cable connection way 01 Power the wifi camera. Connect your router and camera by Ethernet cable. (Please keep your phone and your camera are in the same Internet segment) 1.After installing CamHipro,please open it,and click "Add camera". 2.Choose “IP camera” .
Ethernet cable connection way 02 Choose "Device in use" Way 1 to add: input the UID by manual, or scan the UID QR code on the camera.
Ethernet cable connection way 03 Scan the QR code on the Camera to add the camera to App.
Ethernet cable connection way 04 1.After you add the UID,the default user name and default password are both:admin 2.
Set password 05 Note: For the security of your device, please change the device password when you watch it for the first time. (The password must be a mixture of letters and numbers with more than 8 digits. It is not recommended to use special symbols, otherwise the device may not be recognized and cannot be viewed) Please keep your password properly. If you forget your password, you need to restore the device to factory settings and add it again.
Ethernet cable connection way 06 Transfer the camera to Wifi connection: Setting--Wireless Setting--Find your Wifi signal--Input password of your Wifi--Apply After success, you can unplug the Ethernet cable. If fails,please reset the camera and do the connection again.
Wireless(Hotspot) Connection Way Sketches *When you use wirelesss/hotspot connection, only need plug in(don't connect the ethernet cable). (if you connect the Ethernet cable, will not find the hotspot/wifi signal) The following sketches are only for reference.The camera appearance may be different from the camera model you have ordered,but it will not make any difference to the settings.
Wireless(Hotspot) Connection Way 01 Wireless connection way doesn’ t need Ethernet cable. In phone “settings” --- “WLAN” please choose the camera's hotspot, Named as "IPCAM-XXX",password "01234567". When connect to camera hotspot successfully,please open the phone APP "CamHipro". Note: A.If you can't find camera hotspot,please press reset button for around 30 seconds, then try again. B.Please kindly note if you connect your camera with Ethernet cable,you'll not find the camera hotspot.
Wireless(Hotspot) Connection Way 02 Run CamHipro App--Click Add device--IP camera.
Wireless(Hotspot) Connection Way 03 Choose "New device", UID will show up, click to add this camera. New device: Devices never connected to the network after factory reset Device in use: Cameras that have been connected to the LAN/Internet. Scan QR code on the camera, can view the video.
Wireless(Hotspot) Connection Way 04 After you add the UID,the default user name and default password are both:admin Click "Add to" Choose your Wifi and input your wifi password--Configure wireless and add devices 15
Wireless (Hotspot) Connection Way 05 Can Name the camera--confirm Click the camera--View the video Click the setting gear--Do settings 16
Set password 06 Note: For the security of your device, please change the device password when you watch it for the first time. (The password must be a mixture of letters and numbers with more than 8 digits. It is not recommended to use special symbols, otherwise the device may not be recognized and cannot be viewed) Please keep your password properly. If you forget your password, you need to restore the device to factory settings and add it again.
Wireless (Hotspot) Connection Way 07 If you forgot to transfer camera hotspot to your home wifi when add it to your app, you can configure home Wifi by following steps: Setting--Wireless Setting--Find your Wifi signal--Input password of your Wifi--Apply If fails,please reset the camera and do the connection again.
CamHipro Interface Instruction (Full Screen Viewing) Note:Pan,tilt,zoom,preset,night vision mode and audio function only for some models.If you have question, please contact the seller.
CamHipro Interface Details Instruction (Full Screen Viewing) 1.Return:return to last interface 2.PTZ: Zoom in & Zoom out 3.Rotation: up,down,left,right 4.Toolbar:Mirrow/flip,Focus,Preset,Volume,night vision 5.Audio:live audio monitoring 6.Microphone:speak through the camera 7.Record:start to record video on phone 8.Screenshot:save picture on phone 9.SD & HD: SD-Stardard Definition;HD-High Definition toolbar 20 Mirror/flip Focus add... Preset p... Volume adju... Image adju... Night vision...
CamHipro Interface Details Instruction (Normal Screen Viewing) Set the functions you need via setting buttons.
Motion Detection Setting 01 1.Click "Setting" gear. 2.Alarm management and notification.
Motion Detection Setting 02 1.Receive alarm push: Enable 2.
Motion Detection Setting 03 1.When motion is detected,your phone will get notification. 2.You can play back the video to check what happens. 3.Please make sure the SD card is working.
SD Card Plan Recording 01 1.Select "SD card plan recording" 2.
SD Card Plan Recording 02 1.Enter "Advanced setting" 2.
SD Card Plan Recording 03 1.Select the day you want to modify and add a new time domain. 2.Set up the “Start recording time” and “End recording time” for the new time domain. 3.Click “confirm” to complete the settings.
Email Alarm Setting 1.Turn on “Motion detection alarm” and “Alarm capture sent to Email” at the same time. (Email alarm function will be activated only when you have enabled detection alarm function) 2.Click “Configure Email” ,take Gmail alarm as an example,please check below picture. Please kindly note the password is not your Gmail login password,it is a dedicated password generated randomly by Gmail.Please read manual from page 26 to page 30 to find the way how to obtain this 16-bits dedicated password.
Obtain Gmail password 01 1.Please login your Gmail account,and click “Security” ,and turn on “2-step Verification” . 2.Then a new page will appear,click “GET STARTED” .
Obtain Gmail password 02 3.Input your Gmail account password again to login and click “Next” . 4.In order to protect your account security,you will need to verify your mobile phone.Input your phone number and choose the verification way,Text message or Phone call,finally click “Next” .
Obtain Gmail password 03 5.Then enter the verification codes you obtained,and click “Next” . 6.After verified your identification,you can enable the 2-step Verification by clicking “TURN ON” .
Obtain Gmail password 04 7.After enabled the “2-Step Verification” function,return back to home page of your Gmail. 8.Choose “Security” and click “APP password” to enter next page.
Obtain Gmail password 05 9.Enter your Gmail password to login,and click "Next". 10.
Obtain Gmail password 06 11.Finally you will obtain the 16-bit password,then enter the password into NVR E-mail settings.
T-Series software settings on computer 01 1.Input "www.jennov.com" in browser. 2.Find "Support"--- "Download" 3.
T-Series software settings on computer 02 Dedicated search tool on computer-SearchTool Connect camera and router by Ethernet cable,please ensure that the camera and router are in the same network segment.
T-Series software settings on computer 03 Run the software "SearchTool",and the ip address of your camera will appear soon,double click the ip address to watch the live view in IE browser. If it is the first time for you to watch video in IE browser,you may unable to watch the video before download a plugin.Login user name:admin,password:******** The password is the password set when the phone is logged in. (If fail to install the plugin,please turn down the IE browser security level.
Camera search tool-SearchTool 01 Steps to set up motion detection on SearchTool Please click Settings>Alarm>Motion detection,then you can select detect areas and sensitivity level.
Camera search tool-SearchTool 02 Steps to set up wifi connection on SearchTool Enter System Settings>Network>Wireless. Please ensure you have turn on "Enable Wireless",then click "search", and select your wifi,and enter wifi password,finally click "Apply" to finish the wifi settings.
Camera search tool-SearchTool 03 Steps to set up Email alarm on SearchTool Please follow the steps as below picture shows to set up Email alarm via SearchTool,and you can refer to page 26 to page 30 to obtain the dedicated 16-bit password.
Playback on mobile phone 01 1.Remote playback is to play the videos recorded on the SD card. 2.Run CamHipro APP,and click playback icon to check the videos.
Playback on mobile phone 02 Select "Time playback". Drag the cursor to control the time point you want to playback. Select "image playback" See the saved snapshot image.
Hip2p password login Note: If you are watching directly on the computer, no password is required (provided that the phone is not connected). If you set a password for the camera on your mobile phone, you also need to set the password when viewing on the PC client. Open the client and click the + sign to add a device. At this time, if your phone has changed the camera password, it will prompt that the password is incorrect. Follow the steps below to use the client.
Remote view software on PC-HiP2P Steps to playback on HiP2P Please click "Remote playback",and you can select channel (your camera UID) and Choose date/Start Time/End Time to search the video files to playback.
Playback videos via IE browser You can playback local videos via IE browser. This function requires your camera and computer connect to the same router.
Dedicated video player download 01 1. Go to "www.jennov.com" 2. Find "Support" --- "Download" 3.
Dedicated video player download 02 1.You need to use special video play to playback downloaded video files or videos saved in your camera's SD card.(For H.264/H.265 video files) 2.With this player,you can convert H.264/H.265 files to AVI format and play it via other video player.
Dear Customer, Thank you for your purchase from us. We can promise all the products meet professional standards in surveillance industry. Hope you are satisfied with our product and service. If you have any problem in use our product, please contact Jennov Customer Service. Website: www.jennov.com Email: support@jennov.
Note: This equipment has been tested and found to comply with the limits for a Class B digital device, pursuant to Part 15 of the FCC Rules. These limits are designed to provide reasonable protection against harmful interference in a residential installation. This equipment generates, uses and can radiate radio frequency energy and, if not installed and used in accordance with the instructions, may cause harmful interference to radio communications.
measures: Reorient or relocate the receiving antenna. Increase the separation between the equipment and receiver. Connect the equipment into an outlet on a circuit different from that to which the receiver is connected. Consult the dealer or an experienced radio/TV technician for help. Warning: Changes or modifications to this unit not expressly approved by the part responsible for compliance could void the user’ s authority to operate the equipment.