0.0z3 EasyShot User’s Guide www.jenoptik-camera.
ENGLISH Table of Contents GETTING STARTED ............................................................................................................3 STANDARD ACCESSORIES ............................................................................................................ 3 Attaching the Wrist Strap ........................................................................................................... 3 Using the Soft Case .......................................................................
Magnifying and Trimming Still Images ............................................................................................ 20 Playing Back Movie Clips ........................................................................................................ 20 PLAYING BACK SOUNDS ............................................................................................................. 21 Recording a Voice Memo ..........................................................................................
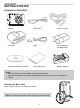
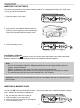
GETTING STARTED GETTING STARTED STANDARD ACCESSORIES Camera USB Cable Video out Cable Soft Case Strap 2 x AA Batteries (Rechargeable*) Software Installation CD-ROM Quick Start Guide Battery charger(*) NOTE: • Items marked with (*) are available as optional accessories. • Note that the shape of the charger plug depends on the area where you purchased the camera. Attaching the Wrist Strap Attach the wrist strap to your camera as shown.
GETTING STARTED Using the Soft Case When not using the digital camera, keep it in the soft case for protection.
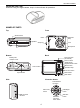
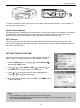
GETTING STARTED INSERTING THE BATTERIES The camera is powered by two AA-size alkaline batteries or rechargeable Ni-MH (min. 2000 mAh / 1.2V to get 250 shots) batteries. 1. Slide the battery cover open. 2. Insert two AA-size alkaline batteries with the positive(+) and negative(-) poles matching the directions indicated inside the battery room. 3. Close the battery cover. Low Battery Indicator A low battery indicator appears on the LCD screen when the batteries are nearly exhausted.
GETTING STARTED To remove the memory card, gently press on the edge of the card and release it. Pull the card out and close the battery cover. About Camera Memory The digital camera is equipped with internal memory. If the memory card is not inserted in the camera, all images and movie clips recorded by the camera will be stored in the internal memory. If the memory card is inserted, images and movie clips are stored on the memory card.
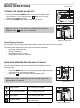
BASIC OPERATIONS BASIC OPERATIONS Power button TURNING THE POWER ON AND OFF 1. Press and hold the POWER button to turn on the camera in the 640 button to turn on the Record mode. Or you can press the 320 camera in the Playback mode. 2. Press the POWER button again to turn the power160 off. Hint: You can turn on the camera by pressing and holding the 640 button over 1.5 seconds.
BASIC OPERATIONS USING THE MENUS Recording Menu / Playback Menu When a menu screen is displayed, the arrow button and the SET button are used to make the desired settings. 1. Press the MENU button to display the menu. • The menu displays depends on whether you are in the Record mode or the Playback mode. 2. Press or to select a menu item. 3. Press or to change the setting. • In playback menu, press or to select an option, and then press the SET button to display a confirmation screen or apply the setting.
BASIC OPERATIONS ADJ. Menu You can quickly adjust the Aperture Value, Shutter Speed, White Balance, ISO, Exposure in Record 640 640 640 640 mode. 640 640 640 640 640 640 640 320 320 160 160 320 320 160 160 640 320 320 160 160 640 320 160 1. Press the SET button to display the320menu.
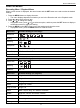
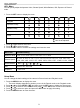
BASIC OPERATIONS Menu Item Available Setting Sounds Sets the camera sounds and volume. Auto Review Off / 3 sec. / 5 sec. Power Save 1 min. / 3 min. / 5 min. Date & Time Sets the date & time. Language English / Spanish / German / French / Italian / Portuguese / Dutch / Czech / Hungarian / Polish / Turkish / Russian / Japanese / Korean / S.Chinese / T.Chinese File No. Series / Reset TV Out NTSC / PAL USB Computer / Printer S.Image Sets the start-up image.
BASIC OPERATIONS USING THE LCD MONITOR The LCD monitor is used to compose images while recording, adjust settings and replay images.
640 RECORDING 320 160 RECORDING RECORDING STILL IMAGES 1. Hold the camera with both hands and make sure the camera is stable. mode. 2. Set the camera to the 3. Aim the focus area to the subject that you want to take and press the shutter release button halfway. • The focus area on the LCD monitor will light green when the camera is in focus. 640 • If the shutter speed is slow or the possibility that image may be blurred, the shake warning icon 320 may appear on the LCD monitor.
320 160 RECORDING Using the Flash Press flash button on the camera to set the various flash modes. A symbol appears on the LCD screen to indicate the flash mode. The flash cannot be used in movie recording mode. mode. 1. Set the camera to the • The flash function is only used in still image recording mode. button to change the flash mode: 2. Press the Display 640 320 Option A Description Flash fires automatically when shooting conditions require extra lighting.
RECORDING 640 320 160 Display Option - Single shot Description Record a single image. 2 2-SEC The shutter release will be delay for 2 seconds. 10 10-SEC The shutter release will be delay for 10 seconds. Double Record two images in a shot after pressing the shutter release button 10 and 12 seconds. Burst For capturing 4 images in succession. 640 320 640 160 320 3. Shoot the image. 160 Each • • • option automatically switches to single shot in the following situation: After each shot.
320 160 RECORDING RECORDING MOVIE CLIPS Your camera can record movie clips with audio. 1. Set the camera to the mode . • The LCD monitor displays the available recording time. 2. Press the shutter to start recording. 3. Press the shutter again to end recording. • The camera will stop recording automatically when the memory capacity has been reached. Note: • The voices of the movie clips are recorded from the microphone of the camera. Be careful to avoid touching the microphone while recording.
40 20 60 640 RECORDING 320 640 Display 320 160 160 Option Program Description All settings can be changed in this mode. Aperture priority The Aperture can be set manually in this mode. Shutter priority The Shutter can be set manually in this mode. Manual The Aperture value and Shutter speed can be set manually in this mode. Portrait Blurring the background to focus on the subject. Landscape Used for the wide scenic views.
RECORDING Using the Manual mode You can manually set the shutter speed and aperture to achieve a particular effect. NOTE: If the image would be underexposed or overexposed and correct exposure cannot be obtained, press the shutter release button halfway, the exposure value display on the LCD monitor turns red. Setting the Resolution and Quality You can select lower image resolution and quality to decrease the image size to capture more images.
RECORDING Setting the White Balance Adjust the white balance to match different light sources such as sunlight, incandescent (tungsten) lighting or, fluorescent lighting. Option AUTO Description Automatically corrects white balance. Ideal for general photography. Adjusts for bright sun conditions, or natural light conditions. Adjusts for cloudy days or twilight conditions Adjusts for normal indoor lighting conditions. Corrects the orange hue of household light bulbs.
RECORDING Setting the Metering There are 3 different light metering options available on your camera. Option Description Light is measured from the entire shooting screen, but gives more importance to the values near the center. Selects an exposure based on readings from multiple points in the subject area Selects an exposure based on a single reading taken from the center of your picture. 640 Setting 640 the Sharpness 320 You can select 160 whether you want the image to have sharp or soft outlines.
PLAYBACK PLAYBACK PLAYING BACK IMAGES 1. Set the camera to the Playback mode . 2. Press to play back the previous image; press Hint: Holding down or to play back the next image. scrolls images in a high speed. Using the Thumbnail When in Playback mode, you can view all your stored images in 640 640 thumbnail format. 320 320 640640 1. Set the camera to the 160 Playback mode . 160 320320 screen is displayed. 2. Press the zoom lever [W], a thumbnail 3.
PLAYBACK PLAYING BACK SOUNDS 1. 2. 3. 4. Set the camera to the Playback mode . to select the audio clip that you want to playback. Press or Press the SET button to start playing the audio clip. Press the MENU button to stop the audio clip, or press the SET button to pause it. • When audio clip paused, press the SET button again to resume. Recording a Voice Memo You can add a voice memo to the still images after you record it. 640640 320320 1. Set the camera to the Playback mode . to select 2.
PLAYBACK 5. Press the SET button to delete the image or press the MENU button to cancel. 6. Repeat step 4~5 to delete images. Hint: • To quickly delete the current display image 1. Select the image you want to delete. button to show a confirmation bar. 2. Press the 3. Press the SET button to delete the current display image. Deleting All Files You can use the Playback Menu to delete multiple files. 1. 2. 3. 4. Set the camera to the playback mode . ).
PLAYBACK EDITING IMAGES Rotating Still Images The still images can be rotated by various degrees. 1. Set the camera to the Playback mode . 2. Press or to select the image you want to rotate. 3. Press the MENU button, then press or to select ROTATE ). ( 4. Press or to select an option, and then press the SET button. 5. Press the SET button to confirm the change or press the MENU button to cancel. • The rotated image will be saved as a new file name.
PLAYBACK Setting Photo Effect You can change or correct photo effect directly on the camera. The changed/corrected photos can then be viewed or printed directly without the need to transfer them onto computer for further photo editing or enhancement. Photo Effect Description B&W Convert color photo into black & white photo. Sepia Add sepia tones to photo to make it looks like old photo. Neg. Art Convert photo color into its opposite color. Mosaic Turn photo into a series of mosaic tiles.
ADVANCE SETTINGS PLAYING A SLIDE SHOW You can set the camera to display images in a slide show. 1. Set the camera to the Playback mode . 2. Press the MENU button, using or to select SLIDE SHOW ) and press the SET button. ( ) and 3. Use the arrow button to set the playback interval ( ). repeat or not ( • You can set the interval between 1~10 seconds. 4. Press the SET button to start the slideshow, or press the MENU button to cancel.
ADVANCE SETTINGS SETTING AUTO REVIEW When Auto Review is enabled, you can view an image for a few seconds after you have taken it. Option Off Description The captured image will not automatically display after shooing. 3 sec. The captured image will display for 3 seconds after shooting. 5 sec. The captured image will display for 5 seconds after shooting. SETTING THE POWER SAVE For power consumption, you can set your camera to turn off automatically for a period of time. Option Description 1 min.
ADVANCE SETTINGS File Naming File name are followed by a 4-digit number that increases in sequence. File numbering starts from 0001 when a new folder is created. If the highest folder number is 999 and highest file number exceeds 9999, the camera will display the warning message “Folder cannot be created”. When it appears, try one of the following ways: • • Reset the file number and plug in a new memory card. Format the memory.
MAKING CONNECTIONS FORMATTING THE MEMORY To erase all data stored in the memory card if you are using a card, or all data stored in the internal memory if there is no card inserted. 1. Set the camera to the Setup Menu . ) then press or the SET button. 2. Press or to select FORMAT ( 3. Press the SET button to start format, or press the MENU button to cancel it. • A “BUSY...PLEASE WAIT” message displays and the memory card is starting format. • A “COMPLETED” message displays when finish formatting.
MAKING CONNECTIONS CONNECTING THE CAMERA TO A PC There are two ways to download files from the camera’s internal memory or memory card to a computer: • • by inserting the memory card into a card reader by connecting the camera to a computer using the included USB cable Using the Card Reader 1. Eject the memory from the camera and insert it in a card reader that is connected to a computer. 2. Open My Computer or Windows Explorer and doubleclick the removable drive icon that represents the memory card. 3.
PRINGTING PICTURES DIRECTLY PRINGTING PICTURES DIRECTLY There are two ways to print the stored pictures without the help of computer: Printing Pictures by Using SD Card 1. 2. 3. 4. Transfer the stored pictures from internal memory to SD card. Set the DPOF ( refer to the section “Setting the DPOF”). Insert the SD card into the SD card slot of the direct printing compatible printer. Refer to the instruction manual of the printer to print the pictures. Printing Pictures by Using a USB Cable 1. 2. 3. 4. 5.
SOFTWARE INSTALLATION(FOR WINDOWS USERS) SOFTWARE INSTALLATION(FOR WINDOWS USERS) SYSTEM REQUIREMENTS Windows: • PC with processor better than MMX Pentium 233 MHz • Windows XP/2000/ME/98SE • Minimum 32 MB RAM • USB port • CD-ROM drive • 800x600 pixels, 16-bit color display compatible monitor Macintosh: • Power Mac G3 or later • Mac OS 9.0, 9.1, 9.
SOFTWARE INSTALLATION(FOR WINDOWS USERS) INSTALLING YOUR CAMERA DRIVER Step 1 Make sure that your camera is not connected to the computer. Step 2 Make sure the computer is powered on and Windows 98SE/ME/2000/XP is running. Step 3 Close any other applications or software you may be running. Step 4 Insert the supplied CD-ROM into the CD-ROM drive. The installer will pop up automatically.
SOFTWARE INSTALLATION(FOR WINDOWS USERS) Click [Next]. Step 8 Step 9 Install progress bar. To ensure the complete installation and enable the camera to function well, please do select “restart your computer”. Step 10 INSTALLING XVID CODEC Note: To ensure the video clips can be played, please install XviD Codec. Step 1 Make sure that your camera is not connected to the computer. Step 2 Make sure the computer is powered on and Windows 98SE/ME/2000/XP is running.
SOFTWARE INSTALLATION(FOR WINDOWS USERS) The installation screen will appear. Click on Install XviD Codec. Step 6 Select the language. Click[OK]. Step 7 Click [Next>]. Step 8 Select “I accept the agreement” then click [Next>]. Step 9 Click [Next>].
SOFTWARE INSTALLATION(FOR WINDOWS USERS) Click [Next>]. Step 11 Click [Next>]. Step 12 Click [Next>]. Step 13 Click [Install].
SOFTWARE INSTALLATION(FOR WINDOWS USERS) Step 15 Install progress bar. Click [Finish]. Step 16 INSTALLING WINDOWS MEDIA PLAYER 9 Step 1 Make sure that your camera is not connected to the computer. Step 2 Make sure the computer is powered on and Windows 98SE/ME/2000/XP is running. Step 3 Close any other applications or software you may be running. Step 4 Insert the supplied CD-ROM into the CD-ROM drive. The installer will pop up automatically.
SOFTWARE INSTALLATION(FOR WINDOWS USERS) Read the License Agreement, then click “I Accpet”. Step 8 Step 9 The screen shows installing progress bars. When the installing is complete, the screen shows welcome page. Click “Next”. Step 10 Choose the privacy options according to your preference, then click “Next”. Step 11 Select or dis-select the file types that will use the Windows Media Player as default player. Then click “Finish”.
SOFTWARE INSTALLATION(FOR WINDOWS USERS) The screen shows the Windows Media Player window. Step 13 Step 14 Close the Windows Media player by clicking on the “X” on the left top corner or clicking “File Exit”. Note: If you have downloaded the video clips recorded with the camera onto your computer, you can click “File Open ...” to view the video clips immediately.
SOFTWARE INSTALLATION(FOR WINDOWS USERS) The installation screen will appear, Click on Install ArcSoft PhotoImpression 5. Step 6 Click [Next >]. Step 7 Click [Yes]. Step 8 Click [Next >].
SOFTWARE INSTALLATION(FOR WINDOWS USERS) Click [Next >]. Step 10 Step 11 The screen will show the status of the installation. You can choose to install DirectX 9 or not, then click [Finish]. Step 12 INSTALLING ADOBE ACROBAT READER (OPTIONAL) Step 1 Make sure your camera is powered off and not connected to the computer. Step 2 Make sure the computer is powered on and Windows is running. Step 3 Close any other applications or software you may be running.
SOFTWARE INSTALLATION(FOR WINDOWS USERS) The installation screen will appear, Click on Install Adobe Acrobat Reader 6. Step 6 “Recomposing data ...” status bar appear. Note for Win 98 SE users: As Adobe Reader 6 requires Internet Explorer 5.
SOFTWARE INSTALLATION(FOR WINDOWS USERS) Click [Next >]. Step 9 Click [Next >]. The files will be saved into C:\Program Files\Adobe\Acrobat 6.0 automatically. You may change the default folder by clicking [Change Destination Folder...] and selecting a different folder in your computer. Step 10 Click [Install] to start install the Adobe Reader 6. Step 11 Click [Finish].
SOFTWARE INSTALLATION(FOR WINDOWS USERS) USING ARCSOFT PHOTOIMPRESSION (FOR WINDOWS USERS ) You can use PhotoImpression 5 to transfer photos from the camera to your computer and or to edit/ enhance the photos saved on your computer. Follow steps below to transfer photos: 1. Connect the camera with your computer by using the supplied USB cable. 2. Launch PhotoImpression 5 by double clicking the icon representing the software on the desktop ). The screen as shown in figure 1.1 appears: ( (Fig. 1.1) 3.
INSTALLING SOFTWARE – FOR MAC USERS INSTALLING SOFTWARE – FOR MAC USERS Note for Mac users: If the video clips recorded with the camera cannot be viewed by using the QuickTime player bundled with your Mac system, please complete the following installation steps. For Mac OS 9 Users 1. Start up your computer and insert the software CD into your computer’s CD-ROM driver. 2. Double click “JD10 v100” icon on your desktop. 3. Double click DivX 5.1.
APPENDIX APPENDIX TROUBLESHOOTING Problem Cause Solution Battery is inserted in the wrong direction. Reload battery in the correct direction. Batteries are dead. Replace or recharge batteries. The battery compartment door is open. Make sure the battery compartment door is securely closed. The flash is charging. Wait for the flash to charge. The camera does not take pictures. Memory is full. Insert a new memory card. Memory card is not formatted correctly.
APPENDIX SPECIFICATIONS Sensor 10.13 Mega Pixels CCD / Size : 1/2.5 inch Lens Focal Length : f=7.94 ~22.71mm , 3X optical zoom, 4X digital zoom LCD monitor 2.4” TFT color LCD Focus Range Normal: 80cm ~ Infinity Macro: (W) 5cm ~ 100cm / (T) 25cm ~100cm Aperture F/2.8 ~ 5.1 Shutter 8 ~ 1/2000 sec. File Format Still Image: JPEG (EXIF 2.
APPENDIX GETTING HELP You can get help from the troubleshooting section, FAQ or Customer Support on our website. Troubleshooting Section in this User’s Guide Please refer to the Troubleshooting section first, as it contains some of the most common problems that users encounter. Website FAQ Please visit our website at www.jenoptik-camera.com to view the Frequently Asked Questions (FAQ).
APPENDIX SAFETY TIPS AND MAINTENANCE Cleaning the camera body Please use a soft dry cloth to clean the camera. Cleaning the lens and LCD 1. Blow off dirt or dust with a blower or canned air. 2. Gently wipe the lens and/or LCD with a micro-fiber cloth. 3. To remove dirt or residue, moisten the cloth with lens cleaning fluid and gently wipe the lens and/or LCD. CAUTION: Do not apply the fluid directly onto the lens or LCD.
APPENDIX • • temperatures may adversely affect the camera’s internal components and could cause a fire. Always use the camera and its accessories in a well-ventilated area. Allowing dust to accumulate in the camera over a long period of time is hazardous and in extreme circumstances may cause a fire. It is best to clean your camera prior to seasonal periods of high humidity. Precautions for batteries • Dispose of the battery in a manner that complies with applicable laws.
APPENDIX REGULATORY INFORMATION INFORMATION FCC WARNING: This equipment meets the limits for a Class B digital device, pursuant to Part 15 of FCC rules. Only the cable supplied with the camera should be used. Operation with other cables is likely to result in interference to radio and TV reception and could void the user’s authorization to operate this equipment. This device complies with Part 15 of the FCC Rules.
Visit Concord on the Internet www.jenoptik-camera.com JD 10.0z3 EasyShot User’s Guide Copyright 2006 Concord Camera Corp. Version 1.