CV2017J TV / DVD Combination USER MANUAL Please read this manual carefully before using this TV set and keep it for future reference.
PRECAUTIONS FCC WARNING-This equipment may generate or use radio frequency energy.Changes or modifications to this equipment may cause harmful interference unless the modifications are expressly approved in the instruction manual.The user could lose the authority to operate this equipment if an unauthorized change or modification is made. LASER SAFETY This unit employs a laser.Only a qualified service person should remove the cover or attempt to service this device,due to possible eye injury.
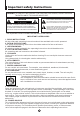
Important safety Instructions WARNING:TO REDUCE THE RISK OF FIRE OR ELECTRIC SHOCK, DO NOT EXPOSE THIS APPLIANCE TO RAIN OR MOISTURE. CAUTION RISK OF ELECTRIC SHOCK DO NOT OPEN CAUTION: TO REDUCE THE RISK OF ELECTRIC SHOCK, DO NOT REMOVE COVER (OR BACK). NO USER SERVICEABLE PARTS INSIDE. REFER SERVICING TO QUALIFIED SERVICE PERSONNEL THIS SYMBOL INDICATES THAT DANGEROUS VOLTAGE CONSTITUTING A RISK OF ELECTRIC SHOCK IS PRESENT WITHIN THIS UNIT.
Important safety Instructions 11. GROUNDING OR POLARIZATION This unit is equipped with a polarized alternating-current line plug (a plug having one blade wider than the other). This plug will fit into the power outlet only one way. This is a safety feature. If you are unable to insert the plug fully into the outlet, try reversing the plug. If the plug should still fail to fit, contact your electrician to replace your obsolete outlet.
Important safety Instructions 19. DAMAGE REQUIRING SERVICE Unplug this unit from the wall outlet and refer servicing to qualified service personnel under the following conditions: a. When the power-supply cord or plug is damaged. b. If liquid has been spilled, or objects have fallen into the unit. c. If the unit has been exposed to rain or water. d. If the unit does not operate normally by following the operating instructions.
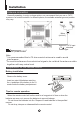
Installation Antenna connection Generally speaking, to enjoy a clearer picture, we recommend that you use a CATV system or an outdoor antenna .In different places, the suitable antenna type and position may vary. Mixer (not incl.) Antenna/ CATV input 75 standard coaxial type AC power socket Note: * It is recommended that a 75 ohm coaxial antenna is used to avoid interference. *To avoid interference from electrical signals, do not bind the antenna cable together with any mains lead.
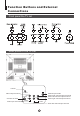
Function Buttons and External Connections Front panel the TV set CHANNEL Stop Rear panel of the TV set COAXIAL COAXIAL Antenna input socket Audio right channel output terminal Audio left channel output terminal Audio right channel input terminal Video output terminal OUT S-VIDEO S-Video terminal Video input terminal IN VIDEO L R AUDIO Audio left channel input terminal
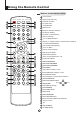
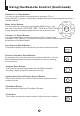
Using the Remote Control Buttons on the remote control Power Switch POWER CALENDAR TIME OPEN/CLOSE Open/close DVD Tray Calendar Function SCAN RECALL DISPLAY MUTE Channel Scan TV Time Menu Mute Sound 1 2 3 4 Return to Previous Channel 5 6 7 8 Channel / Track Selection 9 0 -/-- On Screen Display TV/AV (Non Functional) TV / AV Mode Selection TV/DVD Select 1 or 2 Digit Channel / Track Number Inputting TV / DVD Mode Selection CH+ Volume/Channel Adjusting VOL _ MENU VOL + EXIT Go to
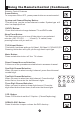
Using the Remote Control (Continued) Remote Control Features Power Button: To turn power ON or OFF , press power button on remote control. System and Channel Display Button: This will show you the current channel number. System type will also be displayed if set. POWER DISPLAY TV/DVD DVD/TV Button: Press this button to change between TV and DVD mode. Sleep Timer Button: This feature allows you to turn off television in pre-selected minutes (180.170,160, ........,10 and 0).
Using the Remote Control (Continued) Channel (+/-) Select Button: You can go up and down the channels by pressing CH (+) button and CH (-) button. This button can also be used in adjusting the functions in the Menu Mode. CH+ Menu Select Button: You can select the menu by pressing the MENU button. You can call on the menu (PICTURE, TIME, TUNE and FUNCTION) VOL _ by pressing the corresponding button on the remote control.
Menu Functions Information to user: This television receiver is equipped with close caption decoder and parental blocking technology as required by the FCC. Menu Functions Video Setup: Pressing MENU button once will bring the Video Setup menu on the TV. The following is shown on your TV screen: Video Picture Brightness Color Sharpness Hue Color Temp. 70 32 50 40 50 Neutral Follow the procedure below to adjust the picture quality of your choice: 1.
Menu Functions (Continued) Audio Setup: By pressing MENU button ,and then pressing VOL(-/+) buttons it will bring you to Audio Setup display. You will see the following menu on your TV screen: Audio Volume 45 Follow the procedure below to adjust the sound quality: Press VOL (+) button to increase and VOL (-)button to decrease the level to your preference. Timer Setup: By pressing MENU button ,and then pressing VOL(-/+) buttons it will bring you to Timer Setup display.
Menu Functions (Continued) Function Setup: By pressing the MENU button, and then pressing VOL(-/+) buttons, you will enter the Function Setup menu. You will see the following menu on your screen: Setup Language Background Black stretch VNR Fade AVL Soft Change C. Caption Demo mode English on on on off on off on Follow the procedure below to select one of the above options: 1.Press the CH(+) and CH(-) button to go up and down the menu. 2.
Menu Functions (Continued) Channel setup: By pressing MENU button ,and then pressing VOL-/+ button it will bring you to Channel Setup menu. You will see the following display on TV screen. Channel Channel System Air Cable Skip Current Ch. Fine Auto Program Auto Air off 2 Follow the procedure below to select above options: 1.Press the CH(+) and CH(-) button to go up and down the menu. 2.Press VOL (+) button or VOL (-) button to select your preference.
Menu Functions (Continued) Calendar: Your TV has been designed with a calendar. By pressing MENU button ,and then pressing VOL(-/+) buttons it will bring you to Calendar. You will see the following display on TV screen. OCT OCT OCT Calendar 2005 9 14 Follow the procedure below to adjust the Calendar date: 1. Press the CH(+/-) buttons to select the year item, the month item or the date item. 2. Press the VOL(-/+) buttons to change the year, month or day. 3. Press EXIT button to exit the calendar mode.
Menu Functions (Continued) PARENTAL LOCK Setup: Press the MENU Button on your remote control to go to Password menu, then input the password (0000). It will bring Parental Lock set up menu onto the screen. You will see the following menu on your screen: Parental Lock Passsword Password ---- Parental Lock TV Rating MPAA Rating Lock Menu Change Password off This function enables you to lock certain TV channels in accordance to the V-CHIP requirement established by the FCC.
Menu Functions (Continued) When MPAA Rating is selected, you will see the following rating table on your TV screen. MPAA Rating G U P G U P G - 1 3 R U U NC-17 U X U Parental Lock off means the lock function is turned off . If the Parental Lock is in "off" mode then function will not be active to accept the broadcast signal. Parental Lock on means the lock function is turned on. If the lock is in the "on" mode then function is activated to accept the broadcast signal.
Menu Functions (Continued) PARENTAL LOCK TECHNOLOGY: The "P.L. Technology" allows you to use U.S. and Canadian Movies and TV PROGRAMS Guide ratings to block certain types of TV programs and movies. To clearly understand TV program rating codes, read the following information: U.S. TV Program Ratings NR: Not Rated-this means that programs are not rated or rating does not apply. TV-Y: For all children - these types of rated programs are designed for a very young audience, including children from ages 2-6.
Menu Functions (Continued) To understand clearly about movie rating codes, read the following list: U.S. Movie Rating Chart NR: This means movie is not rated yet. It is pending government rating approval. G: General Audience-this type of movie rating means all ages admitted to see the movie. PG-13:Parents Strongly Cautioned - this type of movie rating means some material may not be appropriate for children under13.
DVD Features Basic Playback Preparations Press the DVD/TV button on the remote control or the TV to enter the DVD status. Basic playback 1. Press OPEN/CLOSE to open the disc tray, place a disc in the disc tray. There are two different disc sizes. Place the disc in the correct guide on the disc tray. If the disc is out of the guide, it may damage the disc and cause the DVD player to malfunction. Do not place a disc which is unplayable in this DVD player. 2.
DVD Features(Continued) Advanced Playback IMPORTANT NOTE: ALL DESCRIBED FUNCTION IS FOR DVD DISCS. IF YOU PLAY OTHER FORMAT DISCS, THE OPERATION AND ON SCREEN DISPLAY WILL BE DIFFERENT. CAPTION SUBTITLE Press " SUBTITLE ", the screen will display "SUBTITLE 01/XX XXXXX", "01" indicates the ordinal number of this language; "XX" indicates total number of language; "XXXXXX" indicates the language of country. (the number of language depends on disc).
Special Function Playback JPEG DISC PLAYBACK When a disc containing standard JPEG picture files is inserted into the player, a navigation menu will be displayed automatically. Use the UP and DOWN cursor buttons to select a file then press PLAY/ENTER. The slide show will commence. Press PREVIOUS or NEXT to move between pictures. Press pause to stop on the current picture. Press PLAY/ENTER to resume normal playing. A JPEG disc contains JPEG (.
DVD System Setup DVD System Setup General Setup Process SETUP 1.Press the SETUP button, the General Setup Page,Preference Page will be displayed in turn. 2.Press CH+/or b item, then press submenu. PLAY/ENTER to select, the to enter the or bu to select then 3.Press CH+/press PLAY/ENTER to confirm. 4.Press EXIT key or press SETUP repeatedly to exit the set-up menus. ..General Setup Page.. TV Display Angle Mark OSD Lang Spdif Output Caption Screen Saver . LB 4 3:Ps . On 4 3:Lb ENG 16 9 On Off ..
DVD System Setup(Continued) DVD System Setup General Setup Page ANGLE MARK: Users can select a particular camera angle .when playing a DVD which offers multiple angles. This item allows you to set Angle Mark ON or OFF. On Screen Display (OSD) Language: Users can select on-screen display language. ..General Setup Page.. TV Display Angle Mark OSD Lang Spdif Output Captions Screen Saver This DVD player includes three kinds of audio output: 1.
DVD System Setup(Continued) DVD System Setup Preference Page The Preference Page is only available when there is no disc in the player. These settings are applied consistently to all discs which are inserted and played. SETUP PLAY/ENTER PARENTAL: The parental control function works in conjunction with the different censorship classes assigned to DVDs. These classes help to control the types of DVDs that the family watches, There are up to 8 censorship classes for DVDs. ..Preference Page..
DVD System Setup(Continued) DVD System Setup SETUP DEFAULT: Resets all settings (except password and parental lock status) for this DVD player back to the manufacturers original settings. Press ENTER to perform the reset. ..Preference Page.. Parental Password Default Reset PLAY/ENTER Note: Some functions may not be available depending on the type of disc.
Playable Discs The following discs can be played: You cannot play discs other than those listed above. You cannot play non-standardized discs, even if they may be labelled as above. The performance of CD-R or CD-RW disc depends on the way the disc was burned. In a few cases, their performance may not be consistant or may not even operate at all. This DVD Player is designed and manufactured according to the Region Management Information that is recorded on a DVD disc.
Disc Protection and DVD Characteristics Compare DVD disc with other discs: DVD Encode method LD Digital/MPEG Singleside doublelayer 9.4G Doubleside doublelayer 17G 133 242 266 Playing Time minutes minutes minutes 484 minutes Capacity Disc diameter Singleside singlelayer 4.7G Double -side single -layer 8.
Connecting the TV set to the other video and audio equipment Connection of AV input /output terminal The figure below shows how to connect external equipment using AV signals. DVD Player VCR Audio right input Audio left input Video input Audio right output Audio left output Video output There is also an AV input on the front of your television. Use the Left Audio input (white terminal on the TV), if you are connecting equipment with mono sound.
Troubleshooting guide To assist in location possible faults use help guide below. BREAKDOWN PHENOMENON PICTURE SOUND CHECKING The aerial direction and connection Picture with snow Double or Triple Image Noise Normal This is called "ghosting" and can be minimized with an outside aerial, and good quality cable and terminations. Altering the aerial direction can also minimize this effect.
Specifications The specifications offered you here are for reference only. With product improvement there may be some differences between the description and the final product.