MP6312i Instruction Manual
MP6312i INTRODUCTION Congratulations on your purchase of the Jensen MP6312i Mobile Receiver. It’s a good idea to read all of the instructions before beginning the installation. We recommend having your Jensen MP6312i installed by a reputable installation shop.
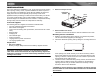
MP6312i INSTALLATION 2. Remove Transport Screws This unit is designed for installation in cars, trucks and vans with an existing radio opening. In many cases, a special installation kit will be required to mount the radio to the dashboard. These kits are available at electronics supply stores and car stereo specialty shops. Always check the kit application before purchasing to make sure the kit works with your vehicle.
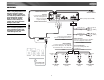
MP6312i 4. Place the radio in front of the dashboard opening so the wiring can be brought through the mounting sleeve. Follow the wiring diagram carefully and make certain all connections are secure and insulated with wire nuts or electrical tape. See “Wiring” on page 5. After completing the wiring connections, turn the unit on to confirm operation (vehicle ignition must be on). If the unit does not operate, re-check all wiring until the problem is corrected. 5.
MP6312i Technical Assistance If you require assistance, contact Technical Support at 1-800-323-4815 from 8:30am to 7:00pm EST Monday through Friday and from 9:00am to 5:00pm EST on Saturday.
MP6312i WIRING NOTE: The amplifier in this radio is only designed for use with four speakers. Never combine (bridge) outputs for use with two speakers. Never ground negative speaker leads to chassis ground. Failure to wire exactly as shown may cause electrical damage to the radio. MediaLink Connector Satellite Radio In Antenna Connect the antenna plug from the existing antenna cable (some vehicles require an adaptor).
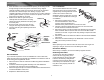
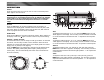
MP6312i FRONT PANEL RELEASE The front panel release button (4) releases the mechanism that holds the front panel to the chassis. Detaching the Front Panel To detach the front panel, first press the front panel release button to release the left side of the panel. Next, grasp the released side and pull it off the chassis. After removing the front panel, store it in the supplied carrying case to protect it from dirt and damage.
MP6312i OPERATION Power Press the power button (2) to turn the unit on. Press and hold the power button again to turn the unit off. NOTE: LCD panels may take longer to respond when subjected to cold temperatures for an extended period of time. In addition, the visibility of the numbers on the LCD may decrease slightly. The LCD display will return to normal when the temperature increases to a normal range.
MP6312i Equalizer Selector The equalizer function applies preset sound effects to the unit’s audio output signal. Press EQ (16) to step through the following equalizer options: “ROCK”, “HIP-HOP”, “DANCE”, and “EQ OFF”. When the equalizer function is activated, the most recently selected bass/ treble levels cannot be adjusted. When the equalizer function is not active, the unit will return to the most recently selected bass and treble levels.
MP6312i TUNER OPERATION The MP6312i allows you to receive channels in U.S.A. or EUROPE mode. See “Frequency Spacing” on page 8 to learn how to change the tuner options. MP6312i Preview Scan Press the SCAN button (14) to scan all strong stations in the current band. The unit will stop at each station for five seconds before continuing to the next station. Press SCAN again to stop scanning and listen to the current station.
MP6312i • Religious Music • Religious Talk • Personality • Public • College • Weather • Emergency Test • Emergency To search for stations in a PTY category: 1. Press the PTY button (15) to view the current PTY category. 2. Use the TUNE/TRACK >>| or |<< buttons (17) to move through the list of available categories. 3. After 2 seconds of inactivity, the radio will automatically scan and play the first station it locates in the selected category.
MP6312i CD PLAYER OPERATION Insert and Eject CD Insert a CD, label side up. To stop CD play and eject the CD, press the eject button (1). NOTE: The unit is designed for play of standard 5” (12 cm.) compact discs only. Do not attempt to use 3” (8 cm.) CD singles in this unit, either with or without an adaptor, as damage to the player and/or the disc may occur. Such damage will not be covered by the warranty on this product.
MP6312i MP3/WMA OPERATION MP3 and WMA (Windows Media Audio) music files are digital audio files that are compressed to allow more files on a single CD. This unit can play MP3/WMA directly from files contained on a CD-R/RW using the buttons on the receiver (or optional remote control) as described below. Many types of software are available for converting audio files into MP3/WMA formats. Jensen recommends Nero or Roxio Easy CD Creator.
MP6312i As a result, the order in which they are expected to be played may not match the order in which they are actually played. You may be able to set the order in which MP3/WMA files are to be played by writing them onto a medium such as a CD-R with their file names beginning with play sequence numbers such as "01" to "99". For example, a medium with the following folder/file hierarchy is subject to Folder Search, File Search or Folder Select as shown below.
MP6312i Navigating Folders Press the folder UP (21) button (also the “5” button) to advance 10 songs. Press the folder DN (20) button (also the “6” button) to move 10 songs in reverse. Press and hold the folder UP button to skip to the next folder or the folder DN button to return to the previous folder. Navigation Search 1. Press the AS button (13) twice. The LCD will display "Navigate". 2. Turn the rotary encoder (5) to navigate through all folders and subfolders on the disc.
MP6312i SATELLITE RADIO OPERATION Selecting a Station Press the TUNE/TRACK >>| or |<< button (17) to change to another station. Press and hold the TUNE/TRACK >>| or |<< button for more than one second to fast forward or fast reverse through the stations. Listeners can subscribe to XM® Radio on the Web by visiting www.xmradio.com, or by calling (800) 967-2346. Customers should have their Radio ID ready (see “Displaying the Identification (ID) Code”).
MP6312i NOTE: If the channel is unauthorized or invalid, “CH Unavail” appears on the LCD and the unit returns to the input interface after 2 seconds. Category Tuning Mode To select stations in a specific category, perform the following steps. 1. Press the AS button (13) twice. “CATEGORY” appears on the screen. 2. Turn the rotary encoder to move through the available categories. 3. Press the MENU button (5) to select the displayed category. 4.
MP6312i IPOD OPERATION MP6312i • CMPOSER Press the MENU button (5) to select an option. At any point, you can press the 6 UP button (21) to return to the previous option. Some search categories require multiple selections before accessing a track, depending on the file structure on your iPod and availability of items in a particular search category. For example, after selecting GENRE you may be required to select GENRE > ARTIST > ALBUM > SONG before accessing the desired track.
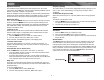
MP6312i REMOTE CONTROL The remote control will allow you to control the basic functions of the MP6312i. Replacing the Battery When the range of operation of the card remote control becomes short or stops functioning, replace the battery with a new lithium battery. Be sure to observe the proper polarity, as indicated below.
MP6312i CARE AND MAINTENANCE CD Player The following guidelines will help you extend the life of your CD player: 1. When cleaning the vehicle interior, do not get water or cleaning fluids on the unit. 2. The CD player will not operate properly in extreme hot/cold or under damp conditions. In case of such conditions, wait until the vehicle interior reaches a normal temperature or any condensation on the disc player lens has evaporated before using the player. 3.
MP6312i TROUBLESHOOTING Problem Does not operate (display does not light) No power to unit No speakers operate (display lights normally) Not all speakers operate Blows fuses Cause No power to yellow wire; no power to red wire Inline fuse blown Inline fuse blown Speaker harness not connected Corrective Action Check connection with test light; check vehicle fuse with test light Replace fuse Check/replace fuse Connect speaker harness; check speaker wires Incorrect splices or connections Speaker wires short
MP6312i SPECIFICATIONS *Specifications subject to change without notice. CEA Power Ratings Power Output . . . . . . . . . . . . . . . .18 watts RMS X 4 channels into 4-ohms @ < 1% THD+N Signal to Noise Ratio. . . . . . . . . . . . . . . 70dBA below reference (reference: 1 watt, 4-ohms) Frequency Response . . . . . 20Hz to 20kHz (-3dB), Auxiliary input used as source reference Reference Supply Voltage. . . . . . . . . . . . . . . . . . . . . . . . . . . . . . . . . . . . . . . . . . . . . 14.
Limited Warranty DO NOT RETURN THIS PRODUCT TO THE STORE CD or Multimedia Radios/Headunits Audiovox Electronics Corporation (“the Company”) is committed to quality and customer service, and are pleased to offer you this Warranty. Please read it thoroughly and contact the Company at 1-800323-4815 with any questions. Who is covered? The Company extends this warranty to the original retail purchaser of products purchased through an authorized Audiovox retailer in the U.S.A., Puerto Rico or Canada.
Audiovox Electronics Corporation Hauppauge, NY 11788 Technical Assistance: 1-800-323-4815 www.jensen.com © 2007 Audiovox Ver.