JCDWIN MOBILE CD PLAYER / RECEIVER Installation and Operation Manual
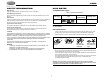
JCDWIN SAFETY INFORMATION DISC NOTES When Driving Compatible Disc Types Keep the volume level Iow enough to be aware of your surroundings. Table 1: General Disc Information When Washing your Vehicle Do not expose the product directly to water, as this can cause electrical shorts, fire or other damage. Disc Type Diameter/ Playable Sides Logo When Parked Audio CD Exposure to direct sunlight for an extended period of time can produce very high temperatures inside the mobile unit.
JCDWIN INSTALLATION Before You Begin 1. 2. 7. Disconnect Battery Before you begin, always disconnect the battery negative terminal. Remove Transport Screws 8. Important Notes • • • • • • • • Before final installation, test the wiring connections to make sure the unit is connected properly and the system works. Use only the parts included with the unit to ensure proper installation. The use of unauthorized parts can cause malfunctions.
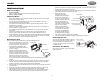
JCDWIN WIRING 15A FUSE A-A Wire Connector ACCESSORY/IGNITION (+) Connect to existing radio accessory fuse or +12 VDC switched power source. POWER ANTENNA Connect to power antenna or amplifier. If not used, tape bare end of wire. MEMORY/BATTERY (+) Connect to battery or 12 volt power source that is always live. The radio will not work if this wire is not connected. GROUND Connect to ground terminal or clean, unpainted metal part of chassis.
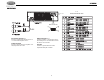
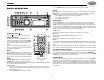
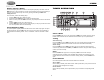
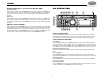
JCDWIN 3. BASIC OPERATION Press MODE again to cancel Aux In mode and return to previous mode. Reset 1 12 7 6 21 5 4 19 3 After releasing the control panel, use a pencil or any non-metallic object to press and hold the RESET button (17) for five seconds to reset the main unit. The unit will return to the factory default settings.
JCDWIN Display Selector (DISP) TUNER OPERATION This unit can display either the clock time or radio frequency/CD player functions. Press the DISP button (6) on the control panel or remote control to display the time for approximately 5 seconds. The correct time of day can be set by pressing and holding the DISP button. 1 12 7 6 21 5 4 19 3 2 Setting the Clock To set the clock, perform the following steps: 1. 2. 3. 4. 5. Press the DISP button (6) to display the clock.
JCDWIN Automatically Store / Preset Scan (AS/PS, AMS) CD OPERATION Automatically Store Select a band (if needed). Press the AS/PS button (16) on the control panel (or the AMS button on the remote control) for more than three seconds to automatically select six strong stations and store them in the current band. The new stations replace any stations already stored in that band. 1 Preset Scan 12 7 6 21 5 4 19 3 2 9 Select a band (if needed).
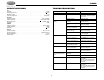
JCDWIN SPECIFICATIONS TROUBLESHOOTING CD S/N Ratio. . . . . . . . . . . . . . . . . . . . . . . . . . . . . . . . . . . . . . . . . . . . . . . . . . . . . . . . . . . > 70dB Sampling Frequency . . . . . . . . . . . . . . . . . . . . . . . . . . . . . . . . . . . . . . . . . . . . . . . . . 44.1Khz Quantization Bits . . . . . . . . . . . . . . . . . . . . . . . . . . . . . . . . . . . . . . . . . . . . . . . . . . . . . . . .1 bit Frequency Response . . . . . . . . . . . . . . . . . . . . . . . . . . . .
JCDWIN 9
ASA Electronics Corporation www.asaelectronics.com www.jensenrvdirect.com © 2009 ASA Electronics Corporation v.