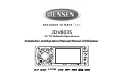
JDV8035 3.
JDV8035 Pour des instructions en Francais, référez-vous à la page 30. SAFETY INFORMATION When Driving Keep the volume level Iow enough to be aware of the road and traffic conditions. When Car Washing Do not expose the product to water or excessive moisture. This could cause electrical shorts, fire or other damage. CAUTION: To avoid an accident, the driver must not watch video while driving. This unit is designed to NOT allow video while driving.
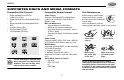
JDV8035 SUPPORTED DISCS AND MEDIA FORMATS Compatible Disc Formats Compatible Media Formats Disc Maintenance • • • Audio Format Playback CD-DA and MP3 or WMA digital music file on CD-ROM or DVD-ROM or Memory Card. MP3 and WMA notes: • Support Maximum of 2000 files • Maximum 30 characters displayed • Supported Sampling frequencies: 32kHz, 44.1kHz, 48kHz.
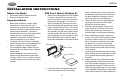
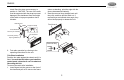
JDV8035 INSTALLATION INSTRUCTIONS Before You Begin DIN Front Mount (Method A) 1. Disconnect battery negative terminal. 2. Remove transport screws. 1. Slide the mounting sleeve off of the chassis if it has not already been removed. If it is locked into position, use the removal keys (supplied) to disengage it. The removal keys are depicted in “Removing the Unit”. 2. Check the dashboard opening size by sliding the mounting sleeve into it.
JDV8035 vided. Bend the strap, as necessary, to position it. CAUTION: The rear of the radio must be supported with the strap to prevent damage to the dashboard from the weight of the radio or improper operation due to vibration. Dashboard (when re-attaching, point the edge with the groove downward and attach). 2. Insert the removal keys straight back until they click, and then pull the radio out. If removal keys are inserted at an angle, they will not lock properly to release the unit.
JDV8035 DIN Rear Mount (Method B) This unit has threaded holes in the chassis side panels which may be used with the original factory mounting brackets of some vehicles to mount the radio to the dashboard. Please consult with your local mobile stereo shop for assistance on this type of installation. 1. Remove the existing factory radio from the dashboard or center console mounting. Save all hardware and brackets as they will be used to mount the new radio. 2.
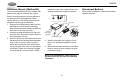
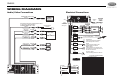
JDV8035 WIRING DIAGRAMS Audio/Video Connections SUB-WOOFER OUTPUT BLUE SUB-W OUT Electrical Connections SUB WOOFER FUSE (See Figure 1 ) GREY REAR CHANNEL RED BLACK YELLOW FRONT CHANNEL VIDEO IN AUDIO INPUT (RIGHT) AUDIO IN R AUDIO INPUT (LEFT) AUDIO IN L RED RED BLUE/WHITE STRIPE VCR or DVD or GAME CONSOLE AMP WHITE L-CH VIDEO INPUT (Not supplied) RCA-TO-RCA CABLES WHITE L-CH EXTERNAL REMOTE RECEIVER R-CH REMOTE 20-PIN AUDIO/POWER HARNESS Connect to power amplifier, If not used, Tape
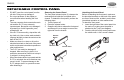
JDV8035 DETACHABLE CONTROL PANEL • • • • • • • DO NOT insert the control panel from the left side. Doing so may damage it. Do not put pressure on the display or control buttons when handling the front panel. The rear connector that connects the main unit and the D.C.P is an extremely important part. Be careful not to damage it by pressing on it with fingernails, pens, screwdrivers, etc. If the D.C.P becomes dirty, wipe with a soft, dry cloth only.
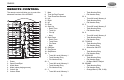
JDV8035 REMOTE CONTROL The remote control will allow you to control the advanced functions of the JDV8035. 9 12 1 2 10 8 5 15 MODE 4 11 VOLUME 16 6 17 13 3 14 AUDIO 18 30 37 34 31 19 38 20 21 GOTO 35 39 22 24 36 32 25 N ME U 7 DISPLAY 27 +10 33 40 29 23 28 26 1. 2. 3. 4. 5. 6. Power Open/Close/Eject Audio Menu Mode (select playing source) Volume Up Volume Down 7. Mute 8. Tune Up/Fast Forward 9. Tune Down/Fast Reverse 10. Left 11. Right 12. Up 13. Down 14.
JDV8035 29. Press repeatedly to select a number in the tens position for direct track entry (for example, to select track “44”, press the +10 button four times and then press the 4 button). 30. DVD MENU/PBC • DVD Menu • PBC (for VCD 2.0 and up) 31. SET UP Menu (Disc only) 32. REPEAT 33. ZOOM 34. DVD OSD (On Screen Display) 35. GOTO (direct entry) 36. SUBTITLE (DVD) 37. DVD TITLE 38. DVD AUDIO • DVD Audio • VCD Audio L/R/ST 39. ANGLE (DVD only) 40.
JDV8035 OPERATING INSTRUCTIONS Front Panel Open/Close This unit is equipped with an advanced full logic motorized slide down front panel. Press the OPEN button (8) to open the closed panel or to close the opened panel. WARNING: Always use the OPEN button to open/close the front panel. Never try to open/close the front panel manually, as this will cause serious and permanent damage to the slide mechanism and void the warranty.
JDV8035 Display Selector (D) System Menu (D/MENU) You can change the way playback information is displayed to suit your needs. Press the D/ DISP button (7) to alternate between the Image Display and Big Font Interface screens, shown below: Press and hold the D/MENU button (7) for more than 3 seconds to display the system menu. You can then press the D/MENU button repeatedly or press the tune/track |||< or >||| buttons (18, 19) to access menu items.
JDV8035 Date Set Turn the rotary encoder to adjust the DATE/ MONTH/YEAR. Press the rotary encoder (4) to confirm each entry and move to the next field. Programmable Turn-On Volume (Vol PGM) Turn the rotary encoder to select the default turn-on volume level. “VOL PGM 12” is the default setting. Clock Turn the rotary encoder (4) to the right to adjust the minutes or to the left to adjust the hour. Rear Speaker On/Off (Rear Spk) Turn the rotary encoder to turn the rear speaker on/off.
JDV8035 chart depicts the curve characteristics for each step: Bass Quality Factor Curve Characteristics Middle Quality Factor Curve Characteristics Middle To adjust Mid-Range options, press the rotary encoder (4) repeatedly until “Middle” appears in the display. Continue pressing the rotary encoder to access the following Mid-Range settings: • LEVEL Turn the rotary encoder clockwise to increase or counter-clockwise to decrease the Mid-Range level from “-6” to “+6”. “00” represents a flat response.
JDV8035 Balance To adjust the balance from “L12” (full left) to “R12” (full right), press the rotary encoder (4) until “Balance” appears in the display. Turn the rotary encode adjust the balance between the left and right speakers. “C00” represents a center balance. iX-BASS button (16) on the front panel and then use the rotary encoder to select “LOW”, “MID”, or “HIGH”. “XBAS” appears on the LCD. Press the IX-BASS button again to turn X-Bass off.
JDV8035 TUNER OPERATION AM/FM Band Selector (BAND) Press the B/BAND button (20) to change between three FM and two AM bands. Each band stores up to six preset stations. Manual Tuning Press the tune/track |||< button (18) to manually tune the radio station higher or press the tune/ track >||| button (19) to tune the radio station lower. Seek Tuning Press and hold the tune/track |||< button (18) to seek tune the radio station higher.
JDV8035 DISC OPERATION Insert Disc (OPEN) Controlling Playback Press the OPEN button (8) to open the front panel and reveal the disc slot. With the label surface facing up, gently insert the disc into the slot until the soft-loading mechanism engages and disc play begins. The front panel will close automatically and “Reading...” will appear on the screen while the disc loads. After inserting an audio disc, the player automatically plays the first track.
JDV8035 Disc Stop Press the 2/STOP button (11) to stop disc play and retain the playback position (DVD, VCD, CD). Press 2/STOP twice if you want to resume playback from the beginning of the disc. Press 1/PAUSE to resume disc play. NOTE: After the last track on a disc is played, the unit will stop playback. Press 1/ PAUSE to play from the beginning of the disc. Track Selection The Track Select functions are used to quickly access the beginning of a track/chapter.
JDV8035 function, the elapsed time of each track will be shown on the display panel.
JDV8035 on the control panel to view the elapsed playing time and remaining time. Press twice to additional DVD information including disc type, current title, selected angle, subtitle information, audio language, etc. Press a third time to return to normal viewing mode. DVD Video Title 1/1 Audio 1/4 Subtitle Off Angle 1/1 00:00:07 Chaptel -/- • • Use the tune/track |||< and >||| buttons (18, 19) on the control panel or the / buttons on the remote control to view the next/previous page of thumbnails.
JDV8035 MEMORY CARD OPERATION This unit can play MP3, WMA, JPEG and MP4 files stored on an SD or MMC Memory card. Inserting an SD or MMC Card 1. Detach the front panel. 2. Insert memory card with label side up. 3. Push in until a “click” is heard. Removing an SD or MMC Card Accessing Card Mode 1. Detach the front panel. 2. Push in until a “click” is heard. 3. Remove the card. After inserting an SD or MMC card, press the MODE button (9) to select “Card” mode.
JDV8035 DUAL ZONE OPERATION This unit is equipped with an advanced Dual AV Zone feature, which allows the user to select different modes of Audio and Video (AV) output for the Front and Rear Speakers and TFT screens (optional). For example, you can choose to the Tuner through the front speakers while playing a movie through the rear speakers.
JDV8035 Default Settings (Dual Zone “ON”) • When DUAL ZONE is turned on, the audio output will be muted for about 1 second. • The default source/mode for Front zone is “Tuner” and for Rear zone is "DVD". • The default Volume level is "12" for both Front and Rear zone audio output (or the selected VOL PGM level indicated in the System Setup menu). • The LCD display is defaulted to display the Front zone mode.
JDV8035 SYSTEM SETUP MENU 1. During DVD or CD playback, press and hold the AS/PS button (15) to access the System Setup Menu. 2. Use the tune/track |||< and >||| buttons (18, 19) on the control panel or the / buttons on the remote control to move left/right and select a menu category. 3. Press the rotary encoder to select a category and access the menu items. 4. Turn the rotary encoder to choose and menu item and then press to select. 5.
JDV8035 Password” and enter the current password. You can then enter a new password. Enter New Password Parental Control Select the appropriate rating level for the intended audience. You may override higher ratings by using your password. Misc Select “Use Default Settings” to restore the factory default settings for the Rating system only. • • No = Return to Use Default Setting Yes = Close Setup menu.
JDV8035 CARE AND MAINTENANCE Your new radio/CD/DVD player does not require any maintenance. However, proper understanding of its use and handling will help you obtain maximum enjoyment of its capabilities. We recommend that you keep this manual for reference on the many features of this unit as well as how to set the clock. The following points should be observed: • • • • • • • When cleaning the interior of the vehicle, do not get water or cleaning fluids on the unit.
JDV8035 SPECIFICATIONS CD-R and CD-RW Capability Technical Specifications Depending on media type and method of "recording / burning", some DVD's, SVCD's, VCD's and CD-R/RW's may be incompatible with this unit. After "recording / burning" the session must be closed. Please refer to your software's recommended procedures for closing a disc / session. Review your recording software to familiarize yourself with the correct "recording / burning" procedures.
JDV8035 28
JDV8035 Manual de L'Utilisateur
JDV8035 For instructions in English, refer to page 2. INFORMATION SUR LA SECURITE Lorsque vous êtes au volant Gardez le niveau de volume assez bas pour être conscient des conditions de la route et de la circulation. Lorsque vous lavez la voiture N'exposez pas le produit à l'eau ou à l'humidité excessive. Cela peut provoquer des court circuits, incendie ou d'autres endommagements. CAUTION : Pour éviter un accident, le conducteur ne doit pas regarder de la vidéo lorsqu'il est au Volant.
JDV8035 FORMATS DU DISQUE COMPATIBLES Formats du disque compatibles Formats media compatibles Maintenance du disque • • • Format audio CD-DA à reproduction, et MP3 ou WMA fichier digital de musique sur un CD-ROM ou un DVDROM ou une carte mémoire. Notes sur MP3 et WMA : • Soutient un maximum de 2000 files • Un maximum de 30 caractères affichés • Fréquence d'échantillonnage soutenue : 32kHz, 44.
JDV8035 INSTRUCTIONS D'INSTALLATION Avant de commencer 1. 2. Débranchez la pile. Enlevez les écrous de transport. Notes Importantes • • • • • • Avant l'installation finale, testez les connexions du câblage pour vous assurer que l'appareil est bien branché et que le système fonctionne. N'utilisez que les pieces founies avec cet appareil pour assure rune installation correcte. L'utilisation des pièces nonautorisées peut provoquer des mal fonctions.
JDV8035 8. et les attaches à resort la verrouille en place. Attachez l'un bout du courroie de soutien perforée (fournie) au clou à l'arrière du chassis en utilisant l'écrou hexagonal fourni. Resserre l'autre bout à une partie sûr du tableau de bord soit au-dessus soit au-dessous de la radio en utilsiant l'écrou et la rondelle fournis. Pliez la courroie comme nécessaire pour la positionner. Certaines installations dans des véhicules fournissent une cavité pour soutien à l'arrière.
JDV8035 Montage à l'arrière DIN (Méthode B) écrous plus longs peuvent nuire aux composants à l'intérieur du châssis. Cet appareil a des trous à visser dans les panneaux de côté du chassis qui peuvent être utilizes avec les equerres de montage d'origine d'usine de certains véhicules pour monter la radio sur le tableau de bord. ON vous prie de bien vouloir consulter avec votre boutique de stéréo portatif pour aide dans ce type d'installation. 1. 2. 3.
JDV8035 DIAGRAMME DU CABLAGE Connexions Audio/Video SALIDA SUB-WOOFER BLEU SUB-W OUT Connexions électriques SUB WOOFER (Non fourni) FUSIBLE JACK D'ANTENNE CONNECTEUR À DISTANCE DE CONTRÔLEUR D'EXTERNAL ROSE (Non fourni) GRIS BLANC REAR CHANNEL RCA-A-RCA CABLE ROUGE R-CH REMOTE RÉCEPTEUR DISTANCE DE CONTRÔLEUR D'EXTERNAL HARNAIS PUISSANCE/ AUDIO A 20-PIN (Voir Figure 1 ) L-CH Sonde externe a distance/Repeteur n'est pas inclus dans ce paquet. Vendu separement.
JDV8035 PANNEAU DE CONTRÔLE DETACHABLE • • • • • • • N'INSEREZ PAS le panneau de contrôle depuis la partie gauche. Cela peut l'endommager N'appuyez pas ssur les boutons d'affichage ou de commande lorsque vous manipulez le panneau d'avant. Le connecteur à l'arrière qui branche l'appareil principal et le DCP est une pièce de haute importance. Assurez vous qu'il ne soit pas endommagé à cause de l'appui avec des ongles, des crayons, des tournevis, etc.
JDV8035 TÉLÉCOMMANDE La télécommande vou permettra de contrôler les fonctions avancées de JDV8035. 9 12 1 2 10 8 5 15 MODE 4 11 VOLUME 16 6 17 13 3 14 AUDIO 18 30 37 34 31 19 38 20 21 GOTO 35 39 22 24 36 32 25 N ME U 7 DISPLAY 27 +10 33 40 29 23 28 26 1. 2. 3. 4. Power Open/Close/Eject Audio Menu Mode (sélectionne la source de reproduction) 5. Volume montant 6. Volume descendant 7. Mute 8. Syntonisation montant/Avance rapide 9.
JDV8035 29. Appuyez de manière répétée pour sélectionner un numéro dans la positions de dizaines pour entrée piste directe (par exemple pour sélectionner la piste 44 appuyez sur le bouton +10 quatre fois et puis appuyez sur le bouton 4). 30. DVD MENU/PBC • DVD Menu • PBC (for VCD 2.0 and up) 31. SET UP Menu (Disc only) 32. REPEAT 33. ZOOM 34. DVD OSD (Affichage sur l'écran) 35. GOTO (entrée directe) 36. SUBTITLE (DVD) 37. DVD TITLE 38. DVD AUDIO • DVD Audio • VCD Audio L/R/ST 39. ANGLE (DVD uniquement) 40.
JDV8035 INSTRUCTIONS D'OPERATION Panneau d'avant ouvrir/fermer Cet appareil est équipé d'un panneau d'avant au glissage motorisé à la logique avancée au bout. Appuyez sur le bouton OPEN (8) pour ouvrir le panneau fermé ou pour fermer le panneau ouvert. AVERTISSEMENT : Utilisez toujours le bouton OPEN pour ouvrir/fermer le panneau d'avant.
JDV8035 Sélectionneur d'affichage (D) Menu Système (D/MENU) Vous pouvez changer la manière don't l'information sur la reproduction est affichée pour aller avec vos besoins. Appuyez sur le bouton D/DISP (7) pour alterner entre les écrans de l'affichage image et l'interface Font Grand. Appuyez et maintenez l'appui sur le bouton D/ MENU (7) pour plus de 3 secondes pour afficher le menu système.
JDV8035 Réglage de date Tournez l'enchiffreur à rotiation pour ajuster la Date/Mois/Année. Appuyez sur l'enchiffreur à rotation (4) pour confirmer chaque entrée et aller au prochain champ. Tonalité Bip Tournez l'enchiffreur à rotation pour choisir si un bip audible sera entendu chaque fois qu'une fonction est sélectionnée : « BEEP ON » or « BEEP OFF ».
JDV8035 • la fréquence centre basse à 60, 80, 100 ou 200Hz. Facteur de qualité basse (BassQ) Tournez l'enchiffreur à rotation pour sélectionner l'une des options de Bass Quality Factor : 2N, 1N, 1W, 2W. La carte suivante dépeint les caractéristiques de courbe pour chaque étape : Caractéristiques de BASS • la fréquence de centre de gamme moyenne à 500Hz, 1KHz, 1.5KHz, ou 2.5KHz.
JDV8035 basse. Appuyez sur l'enchiffreur à rotation pour accéder et modifier les options suivantes : • Niveau : Tournez l'enchiffreur à rotation pour ajuster le niveau de caisson de basse de « 00 » à « 12 ». • LPF : Tournez l'enchiffreur à rotation pour ajuster le LPF (Filtre à passe bas) à 80Hz, 120Hz ou 160Hz. Bass Boost (iX-BASS) Lorsque vous écoutez la musique à des niveaux de volume bas, cette fonction va augmenter les gammes basses et aigues pour compenser les caractéristiques de l'ouie humaine.
JDV8035 OPERATION TUNER Sélectionneur de bande AM/FM (BAND) Appuyez sur le bouton B/BAND (20) pour changer entre les trois bandes FM et deux bandes AM. Chaque bande met en mémoire jusqu'à six stations préréglées. Syntonisation à la main Appuyez sur le bouton tune/track |||< (18) pour syntoniser la station de radio en montant ou appuyez sur le bouton tune/track >||| (19) pour syntoniser la station de radio en descendant.
JDV8035 OPERATION DISQUE Insérez un disque (OPEN) Commander la reproduction Appuyez sur le bouton OPEN (8) pour ouvrir le panneau d'avant et révéler la fente du disque. Avec l'étiquette en haut insérez doucement le disque dans la fente jusqu'à ce que le mécanisme à chargement doux s'engage et la reproduction du disque commence. Le panneau d'avant va automatiquement se fermer et « Reading » apparaîtra sur l'écran pendant que le disque se charge.
JDV8035 bouton +10 quatre fois et puis appuyez sur le bouton 4. Reproduction/Pause du disque Appuyez sur le bouton 1/PAUSE (10) pour arrêter la reproduction du disque. Appuyez sur 1/PAUSE de nouveau pour reprendre la reproduction du disque. Arrêter le disque Appuyez sur le bouton 2/STOP (11) pour arrêter la reproduction du disque et retenir la position de reproduction (DVD, VCD, CD). Appuyez sur 2/STOP deux fois si vous voulez reprendre la reproduction depuis le debut du disque.
JDV8035 4. Appuyez sur le bouton OK pour confirmer et commencer la reproduction. OK. Le dossier est ouvert et le contenu est affiché. Avance/Recul rapide Appuyez et maintenez l'appui sur le bouton track up (|||<) (18) pour avancer rapidement (>> x 2) ou le bouton track down (>|||) (19) pour reculer rapidement (<< x 2). Appuyez et maintenez l'appui sur le bouton track up/down plusieurs fois de suite pour ajuster la vitesse d'avance/recul rapide de x 2 à x 4, x 8 ou x 20.
JDV8035 • • • • • SUBTITLE : Appuyez pour sélectionner une langue de sous-titre aleternatif lorsque celui-ci est disponible. TITLE : Appuyez pour afficher le titre ou la liste des chapitres. Utilisez les boutons , , ou ou les boutons numériques pour entrer un numéro de titre ou chaptire et puis appuyez sur OK pour jouer. ANGLE : Appuyez pour sélectionner un angle de visionnement alternative lorsque celui-ci est disponible.
JDV8035 OPERATION CARTE DE MEMOIRE Cet appareil peut jouer des fichiers MP3, WMA, JPEG et MP4 mis en mémoire sur une carte de mémoire MMC ou SD. Insérer une carte MMC ou SD 1. Détachez le panneau d'avant. 2. Insérez la carte mémoire avec la face etiquette en haut. 3. Poussez jusqu'à ce qu'un clic soit entendu. Enlevez une carte MMC ou SD Accéder au mode carte 1. Détachez le panneau d'avant. 2. Poussez jusqu'à ce qu'un clic soit entendu. 3. Enlevez la carte.
JDV8035 OPERATION A ZONE DOUBLE Cet appareil est équipé d'une fonction avancée AV Zone Double, qui permet à l'utilisateur de sélectionner des modes différents de sortie Audio ou Vidéo (AV) pour les hauts parleurs d'avant et d'arrière et les écrans TFT (facultative). Par exemple, vous pouvez choisir le Tuner pour les hauts parleurs d'avant tout en jouant un film à travers les hauts parleurs d'arrière.
JDV8035 1. Appuyez sur le bouton MODE (9) pour changer à la source arrière. L'affichage aux cristaux liquides affichera le mode Source Arrière pour 10 secondes. 2. Dans 10 secondes, exécutez l'opération désirée pour la source arrière en utilisant la télécommande ou les boutons du penneau de commande. L'affichage aux cristaux liquides reviendra à la source avant après 10 secondes. A NOTER : La sortie caisson de basse n'est pas disponible lorsque le bouton 2-ZONE est appuyé.
JDV8035 MENU CONFIGURATION SYSTEME 1. Pendant la reproduction DVD ou CD, appuyez et maintenez l'appui sur le bouton AS/PS (15) pour accéder au menu configuration système. 2. Utilisez les boutons tune/track |||< et >||| (18, 19) sur le panneau de commande ou les boutons / sur la télécommande pour vous déplacer à droite/à gauche et sélectionner une catégorie du menu. 3. Appuyez sur l'enchiffreur à rotation pour sélectionner une catégorie et accéder aux articles menu. 4.
JDV8035 Rating Réglez le mot de passe Entrez un mot de passé à 4 chiffre pour activer la fonction Rating. Le mot de passe d'origine est 8888. Contrôle parental Sélectionnez le niveau de rating approprié pour l'assistance visée. Vous pouvez surpasser les ratings plus hauts en utilisant votre mot de passe.. Enter Password In Correct Password Activé, ce mot de passé sera exigé pour accéder au contenu restraint ou pour faire des changements au menu Rating.
JDV8035 SOIN ET ENTRETIEN Votre nouvelle radio/lecteur CD/DVD n'a pas besoin d'être maintenu. Cependant, une bonne compréhension de son utilisation et manipulation vous aidera à obtenir une jouissance maximale de ses capacités. Nous recommandons que vous gardiez ce guide pour référence sur les nombreuses fonctions de cet appareil aussi bien que la façon de régler l'horloge.
JDV8035 CARACTERISTIQUES Capacité CD-R et CD-RW Caractéristiques techniques Dépendant du type de media et de la méthode d'enregistrement, certains DVDs, SVCDs, VCDs et CD-R/RWs peuvent être incompatibles avec cet appareil. LA SÉANCE DOIT ÊTRE FERMÉE APRÈS L'ENREGISTREMENT. Veuillez vous référer aux procedures recommandées de votre logiciel pour savoir comment fermer un disque/une séance. Réviser votre logiciel d'enregistrement pour vous familiariser avec les proécédures correctes d'enregistrement.
ASA Electronics Corporation www.asaelectronics.com © 2008 ASA Electronics Corporation v.