.JE1912LED
• Names of each part (Front View) I Accessories . ..... . ..... . .. . .. ... . ... ............ . ... .· ............. 6 • Names of each part (Back View). . . . . . . . . . . . . . . . . . . . . . . . . . . . . . . . . . . . . . . . . . . . . . . . . . . . . . . . . . . . . . . . . . . . 7 • Mounting on a Desktop I Installation Precautions. . . . . . . . . . . . . . . . . . . . . . . . . . . . . . . . . . . . . . . . . . . . . . . . . . . . . 8 • Power Input Connections I Installing an Antenna . . . . .
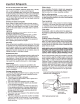
Important Information WARNING IMPORTANT SAFETY INSTRUCTIONS To reduce the risk of fire or electric shock, do not expose this product ot rain or moisture. 1) 2) 3) 4) 5) CAUTION-To reduce the risk of electric shock, do not 6) 7) perform any servicing other than that contained in the operating instructions unless you are qualified to do so.
Important Safeguards Before using your TV, please read these instructions completely, and keep this manual for future reference, Carefully observe and comply with all warnings, cautions and instructions placed on the unit or described in the operating instructions or se rvice manual. WARNING To guard against injury, the following basic safety precautions should be observed in the installation, use and servicing of the unit.
Important Safeguards Do not use this product near water Do not use near a bathtub, washbowl, kitchen sink, or laundry tub, in a wet basement, or near a swimming pool. Do not use immediately after moving from a low temperture to high temperature environment, as this cause condensation, which may result in fire, electric shock, or other hazards. This product should not be exposed to dripping or splasing and no objects filled with liquids, such as vases, should be placed on the product.
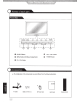
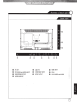
,... --SOURCE J MENU ,_ 2 CH- CH+ -~-- VOL+ VOL- - ~- POVIIER 5 8 SOURCE Button 8 VOL-/ VOL+ Button 8 MENU Button-OSD Menu Display Button ~ POWER Button C) CH-/ CH+ Button • The configuration of the components may look different from the following illustration. ~ AVCable users Guido ~?] ~v_ Battery 1.5V ( AA x 2) \!) DC Power Cable User's Guide Remote Control
0 0 L_] 0 DC1~V e USB Port 0 PC: I.
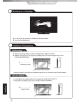
• Your LED TV can be mounted on a desktop with the base installed. • This is not a floor-standing unit. Wall Mounting • Please ensure enough space for safe use. (Please refer to diagrams A and B. ) • Installation of the LED TV in an improperly ventilated location can cause damage to the LED TV due to increased temperature. (Mounting on a wall) ;~~; Contact your dealer to purchase the 'J\djustable-angle wall mount" required for wall-mounted installation.
• Connecting to POWER INPUT +12V @ [:::::J DC 12V USB Ill I}SJ @ @ @ VGA A UD IO Y P!'l @ Pr 1 - fOIAPflt fi\T ~PI~ 1 . - Pr: N---1 .....I (+)12VDC 12V Power Cable (Included) (-)12VCC NOTE:Optional AC/DC adapter available. Optional Cigarette adapter available. For connecting to ATSC or NTSG broadcasts @ ~ DC 12V USB Ill I}SJ @ VGA AUDIO l - . - PC IN ---..1 Wall Jack with F-Connector @ @ Y Pb 1..- C0 '-' "0N f '< @ Pr YPt-~< ....J .
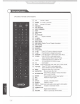
• Functions of remote control buttons
BUTION TV-FUNCTION DVD-FUNCTION BUTION TV-FUNCTION DVD-FUNCTION BUTION TV-FUNCTION DVD-FUNCTION POWER POWER 0 POWER 0! EPG CH+ CH- T-F 0 EJECT 8 !- .
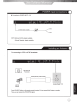
1. Check the polarity (+,-) of the batteries in the remote control. 2. Check that the batteries are good · Inserting Batteries in the Remote C,on~r~L , ,; 1. Open the cover completely. 2. Insert the two supplied batteries (AA, 1.5V). Ensure that the polarities(+ and -)of the batteries are aligned correctly. 3. Silde back the cover. Step3 it CAUTION : Risk of explosion if battery is replaced by an incorrect type. Dispose of used batteries according to the national code (Recycling program) .
• Connecting to the Composite terminal * Terminals vary by mani,Jfacturer VIDEO @ l L... @ AVOIC R (R) ("" 0 111 _J ijf Composite Cable (Included) Connect the LED TV's Composite In terminal to VCR's Composite OUT terminal using the included Composite cable. (Make sure the color of the terminals and the colors of the cable are the same.) • Connecting to a Digital Amplifier * Terminals vary by manufacturer. Digital Amplifier II II t ' (;) SPDIF Cable (Not Included) @ I @ AUD IO L.
• Connecting to the Composite terminal * In order to watch Cable TV, Subscribe to your local Cable TV company and install a separate receiver (Set-Top Box) * Terminals vary by manufacturer Cable broadcasting receiver 1~1 _t-\: = =-~- - - ~Com~pos~ite~Ca~b~le_l!(l~nc~lu~de~d)L_ _ . ,~ t. . ___ • : Connect the LED TV's Composite In terminal to the cable broadcasting receiver Composite Out terminal using the Composite cable.
• Connecting to the component terrninal * Terminals vary by manufacturer DVD I II t y 1:'1! Pr '''"'~';;;;;~; (R) (l) • (.;) e4F~e~ • r.l Audio cable (Not Included) 1. Connect LED TV's YPbPr terminal to DVD's Video Out terminal. 2. Connect LED TV's Audio terminals in YPbPr to DVD's Audio Out terminal. 3. You must match the component connection cable Y, Pb, Pr colors between the LED TV and DVD Player. • Connecting to the HOM I terminal @ :=1 OC 12V USH • . ~ V GA 1.
?II Terminals vary by manufacturer. @ t==J DC 12V USB .. [21 '•l @ @ VGA AUDIO V Pb L . . . - l'c-1 .. ___, @ ~COIIIPOt.E .. fVPLI p, ....J ' VGA Cable (Not Included) ····... ················ ...··· PC Audio Cable (Not Included) • Connect the LED TV's PC Input terminal to the PC's VGA terminal using a VGA cable. • Connect the LED TV's PC Audio terminal to the PC's Audio terminal using a 3.5mm (Headphone) audio cable.
• You can select between the TV signal and the input signal of other equipment connected to the TV. • Use this function to switch to the input source you wish to view. Press button on the remote control. Use to move to the desired input source. Press to select. Note: After you selected the desired input sorce. if stop operation a few seconds, then will automatically enter the selection mode. After connecting your TV antenna or Coaxial cable, turn the television ON.
1. 2. 3. Press the POWER button to turn the LED TV on. Press the MENU button on the remote control, the on-screen menu will appear. Use the LEFT and RIGHT buttons to select your main menu option. AUDIO MENU: PICTURE MENU: Allows you to make adjustments to your picture settings. Allows you to customize the sound options and effects. (select TV source for example) (Select TV source for example) TIME MENU: SETUP MENU: Allows you to set up a variety of time options.
Customizing the PICTURE Settings • Select TV source for example. (Press SOURCE button to select TV mode) 1. 2. Press the POWER button to tum the LED TV on. Press the MENU button on the remote control to display the Main menu, and use the LEFT and RIGHT buttons to select the PICTURE. 3. Use the UP and DOWN buttons to highlight an individual PICTURE option, use the LEFT and RIGHT buttons to change the setting, and press the MENU or EXIT button to exit.
Select TV source for example. (Press SOURCE button to select TV mode) Press the POWER button to turn the LED TV on 1. Press the MENU button on the remote control to display the Main menu, and use the LEFT and RIGHT 2. buttons to select_ the Audio 3.
Select TV source for example. (Press SOURCE button to select TV mode) 1. Press the POWER button to turn the LED TV on. 2. Press the MENU button on the remote control to display the Main menu, and use the LEFT and RIGHT buttons to select the TIME. 3. Use the UP and DOWN buttons to highlight an individual TIME option , use the LEFT and RIGHT buttons to change the setting, and press the MENU or EXIT button to exit.
Select TV source for example. (Press SOURCE button to select TV mode) Press the POWER button to turn the LED TV on. 1. Press the MENU button on the remote control to display the Main menu, and use the LEFT or RIGHT 2. button to select the SETUP. 3. Use the UP and DOWN buttons to highlight an individual SETUP option, use the LEFT and RIGHT buttons to change the setting, and press the MENU or EXIT button to exit.
Closed Caption Use Down button to highlight "CC Mode", then press RIGHT button or ENTER to enter into the following menu. CC Mode Allows you to select the CC Modes: On, Off and CC on Mute. Basic Selection Allows you to select the basic selections: CC1, CC2, CC3, CC4, Text1, Text2, Text3 and Text4. Advanced Selection Allows you to select the advanced services: Service1 , Service2, Service3, Service4, ServiceS and Service6.
Select TV source for example. (Press SOURCE button to select TV mode) 1. Press the POWER button to turn the LED TV on 2. Press the MENU button on the remote control to display the Main menu, and use the LEFT and RIGHT buttons to select the LOCK 3. Use the DOWN button to highlight "Enter Password", use the numeric keys to input 4-digit password. After that, the screen will display the next menu. After setting, press menu or exit button to exit. NOTE: The factory password is 0000.
Customizing the LOCK Settings • us Use Down button to highlight "US" , then press RIGHT or ENTER button to enter into the following menu. TV Use Down button to highlight "TV" , then press RIGHT or ENTER button to enter into the following menu. Use UP and DOWN buttons to select the desired rating and press ENTER button to block or unblock rating.
Use Down button to highlight "Canada" , then press RIGHTor ENTER button to enter into the following menu. Canada Canada English Use LEFT and RIGHT buttons to select among: E, C, C8+, G, PG, 14+ and 18+ Canada French Use LEFT and RIGHT buttons to select among: E, G, 8ans+, 13ans+, 16ans+ and 18ans+ RRT Setting ·----------·-·--·-··· ..··--·-·---·-·- ··-------.. ·----·--·--·-·----~.,---·--·"··· Reset RRT Allows you to reset the RRT setting.
Select TV source for example. (Press SOURCE button to select TV mode) 1. Press the POWER button to turn the LED TV on . 2. Press the MENU button on the remote control to display the Main menu, and use the LEFT and RIGHT buttons to select the CHANNEL. 3. Use the UP and DOWN buttons to highlight an individual CHANNEL option, use the LEFT and RIGHT buttons to change the setting, and press the MENU or EXIT button to exit.
If you select "Cable" as input signal in Antenna then you can select Cable Systems: Auto, STD, IRC and HRC. Use DOWN button to highlight "Start to Scan", then press RIGHT or ENTER buttonto search the channels automatically. The receivable channels will be stored automatically. When searching channels, press MENU to stop. Favorite Allows you to add these channels as the favorite channels. Use UP or DOWN button to highlight "Favorite" , then press RIGHT or ENTER button to enter into the following menu.
USB Settings The TV is a widescreen TV with a USB port. With the USB port the TV can access USB flash drives and display pictures or play MP3 files. To use this feature connect a USB flash drive to the USB port of the TV and press the SOURCE button to select USB to start browsing for music and pictures. In the USB function, select Photo In the Remote TV Mode: You can use the ~ or ~button to select Photo. You can use the • or T button to select the file you want and use the ENTER to view the file.
• In case a problem occurs with your LED TV, please take the following steps first. • If you still have the problem, turn the power off and contact your dealer or an authorized service center. Action Problem Is the power plug connected? Insert the power plug. Press the power button of the remote control. The screen does not appear.
19" TFTLED 250 1000:1 170°/160° DC 12V • The cabinet design and electronics specifications will be modified without prior notice for performance improvement.
•• electronics. ILE ELECTRONICS COMPANY SINCE 1977 www .asaelectronics.com www.jensenrvdirect.
Digital Television Transition Notice: This device contains a digital television tuner, so it should receive digital over the air TV programming, with a suitable antenna,after the end of full-power analog TV broadcasting in the United States on February 17 ,2009.Some older . television receivers ·if they rely on a TV antenna, will need a TV Converter to receive over the air digital programming,but should continue to work as before for other purposes( e.g.