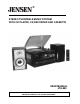
® STEREO TURNTABLE MUSIC SYSTEM WITH CD PLAYER, CD RECORDER AND CASSETTE USER MANUAL JTA-980 PLEASE READ THIS USER MANUAL COMPLETELY BEFORE OPERATING THIS UNIT AND RETAIN THIS BOOKLET FOR FUTURE REFERENCE.
DEAR JENSEN® CUSTOMER Selecting fine audio equipment such as the unit you've just purchased is only the start of your musical enjoyment. Now it's time to consider how you can maximize the fun and excitement your equipment offers. This manufacturer and the Electronic Industries Association's Consumer Electronics Group want you to get the most out of your equipment by playing it at a safe level.
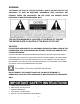
WARNING: TO REDUCE THE RISK OF FIRE OR ELECTRIC SHOCK, DO NOT EXPOSE THIS APPLIANCE TO RAIN OR MOISTURE. DANGEROUS HIGH VOLTAGES ARE PRESENT INSIDE THE ENCLOSURE. DO NOT OPEN THE CABINET REFER SERVICING TO QUALIFIED PERSONNEL ONLY. THE CAUTION MARKING IS LOCATED AT THE BACK OF THE UNIT THE RATING PLATE IS LOCATED AT THE BACK OF THE UNIT CAUTION: PLEASE READ AND OBSERVE ALL WARNINGS AND INSTRUCTIONS GIVEN IN THIS USER MANUAL AND THOSE MARKED ON THE UNIT. RETAIN THIS BOOKLET FOR FUTURE REFERENCE.
6. CLEAN ONLY WITH A DRY CLOTH. 7. DO NOT BLOCK ANY OF THE VENTILATION OPENINGS. INSTALL IN ACCORDANCE WITH THE MANUFACTURER’S INSTRUCTIONS. 8. DO NOT INSTALL NEAR ANY HEAT SOURCES SUCH AS RADIATORS, HEAT REGISTERS, STOVES, OR OTHER APPARATUS (INCLUDING AMPLIFIERS) THAT PRODUCE HEAT. 9. DO NOT DEFEAT THE SAFETY PURPOSE OF THE POLARIZED OR GROUNDING – TYPE PLUG. A POLARIZED PLUG HAS TWO BLADES WITH ONE WIDER THAN THE OTHER. A GROUNDING TYPE PLUG HAS TWO BLADES AND A THIRD GROUNDING PRONG.
18. OBJECT AND LIQUID ENTRY - CARE SHOULD BE TAKEN SO THAT OBJECTS DO NOT FALL AND LIQUIDS ARE NOT SPILLED INTO THE ENCLOSURE THROUGH OPENINGS. 19. REFER ALL SERVICING TO QUALIFIED SERVICE PERSONNEL. SERVICING IS REQUIRED WHEN THE APPARATUS HAS BEEN DAMAGED IN ANYWAY, SUCH AS POWER-SUPPLY CORD OR PLUG IS DAMAGED, LIQUID HAS BEEN SPILLED OR OBJECTS HAVE FALLEN INTO THE APPARATUS, THE APPARATUS HAS BEEN EXPOSED TO RAIN OR MOISTURE, DOES NOT OPERATE NORMALLY OR HAS BEEN DROPPED. 20.
CAUTION Note: This product complies with DHHS Rule 21 Subchapter J at date of manufacture. Follow the advice below for safe and appropriate operation. ON PROTECTION AGAINST LASER ENERGY EXPOSURE o o o o o As the laser beam used in this compact disc player is harmful to the eyes, do not attempt to disassemble the casing. Stop operation immediately if any liquid or solid object should fall into the cabinet. Do not touch the lens or poke at it.
DO NOT COVER ANY VENTS AND MAKE SURE THAT THERE IS A SPACE OF SEVERAL CENTIMETERS AROUND THE UNIT FOR VENTILATION. IMPORTANT NOTES Avoid installing the unit in locations described below: Places exposed to direct sunlight or close to heat radiating appliances such as electric heaters. Places subject to constant vibration. Dusty, humid or moist places. COMPLIANCE WITH FCC REGULATIONS This device complies with Part 15 of the FCC Rules.
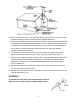
GETTING STARTED SPEAKER CONNECTION 1. Insert the speaker cable ends (exposed wires) into the terminals located on the back of the main unit by pushing down the lever of the left speaker terminal and then the right speaker terminal 2. Connect the left speaker to the left speaker terminals with the red wire to L+ and the black wire to L -. 3. Connect the right speaker to the right speaker terminals with the red wire to R+ and the black wire to R -.
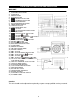
LOCATION OF CONTROLS AND INDICATORS MAIN UNIT 1) 2) 3) 4) 5) 6) 7) 8) 9) 10) 11) 12) 13) 14) 15) 16) 17) 18) 19) 20) 21) 22) 23) 24) 25) 26) 27) 28) 29) 30) 31) 32) 33) 34) 35) 36) 37) 38) 39) 40) 41) 42) TURNTABLE DUST COVER LCD DISPLAY ERASE BUTTON FINALIZE BUTTON – REPEAT PLAY BUTTON – RANDOM PLAY BUTTON POWER LED INDICATOR FM STEREO/MONO SELECTOR POWER ON/OFF SWITCH 3.5MM AUX-IN JACK 3.
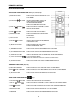
REMOTE CONTROL BUTTON DESCRIPTION EXCLUSIVE FUNCTIONS FOR CD-2 (1-7, 10-14, 16) 1) REPEAT BUTTON PRESS TO ACTIVATE CD REPEAT 1/ALL PLAY MODE 2) PLAY/PAUSE IN CD PLAYER MODE, PRESS TO START /PAUSE CD PLAYBACK.
BATTERY INSTALLATION The battery compartment is located on the back of the remote control. 1. Remove the battery compartment door by pressing in on the tab and lifting it off. 2. Insert two (2) AAA size batteries (included) into the battery compartment following the polarity markings inside the battery compartment. 3. Replace the battery compartment door. Battery Precautions Replacement of batteries must be done by an adult. Do not mix old and new batteries.
OPERATING INSTRUCTIONS LISTENING TO RADIO 1. Slide the POWER ON/OFF switch to turn the system "On", power LED indicator lights. 2. Select the desire band by pressing the AM/FM button on unit front panel until the LCD display shows your desire band (AM or FM). 3. Tune to your desired station with the TUNING knob. If FM STEREO mode is selected and you tune to a FM Stereo station, the FM STEREO LED Indicator will light. 4.
4. After the CD is read, the LCD display shows the total number of tracks. If a CD is not recognized by the player or if no disc is loaded, the display will show “- -“. NOTES: - Keep the CD disc tray closed when the system is not in use to prevent dirt and dust from entering the CD mechanism. Never place more than one CD in the CD tray. If two discs are loaded at the same time, the CD mechanism may jam and / or the discs themselves may be damaged. Play / Pause Mode 1.
7. To cancel the programmed selections, press the PROGRAM button and then the “STOP button until the “PROG “indicator disappears from LCD display. ” Important Notices: - Always press the “STOP ” button to stop CD playback and return the LCD to the original information before pressing the “OPEN/CLOSE ” button for disc changing. - Before opening the tray for either or CD-2, make sure the system is in the CD “STOP“ mode and you have deleted all programmed tracks.
- The CD burner is mainly designed for recording purposes. After recording, the recorded disc may be played back in CD 2, but it is only for checking your recording before finalizing. Please note that the first few seconds of the recording may not play in the CD 2 tray. We recommend only using the CD 1 tray (CD1/AUX mode) for normal CD playback. RECORDING FUNCTION ON CD-2 Apart from the CD playback function, CD-2 can perform the CD recording function either from CD 1, PHONOGRAPH, TAPE or AUX modes.
III) CASSETTE RECORDING 1) Press the TAPE function button to enter “TAPE“ mode. Get the tape ready for playback. 2) Press “REC “ button and then the CD “PLAY/PAUSE ” button at CD-2 until the recording indicator “ “ shows on LCD display. 3) After few seconds, the LCD will show the time counter and now the system is start recording process. Insert the cassette tape to start playback. 4) During the recording, you can record the desired session by pressing the track separation “ ” button.
Notes: - The time for finalizing is subject to the contents of the recording and it may take up to 15 minutes in some cases. - No buttons will work during the finalize process. - Never turn off the power or un-plug the power cord during finalize process. - The CD-R disc cannot be recorder again after finalizing. - Finalized CD-R discs can be played in ordinary CD players, but finalized CD-RW disc may not play in ordinary CD players.
LISTENING TO TAPE GENERAL OPERATION 1. Press the TAPE function button to enter the “TAPE” mode. 2. The system will start playback automatically after inserting the cassette tape. 3. Adjust the volume to the desired level. 4. Press the TAPE FAST FORWARD / EJECT button half way when playing, the tape will be advanced forward rapidly. 5. Slightly press the TAPE FAST FORWARD / EJECT button again to resume normal playback. The button will resume to the outermost position. 6.
BASS BOOST Press down the “BASS BOOST” button on the main unit if you want to enhance the bass when listening to the system. Press the button again to turn off bass boost effect. MUTE FUNCTION - Press the MUTE button on remote control to mute the sound output from speaker temporarily, no sound “NO SND” indicator will appear on display. - Press the MUTE button again to resume to normal speaker playback.
RESETTING If the system does not respond or has erratic operation, you may have experienced an electrostatic discharge (ESD) or a power surge that triggered the internal computer to shut down automatically. If this occurs, simply turn off the power by switching the POWER ON/OFF switch to “OFF” position and wait for three minutes, then turn the power ON again. CARE AND MAINTENANCE 1. 2. 3. 4. 5. Do not subject the unit to excessive force, shock, dust or extreme temperature.
COMPACT DISC CARE Handle the disc only by its edges. Never allow your fingers to come in contact with the shiny, unprinted side of the disc. Do not attach adhesive tape, stickers etc., to the disc label. Clean the disc periodically with soft, lint-free, dry cloth. Never use detergents or adhesive cleaners to clean the disc. If necessary, use a CD cleaning kit. If disc skips or gets stuck on a section of the disc, it is probably dirty or damaged (scratched).
TROUBLESHOOTING GUIDE SHOULD YOU EXPERIENCE DIFFICULTIES IN THE USE OF THIS PLAYER PLEASE REFER TO THE FOLLOWING CHART OR CALL 1-800-777-5331 FOR CUSTOMER SERVICE. PROBLEM The unit does not respond (no power) AM band is too noisy FM STEREO indicator does not light up POSSIBLE CAUSE The unit is disconnected from the AC outlet. AC outlet is not functioning. The reception at the set location is poor. You have tuned to a mono SOLUTION Reconnect to the AC outlet.
SPECIFICATION Power Requirement Main unit: AC120V~ 60Hz Remote control 2 x 1.5V “AAA” (UM-4) size batteries (included) Frequency Range Radio Band Power Consumption Main Unit: FM 88 ~ 108 MHz AM 530 ~ 1710 KHz 22Watts At Spectra, environmental and social responsibility is a core value of our business. We are dedicated to continuous implementation of responsible initiatives with an aim to conserve and maintain the environment through responsible recycling. Please visit us at http://www.spectraintl.
90 DAY LIMITED WARRANTY AND SERVICE VALID IN THE U.S.A ONLY SPECTRA MERCHANDISING INTERNATIONAL, INC. warrants this unit to be free from defective materials or factory workmanship for a period of 90 days from the date of original customer purchase and provided the product is utilized within the U.S.A. This warranty is not assignable or transferable.