PORTABLE CASSETTE PLAYER / RECORDER USER MANUAL MCR-100 PLEASE READ THIS USER MANUAL COMPLETELY BEFORE OPERATING THIS UNIT AND RETAIN THIS BOOKLET FOR FUTURE REFERENCE.
COMPLIANCE WITH FCC REGULATIONS This device complies with Part 15 of the FCC Rules. Operation is subject to the following two conditions: (1) This device may not cause harmful interference, and (2) This device must accept any interference received, including interference that may cause undesired operation. This equipment has been tested and found to comply with the limits for a Class B Digital Device, pursuant to Part 15 of the FCC Rules.
DEAR JENSEN® CUSTOMER Selecting fine audio equipment such as the unit you've just purchased is only the start of your musical enjoyment. Now it's time to consider how you can maximize the fun and excitement your equipment offers. This manufacturer and t h e E l e c t r o n i c Industries Association's Consumer Electronics Group want you to get the most out of your equipment by playing it at a safe level.
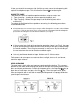
LOCATION OF CONTROLS 1 SPEAKER 6 MIC/REM JACK 2 RECORD/BATTERY INDICATOR 7 BUILT-IN MIC 3 DC IN 8 VOLUME 4 AUX IN (for mono recording) 9 DECK CONTROL BUTTONS 5 EARPHONE E‐3
POWER SOURCE The MCR-100 operates using the supplied AC Adapter (AC 120V ~ 60Hz) or with 4 X ’C' size (UM-2) batteries (not included). BATTERY OPERATION 1. Remove the Battery Door located on the bottom of the unit by carefully pushing the battery door towards the OPEN direction. The battery door can then be removed. 2. Following the polarity diagram shown in the battery compartment, insert 4 X `C' size (UM-2) batteries (not included) and replace the battery door.
TAPE OPERATION DECK CONTROL BUTTONS (#9) STOP / EJECT KEY Press to stop all deck operations. Press again to open the cassette door. FAST FORWARD KEY & REWIND KEY Press to start rapid tape winding in either forward or reverse direction. Press the STOP / EJECT key when the cassette spools stop turning PLAY KEY Press to start playing tape PAUSE KEY Press to stop the tape operation temporarily. Press again to resume RECORD KEY Press to start tape recording.
Insert the microphone plug into the MIC JACK (#6). If you use a microphone other than the one that is included, and it has a remote control plug, plug that into the REM JACK (#6). Audio Source – Connect the audio source to the AUX JACK (#4) using a mono patch cord (not included) and set the audio source’s volume to the desired level. 2. Press the STOP/EJECT to load a blank cassette tape. 3. Record: Both PLAY and RECORD buttons should be pressed simultaneously and recording starts. Notes: a.
If later you do wish to record on side A of the cassette, cover the tab opening with a piece of cellophane tape. This will allow the Record to function again. CASSETTE CARE Two common causes of trouble experienced when using cassettes are: 1) Tape Jamming – Leading to uneven speed in playback, and 2) Tape Tangling – Where the tape wraps itself around ital parts of the mechanism.
1. 2. 3. 4. Avoid operating your unit under direct sunlight or in hot, humid or dusty places. Keep your unit away from heating appliances and sources of electrical noise such as fluorescent lamps or motors. For better Clock Display clarity, avoid operating the unit under direct sunlight or in strong room illumination. Unplug the unit from the electrical power outlet immediately in case of malfunction.
90 DAY LIMITED WARRANTY AND SERVICE VALID IN THE U.S.A. ONLY SPECTRA MERCHANDISING INTERNATIONAL, INC. warrants this unit to be free from defective materials or factory workmanship for a period of 90 days from the date of original customer purchase and provided the product is utilized within the U.S.A. This warranty is not assignable or transferable.