
Owner's Manual


7
MP1516
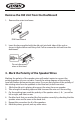
INSTALLATION TOOLS
Two removal wrenches are supplied for taking out the old unit and place with this
brand name car radio. The following tools and supplies may also be needed for
the installation, but are not supplied:
Installation Tools:
• Phillips Screwdrivers
• Wire Stripper
• Wire Cutter
• Hammer
• Pencil
• Electrical Tape
• Electric Drill
Installation Supplies:
• Machine Screws
• Crimp Connectors
• 14 Gauge Wire for Power Connections
• 14-16 Gauge Speaker Wires
•
BEFORE YOU INSTALL
Automotive audio equipment installations can be troublesome at times, even to
the most experienced of installation technicians. If you are not condent working
with electrical wiring, removing and reinstalling interior panels, carpeting,
dashboards or other components of your vehicle, please call your dealer in order
to have the unit professionally installed.
• If noise is still experienced when the motor of the vehicle accelerates, a choke
should be placed in line with the power to the unit. The installation company
will know what is required.
• When replacing the fuse(s) the replacement must be of the same amperage as
shown on the fuse holder. Never replace a fuse with another fuse of a dierent
value. If the fuse blows again please contact your installation company.
• Double check that all wiring and connections are correct before re-connecting
the battery and turning on the unit.
• After completing the installation and before operating the unit, reconnect the
battery, then press the RESET button with a pointed object, such as a ball-point
pen to set the unit to its initial status. After pushing the button, wait a few
seconds for the red light to ash.