
Operation Manual


MS30
3
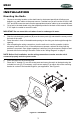
INSTALLATION
Mounting the Radio
1. Choose a mounting location on the dash board or instrument panel that will allow room
behind to run radio cables to the power source. Consider how you will use the AUX IN, LINE
OUT and USB connectors and route the appropriate extension cables to an accessible area.
2. Cut a hole in the dash board using the template provided in the back of this manual. At least
3 3/4” depth is needed to mount the radio.
IMPORTANT! Do not mount this unit where it can be submerged in water.
3. Slide the included spring washers (B) over the screw posts (A) and attach the screw posts to
the back of the radio.
4. Place the radio in front of the dashboard opening so the wiring can be brought through the
opening.
5. After completing the wiring connections, turn the radio on to confirm operation (vehicle
accessory switch must be on). If the radio does not operate, recheck all wiring until the
problem is corrected. Once proper operation is achieved, turn the accessory switch off and
proceed with final mounting of the radio. Refer to the “Wiring Diagram” on page 5.
NOTE: Before final installation, test the wiring connections to make sure the unit is
connected properly and the system works.
6. Insert the radio into the mounting hole.
7. Place the “U” bracket (C) over the screw posts and secure the radio to the dash using the
included hex nuts (D). If necessary, cut the score marks (E) on either side of the mounting
bracket to custom fit the bracket length for your application. See Figure A.
Figure A - Installation
A
C
D
E
B
3 Inch Hole