UV8020 Installation and Operation Manual
CONTENTS Thank you for choosing a Phase Linear product. We hope you will find the instructions in this owner’s manual clear and easy to follow. If you take a few minutes to look through it, you’ll learn how to use all the features of your new Phase Linear UV8020 Mobile Multimedia Receiver for maximum enjoyment. Preparation............................................................................................................................ 1 Installation ................................................
ii
UV8020 PREPARATION Congratulations on your purchase of the Phase Linear UV8020 Mobile Multimedia Receiver. It’s a good idea to read all of the instructions before beginning the installation. We recommend having your Phase Linear UV8020 installed by a reputable installation shop.
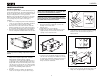
UV8020 INSTALLATION ISO DIN Installation This unit is designed to fit into a 2.0 DIN dashboard opening, found in many imported cars. The unit has threaded holes in the chassis side panels which may be used with the original factory mounting brackets of some Toyota, Nissan, Mitsubishi, Isuzu, Hyundai and Honda vehicles to mount the radio to the dashboard. Please consult with your local car stereo specialty shop for assistance on this type of installation. 1. 2. 3.
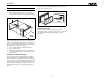
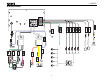
UV8020 CAUTION! Be careful not to damage the car wiring. 5. The 4 tabs on the trim ring will snap into four holes on top and bottom of the mounting sleeve. Complete wiring as illustrated in the wiring diagram on page 3. Once the wiring is complete, reconnect the battery negative terminal. If there is no ACC available, connect the ACC lead to the power supply with a switch. TRIM RING MOUNTING SLEEVE OPTIONAL MOUNTING TRIM RING SLEEVE Replacing the Fuse The fuse is located next to the wiring harness.
+ IGNITION SWITCH PURPLE/BLACK(-) BATT GREY(+) GREY/BLACK(-) PURPLE(+) REAR L BLACK YELLOW RED ACC BATTERY 4 RED BLUE - External Power Amplifier WHITE RED Rear Video 2 Rear Video 1 BLUE/WHITE Auto Antenna WHITE GND REAR R FRONT R FRONT L WHITE/BLACK(-) WHITE(+) GREEN(+) GREEN/BLACK(-) PINK (-) CAMERA VIDEO OUT 2 VIDEO OUT 1 FRONT L FRONT R REAR L REAR R SUBWOOFER REVERSE GREEN/WHITE (+) PRK SW YELLOW YELLOW YELLOW ANT.
UV8020 CONTROLS AND INDICATORS 1. POWER/MUTE Press to turn the unit on. Press and hold to turn the unit off. UV8020 MultiMedia Receiver When on, press to silence the receiver. Press again to resume the previous volume level. 2. SRC Press to select playing mode (SD, AV IN, DISC, Tuner). 3. VOL– Press to adjust the volume lower. 4. VOL+ Press to adjust the volume higher. 10 5. OPEN/EJECT Press to activate the automatic mechanical system and move the TFT monitor down to reveal the CD and SD Card slots.
UV8020 REMOTE CONTROL Table 1: Remote Control Functions Button Name MENU TITLE Function Ref# 1 2 DVD VCD 8 TUNER CD/MP3 Enters the main menu of the disc 23 4 1 11 Enters the title menu of the disc 20 MUTE 3 Toggles audio output on/off Toggles audio output on/off Toggles audio output on/off Toggles audio output on/off POWER/ 4 Turns the power on/off Turns the power on/off Turns the power on/off Turns the power on/off 13 REPT A-B 5 6 SUBTITLE 2 22 AUDIO 12 MODE Select STEREO
UV8020 Table 1: Remote Control Functions Button Name Function Ref# 24 DVD Decreases monitor tilt angle VCD TUNER Decreases monitor tilt angle Decreases monitor tilt angle CD/MP3 Decreases monitor tilt angle 25 Increases monitor tilt angle Increases monitor tilt angle Increases monitor tilt angle Increases monitor tilt angle OK 26 Confirms Entry Confirms Entry Confirms Entry Confirms Entry 1, 2, 3, 4, 5, 6, 7, 8, 9, 0, 10+ (Numeric Keypad) 27 Directly accesses chapter (press 10+ to move
UV8020 USING THE TFT MONITOR Open/Close TFT Monitor Image Setting Open TFT Monitor Table 2 shows the video output mode for each playing source. Press the EJECT button on the front panel (5) or remote control (23) to slide the monitor panel down and reveal the disc and SD card slots. Table 2: Video Output Modes Close TFT Monitor Playing Source Video Output Modes Press the EJECT button on the front panel (5) or remote control (23) to close the monitor panel.
UV8020 OPERATING INSTRUCTIONS Power On / Off Volume Adjustment Press the / button (1) on the unit (or the the remote control) to turn the unit on. Press and hold the button to power off the unit. The monitor is drawn back into the main compartment (if the Tilt function is in use). To increase or decrease the volume level, press the VOL-/+ buttons on the unit (3, 4) or on the remote control (15, 16).
UV8020 NOTE: If the unit is reset while a DVD is playing, the DVD resumes play once the reset is complete.
UV8020 DVD SETUP MENU ASPECT RATIO 4: 3 PS With 16:9 display, the left and right sides are cut off. SYSTEM LANGUAGE VIDEO 4:3 LB VIDEO FORMAT SCREEN SAVER ASPECT RATIO PASSWORD RATING DEFAULT EXIT SETUP PASSWORD RATING 16:9 Image is presented in wide view with a 16:9 aspect ratio. ____ Enter a 4-digit password to activate the “Rating” feature. The original password is “8888”. 1 KID SAFE 3 PG Use the , , or cursor buttons to choose between SYSTEM, LANGUAGE, or VIDEO setup options.
UV8020 TUNER OPERATION Tuner TFT Display Seek Tuning To seek the next higher station: 2 14 7 8 SRC 1 5 6 4 3 1. 2. 3. 4. 5. 6. 7. 8. 9. 10. 11. 12. 13. 14. 15. Touch the >>| button on screen. Press the >>| button (18) on remote control. To seek the next lower station: P 15 • • 87.50 1 EQ USER 2 3 4 5 01:13 6 SEL PS 13 11 • • 87.50 101.10 98.90 106.70 107.90 104.10 9 • 1 2 3 4 5 6 Touch the |<<| button on screen. Press the |<< button (17) on the remote control.
UV8020 DVD/VCD VIDEO OPERATION NOTE: When properly installed, DVD video cannot be displayed on the main TFT screen unless the parking brake is applied. If you attempt to play a DVD while the vehicle is moving, the TFT screen displays “DO NOT WATCH VIDEO WHILE DRIVING” with a black background. Rear video screens, if applicable, will operate normally. Inserting a Disc also change the source by touching the top left corner to display the “SOURCE” menu. Select “DISC” to access DVD mode.
UV8020 • • • TITLE: Press to display the title or chapter list. Use the , , or cursor buttons or the numeric buttons to enter a title or chapter number, and then press OK to play. ANGLE: Press to select an alternate viewing angle, if available. ZOOM: Press to zoom the picture at ZOOM 2, ZOOM 3, ZOOM 4, ZOOM 1/2, ZOOM 1/3 or ZOOM 1/4, or select OFF to return to normal view. NOTE: Feature availability is dependent upon DVD embedded information. Programmed Playback 1.
UV8020 Table 6: Disc Symbols Symbol Meaning Number of voice languages recorded. The number inside the icon indicates the number languages on the disc (maximum of 8). Number of subtitle languages available on the disc (maximum of 32). Number of angles provided (maximum of 9). Aspect ratios available. “LB” stands for Letter Box and “PS” stands for Pan/Scan. In the example on the left, the 16:9 video can be converted to Letter Box video. Indicates the region code where the disc can be played.
UV8020 DVD/CD AUDIO OPERATION Instructions for TFT control and Insert/Eject are the same for DVD and CD operation. Please see the DVD/Disc Video Operation section for information about these topics.
UV8020 CD Playback Information The following information is displayed at the top of the screen during CD playback: • • • TRK ##/## – “1/18” indicates the first of 18 tracks on the CD is currently playing. – “X” indicates repeat play is OFF, “1” indicates repeat track, and “A” indicates repeat disc.
UV8020 MP3/WMA OPERATION Instructions for TFT control and Insert/Eject are the same for DVD and MP3 operation. Please see the DVD/Disc Video Operation section for information about these topics. Media and File Requirements This player allows you to play back MP3 and WMA files recorded onto CD-R/RWs, DVD+R/RWs, DVD-R/RWs and SD cards. For CD-RW discs, please make sure it is formatted using the full method and not the quick method to prevent illegal disc operation.
UV8020 MP3 Player User Interface Controlling Playback Programmed Playback The on-screen indicators and touch key areas for MP3 playback are outlined below. Playing MP3/WMA Files 1. Press the PROG button (34) on the remote control to access the programmed playback screen: 2. Use the , , or cursor buttons to access the fields on the “PROG” screen. 1 2 3 4 SRC 001.01 002.02 003.03 004.04 005.05 006.06 13 12 SEL 11 12. 13. 14. 15.
UV8020 MP3 Playback Information The following information is displayed at the top of the screen during CD playback: • • • TRK ##/## – “9/150” indicates the ninth of 150 tracks on the disc is currently playing. – “X” indicates repeat play is OFF, “1” indicates repeat song, and “D” indicates repeat directory (folder).
UV8020 TROUBLESHOOTING Table 7: Troubleshooting Problem Cause Corrective Action GENERAL Unit will not power on Remote control does not function No/low audio output Radio Fuse blown Install new fuse with correct rating Car battery fuse blown Install new fuse with correct rating Illegal operation Press the RESET button located in the bottom right corner of the front panel Battery depleted Replace battery with new one Battery installed incorrectly Remove battery and install correctly Improper a
UV8020 Table 7: Troubleshooting Problem Disc does not play back Cause Corrective Action Disc is warped or scratched Use disc in good condition Disc is dirty or wet Clean disc with soft cloth Laser pickup is dirty Clean laser pickup with cleaning disc Incompatible disc is used Use compatible disc Disc rating exceeds Parental Lock rating limit Change Parental Lock settings to lower restriction Disc region code is not compatible with unit Use disc with proper region code Disc is inserted upside
UV8020 SPECIFICATIONS DVD/CD Player Compatible Disc Media: DVD + R / RW (Single and Dual Layer) and CD-R / RW Compatible Media Formats: CD-DA, MP3, WMA, VCD, SVCD, AVI, MPEG1 / 2, XviD, and Kodak picture CD (JPEG). Signal to Noise Ratio: > 95dBA Dynamic Range: > 90dB Frequency Response: 20Hz to 20 kHz, -3dB Channel Separation: > 60dB @ 1 kHz D/A Converter: Multi-Bit Sigma-Delta Modulator Video Format: NTSC, PAL (auto-detection) Output: 1Vp-p (75-ohm) Input: 1Vp-p (75-ohm) FM Tuner Tuning Range (USA): 87.
UV8020 24
Limited Warranty DO NOT RETURN THIS PRODUCT TO THE STORE CD or Multimedia Radios/Headunits Audiovox Electronics Corporation (“the Company”) is committed to quality and customer service, and are pleased to offer you this Warranty. Please read it thoroughly and contact the Company at 1-800323-4815 with any questions. Who is covered? The Company extends this warranty to the original retail purchaser of products purchased through an authorized Audiovox retailer in the U.S.A., Puerto Rico or Canada.
Audiovox Electronics Corporation Hauppauge, NY 11788 Technical Assistance: 1-800-323-4815 www.audiovox.com © 2007 Audiovox Ver.