
7315 Manual Italian User Manual


26
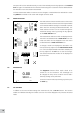
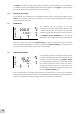
The toggle icon enables the large primary display to be set to show the absorbance or % transmittance.
To change the primary and secondary displays press the key adjacent to the toggle icon. Repeat presses
will cycle the displays between absorbance or % transmittance.
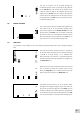
5.2.1 Selecting a Wavelength
The wavelength can be adjusted in the expanded operating menu by using the keys adjacent to the
arrow icons to increase or decrease the wavelength. Once the required wavelength has been selected
a calibration can be performed.
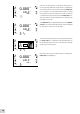
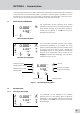
5.3 CALIBRATION
The calibration must be performed at the same
wavelength at which the sample will be measured. Insert
a cuvette containing the blank solution into the sample
chamber and close the instrument lid. Press the key below
the calibrate to zero absorbance icon. This sets the
instrument to zero absorbance and 100% transmittance.
Once the calibration is complete the measure sample icon appears and the sample can be measured.
If the wavelength is adjusted before a sample is measured the measure sample icon will disappear and
the instrument must be calibrated again at the new wavelength.
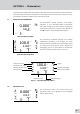
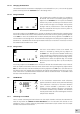
5.4 SAMPLE MEASURMENT
It is not possible to measure a sample before the instrument
has been calibrated at the selected wavelength. Once the
calibration has been performed the measure sample
icon is displayed and a sample can be measured. Remove
the cuvette containing the blank solution and place a
cuvette containing the sample to be measured in the
sample holder. Close the instrument lid and press the key
below the measure sample icon.
Once the measurement is complete the photometric result will be shown on the screen. Subsequent
samples can be measured in the same way. If the wavelength is adjusted between sample measurements
then the instrument must be calibrated again before more samples can be measured.
100.0
0.000
400
09 :02
%T
ABS
nm
81.7
0.088
400
09 :02
%T
ABS
nm