Genova Nano Spectrophotometer Micro Volume Accessory Accessory Fitting and Operating Manual 737 555 REV A/03-12
Safety Please read this information carefully prior to installing or using this equipment. 1. The unit described in this manual is designed be operated only by trained personnel. Any adjustments, m . aintenance and repair must be carried out as defined in this manual, by a person qualified to be aware of the hazards involved. 2. It is essential that both operating and service personnel employ a safe system of work, in addition to the detailed instructions specified in this manual. 3.
4. Es ist jederzeit auf die sicherheitsrelevanten Daten sämtlicher verwendeter Chemikalien Bezug zu nehmen. Allgemein anerkannte Labormethoden zum sicheren Umgang mit Chemikalien sollten eingesetzt werden. 5. Besteht der Verdacht, dass die Sicherheitsvorrichtungen in irgendeiner Weise beschädigt wurden, muss das Gerät außer Betrieb genommen und gegen weiteren Gebrauch gesichert werden. Die Störung sollte der zuständigen Serviceeinrichtung unverzüglich gemeldet werden.
Contents 2 Page SECTION 1 - Introduction 1.1 MICRO VOLUME ACCESSORY DESCRIPTION 1.2 MICRO VOLUME ACCESSORY SPECIFICATION 1.3 UNPACKING 3 3 3 4 SECTION 2 – Accessory layout and Installation 2.1 ACCESSORY LAYOUT 2.2 ACCESSORY REMOVAL 2.3 ACCESSORY INSTALLATION 2.4 INITIALISATION 5 5 5 7 7 SECTION 3 – Accessory Settings 3.1 ACCESSING THE MICRO VOLUME ACCESSORY SETTINGS 3.2 PATH LENGTH SELECTION 3.2.1 Known Path Length Measurements 3.2.
SECTION 1 - INTRODUCTION 1.1 MICRO VOLUME ACCESSORY DESCRIPTION The Genova Nano is a UV/visible spectrophotometer dedicated to life science analysis. This spectrophotometer incorporates a micro volume sample measurement accessory that allows sample volumes as low as 0.5μl to be analysed.
1.3 UNPACKING The Genova Nano is delivered with the micro volume accessory pre-installed and securely packaged in the spectrophotometers sample chamber. The protective packaging must be removed before the instrument is first initialised. Micro volume protective packaging (Remove) Fig 1.
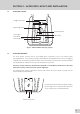
SECTION 2 – ACCESSORY LAYOUT AND INSTALLATION 2.1 ACCESSORY LAYOUT Linkage Connection Upper Read Head Read Head Cover Path Length Drive Motor Lower Read Head Side Covers 2.2 Fig 2.1 – Micro Volume Accessory Layout ACCESSORY REMOVAL The micro volume accessory will be pre-installed when purchased as part of the Genova Nano spectrophotometer. The accessory is optically matched to the spectrophotometer in which it is originally installed.
Remove the side covers by lifting them out Side Covers Screws 3 & 4 Remove the outer screws 3 and 4. Ensure that the inner screws 5 and 6 are not adjusted/removed. Screws 5 & 6 Linkage connection Disconnect the linkage connection from the bracket found on the underside of the spectrophotometer lid using the supplied Allen key and remove the read head cover. Read Head Cover View with linkage disconected and read head cover removed.
Carefully lift the micro volume accessory from the spectrophotometer sample chamber by rotating the accessory towards the right hand side so that the highlighted detector optic is not knocked during the removal of the accessory. Detector optic Rotate the accessory to the right to remove. Finally disconnect the communication cable Finally disconnect thepower power and and communication from the underside of the from cable the underside of the accessory PCB. accessory PCB. 2.3 2.
SECTION 3 – ACCESSORY SETTINGS SETTINGS SECTION 3 – ACCESSORY SECTION 3 – ACCESSORY SETTINGS 3.1 ACCESSING THE MICRO VOLUME ACCESSORY SETTINGS 3.1 ACCESSING THE MICRO VOLUME ACCESSORY SETTINGS 3.
3.2 PATH LENGTH SELECTION 3.2 PATH LENGTH SELECTION 3.2.1 3.2 LENGTH SELECTION Known Path Length Measurements 3.2.1 PATH Known Path Length Measurements 3.2.1 Known Path Length Measurements If the requiredmeasurement measurement path path length length is If the required is known known it it can be selected by pressing the button adjacent selected by pressing path the button Ifcan thebe required measurement length adjacent is known to it to the 0.2mm or 0.5mm path length setting icons. the 0.2mm or 0.
SECTION 4 – PERFORMING MICRO VOLUME MEASUREMENTS For detailed descriptions of the measurement modes that are available on the Genova Nano spectrophotometer please refer to the supplied Genova Plus operating manual. 4.1 PIPETTING SAMPLES ONTO THE MICRO VOLUME READ HEAD The Genova Nano spectrophotometer is designed to measure sample volumes ranging from 0.5μl to 5.0μl. Jenway recommends that users should, if possible, use at least 2μl of sample for their measurements. 1.
4.2 SAMPLE RECOVERY OR REMOVAL Once a measurement is complete, the sample solution can be recovered from the lower read head with a suitable pipette or removed from the read heads by cleaning with a suitable lint free cloth. 1. Open the lid of the spectrophotometer. The read head mechanism will open to allow access to the upper and lower read heads. 2. The sample can be recovered by carefully drawing the liquid that is retained on the lower read head into a clean pipette. 3.
SECTION 5 – CALIBRATION OF THE MICRO VOLUME SECTION 5 – CALIBRATION OF THE MICRO VOLUME ACCESSORY ACCESSORY SECTION 5 – CALIBRATION OF THE MICRO VOLUME ACCESSORY 5.1 Jenway recommends that micro volume accessory is calibrated everyA6setmonths. A set of Jenway recommends that the the micro volume accessory is calibrated every 6 months. of calibration Jenway that the micro volume isthecalibrated every spectrophotometer. 6 months.
2. 2.Select the digit to betochanged usingusing the keys Select the digit be changed the at keys 2.the Select digitscreen. to be changed using the keys bottomthe of the Use the keys adjacent at the bottom of the screen. Use the keys 2. Select the digit to changed using the keys arrow icons to be increase or decrease at the bottom the screen. Use the 2.to the Select the digit of to be changed using thethe keys adjacent to the arrow icons to increase or number. at the bottom of the screen.
3.3. 3. 4. 4. 4. The unit takes five dark and light readings at The unit takes five dark and light readings at 260 and 330nm, at both the 0.5 and 0.2mm 260 and 330nm, at both the 0.5 and 0.2mm pathlengths. pathlengths. The BlankSolution SolutionMeasurement Measurement icon The Blank icon willwill be be The Blank Solution Measurement icon will be displayed. Open lidlid and pipette displayed. Openthe theinstrument instrument and pipette Openofthe lid and pipette adisplayed. 2.
14. The new calibration factor values must now be verified by re-measuring the air, blank and 15. The Air Measurement icon will be displayed. standard values. Open the instrument lid and use a lint free 15.15. Thecloth AirAir Measurement will be be displayed. The icon will displayed. to Measurement clean the icon read heads. Close the Open the instrument lid and use a lint free cloth Open the instrument lid the and key useadjacent a lint free instrument lid and press to to clean the read heads.
SECTION 6 – CLEANING AND DECONTAMINATION OF THE MICRO VOLUME ACCESSORY 6.1 ACCESSORY CLEANING Wiping the sample from both the upper and lower read heads upon completion of each sample measurement with a lint free cloth is usually sufficient to prevent sample carryover and avoid residue buildup.
SECTION 8 – MAINTENANCE AND SERVICE 8.1 ROUTINE MAINTENANCE Ensure the external surfaces of the unit are clean and free from dust. The sample area should always be kept clean and any accidental spillage should be wiped away immediately. 8.2 SERVICE Our dedicated service team are on hand to help in the unlikely event that your Jenway equipment develops a fault. Please contact them by one of the following means with a clear description of the problem: E-mail: service@bibby-scientific.
SECTION 9 – TROUBLESHOOTING 9.1 SECTION ACCESSORY ERROR CODES 9 – TROUBLESHOOTING SECTION 9 – TROUBLESHOOTING SECTION 9 – TROUBLESHOOTING 9.1 ACCESSORY ERROR CODES SECTION 9 – code TROUBLESHOOTING If an error is displayed it will be accompanied by a clipboard icon and a number to indicate the 9.1 ACCESSORY ERROR CODES SECTION 9 – TROUBLESHOOTING 9.1 ACCESSORY ERROR CODES SECTION 9– of the error.
9.2 TROUBLESHOOTING GUIDE Issue Unable to achieve zero absorbance or 100% transmittance when calibrating Solution Ensure that there is not a sample on the micro volume accessories read head. Ensure the instrument lid is closed before and during the calibration. Ensure the lamp is working – if the lamp has failed please request service assistance. Unable to achieve a reading when measuring a sample Ensure the correct path length is being used.
SECTION 10 – GLOSSARY OF ICONS Mode 20 ICON Description Common Back key Common Tick icon - Done/yes Common Cross icon – Cancel/no Common Arrow icon – Move down, decrease Common Arrow icon – Move up, increase Settings 0.2mm path length setting / selected Settings 0.
SECTION 11 – CHEMICAL COMPATIBILITY Assay Chemical Concentration BCA Sodium bicinchoninate 1%* BCA Sodium carbonate 2%* BCA Sodium tartrate 0.16%* BCA Sodium hydroxide 0.1M* BCA Sodium bicarbonate 0.95%* BCA Copper (II) sulphate 0.08% Biuret Sodium potassium tartrate 0.9%* Biuret Copper (II) sulphate 0.3%* Biuret Potassium iodide 0.5%* Biuret Sodium hydroxide 0.08M Lowry Sodium carbonate 1.6% Lowry Copper (II) sulphate 0.032% Lowry Sodium potassium tartrate 0.
UK North & South America Middle East Bibby Scientific Ltd. Beacon Road, Stone Staffordshire ST15 0SA United Kingdom Tel: +44 (0)1785 812121 Fax: +44 (0)1785 810405 e-mail: sales@bibby-scientific.com www.bibby-scientific.com Bibby Scientific US Inc. t/a Techne Inc. 3 Terri Lane, Suite 10 Burlington, NJ 08016 USA Toll Free (in NA): 800-225-9243 Tel: +1 609 589 2560 Fax: +1 609-589-2571 e-mail: labproducts@techneusa.com www.techneusa.com Bibby Scientific Middle East Ltd.