INDS Data Manager for Windows Quick Start Guide
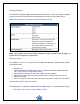
Getting Started The INDS Data Manager (IDM) for Windows Quick Start Guide leads you through installation and gets you started using download and programming functions for your INDS services. INDS Data Manager for Windows System Requirements NOTE: This software may not run properly and INDS is unable to provide technical support on systems that do not meet these requirements.
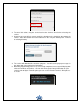
2. Click the Download IDM link and save the installation package file to your PC. 3. When the download is finished, minimize or close all browser windows. 4. Navigate to the location where you downloaded the package and continue with the installation instructions below. Installing IDM 1. Double-click the installation package (.msi) to start the installation process. 2. Follow the instructions in the Setup Wizard. Be sure to accept the License Agreement. 3.
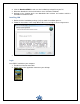
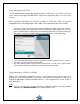
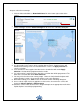
3. When the login dialog appears, enter your username and password. New User Interface The new graphical user interface for IDM for Windows is comprised of several areas. These areas provide you with the ability to easily find more information about your services, status, and media. Figure 1 Overview The Folders Area allows the user to create custom folders. The "All" folder will show all aircraft in the Services Area. To add a custom folder, click the plus (+) icon at the bottom of the Folders Area.
The Aircraft Filter provides a quick and easy way for you to narrow your search on a particular aircraft and the associated services. Select All to show all aircraft in the Services Area. The Services Area is where services are displayed based on the aircraft filter selection. You can drag and drop a service to the hard drive, USB drive, or CD-Rom. You can select multiple services by holding down the key and clicking with your mouse.
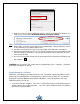
2. To cancel this action, drag the service back to the Services Area before releasing the service. 3. A pop-up message will ask you to specify the location on the hard drive to program the service. Enter the location and select Continue in the user-pick directory box. Point to an existing directory. 4. The service will download first and then program. You will receive pop-up messages in the upper right corner with status information. 5.
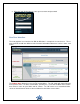
Programming to USB Drive You can download and program data updates directly to a USB drive. You must be connected to the Internet and logged into IDM before starting the programming process for your data services. Note: Honeywell recommends the USB be formatted in FAT32 file system to maximize compatibility across Data Management Units (DMU) / Data LAN Management Units (DLMU). 1. Click on a service in the Services Area that is Available for Update.
2. Drop the service to start the download process. When the download is complete, the status on the service will be Downloaded. Ready to program (offline). Offline 3. When ready, select the service that has been downloaded. Drag and drop the service on the USB drive in the Update Options Area. 4. You will receive pop-up messages in the upper right corner with status information. 5. When the programming process has successfully completed, a message will display with a link to View Alerts and notices.
2. Click on an Electronic Charts service in the Services area with a status of Available for Update and drag to the CD in the Update Options area and drop the service to start the programming process. 3. To cancel this action, drag the service back to the Services area before releasing the service. 4. The service will download first and then program. You will receive pop-up messages in the upper right corner with status information. 5.
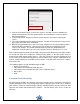
Steps to subset chart coverage: 1. Click the Subset:Available >> Download Charts link in the lower right section of the service. 2. After completing the download, the service will have a link called Subset: Not Applied >> Select Coverage. Click the Select Coverage link to access the subsetting dialog box. 3. Use the mouse to drag the selection box around the map. 4. Use the handles in the corners of the selection box to resize it.
Uninstalling IDM For Windows, there are two methods of removing the application from your PC - the Control Panel and the installation file. Go to the Control Panel > Programs and Features (for Windows 7). Highlight the INDS Data Manager software, and click Uninstall from the list of options. You can also remove the application by using the installation file (.msi) that may have been saved to your computer during the installation process (if you selected Save). Double click on the .msi file.
If you encounter any problems while using INDS Data Manager, please refer to the Google Groups forum to see if others are experiencing the same issue and if a solution has been posted. The Google Groups forum is located at the following link: https://groups.google.com/forum/#!forum/inds-data-manager-for-pc. Access to the Google Group is by invitation only. You must accept the invitation to join the Google Group before you will be able to post and review comments.