
Product Manual


14
14.0 Adjustments
14.1 Replacing load chain
Over time, the load chain will wear or elongate.
This can cause damage to hoist, breakage, or non-
engagement of the load sheave. The following
procedures describe replacing the load chain for
single and multiple fall hoists. These procedures
should be performed by qualified persons only.
It is recommended that after installing new chain,
the first few lifts be limited to no more than 25-50%
of rated load capacity. Thoroughly inspect new
chain for twist before placing hoist into routine
service.
14.2 Cutting chain
Use eye/face protection when
cutting chain.
Use a bolt cutter with special cutter jaws for cutting
hardened chain. Cut only one side of the link at a
time. When making the second cut, place a mat
over the chain to catch the flying chain section.
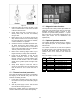
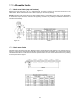
14.3 Making a C-Link
Replacing load chain will require the use of a C-link
(in some cases, two C-links), which you can easily
make as follows:
1. Cut a link from the old chain.
2. Cut the weld from the link leaving an opening
approximately 1.25 times the diameter of the
link material. See Figure 11.
3. Grind the cut areas smooth and remove all
burrs.
Figure 11
14.4 Single fall chain hoist
1. Lower the load hook until only 1 to 2 feet of
slack chain remains in the chain container.
2. Remove chain container.
3. On the slack side of the chain, remove the
chain stop, spring, and limit block (Figure 12).
Keep these handy for later re-installing.
4. Using a C-link, connect the new chain to the
old chain. Be sure vertical link welds face
away from load sheave (see Figure 13 and its
accompanying text).
Figure 12
5. Keep tension on both sides of the chain and
lower the load hook to pull the new chain
through the hoist. Do not let the chain twist or
bind as it is being pulled through the hoist.
6. Stop hoist when 1 to 2 feet of new chain
remains on the slack side.
7. Install the limit block, spring and chain stop on
the slack end of the chain.
8. Continue lowering the load hook until the new
chain clears the load hook. Inspect condition of
both spring and hook.
9. Lower load hook until the limit switch stops
hoist movement. Inspect the chain for any
signs of twist.
10. Install chain container, making sure to install
the self-locking nut on the screw. Do not fill
chain container by hand.
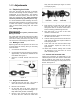
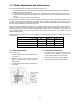
14.5 Vertical and horizontal links
Vertical and horizontal are determined by the
relationship to the load chain sheave. Vertical links
will be guided by the center slit in the sheave.
Horizontal links will engage the oval pockets on the
sheave. See Figure 13.
Figure 13