
Product Manual


15
14.6 Dual/multiple fall chain hoists
The link on the load side end
must be a vertical link. If it is a horizontal link,
the chain will have a twist in it.
1. Lower hook until only 1 to 2 feet of slack chain
remains in the chain container.
2. Remove chain container.
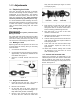
3. On the slack side of the chain, remove the
chain stop, spring and limit block (see Figure
12). Keep these handy for later re-installing.
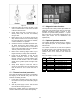
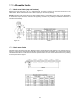
4. Using a C-link(s), connect the new chain to the
old chain. If the end link of the old chain is
horizontal, use two C-links. If the end link of
the old chain is vertical, use one C-link. See
Figure 14. Using the correct number of C-links
will properly orient the chain, and ensure that
the first link on the load side end is a vertical
link.
Figure 14
5. Install the limit block, spring, and chain stop on
the opposite end of the new chain.
6. Support the load hook so that the load chain
can pass through the chain sheaves smoothly.
7. Press the DOWN button to move the chain
through the hoist. Keep tension on the chain
as you pull it through to the load side, until the
C-link(s) clears the hoist at the load side.
Continue pressing DOWN until the new chain
clears the load hook.
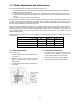
8. Place the first link of the new chain into the
load side end holder (Figure 15). Be sure there
is no twisting of chain between last chain
sprocket and load side end holder.
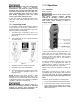
Figure 15
9. Install chain container, making sure to install
the self-locking nut on the screw. Do not fill
chain container by hand.
10. Lower hook until limit switch stops hoist
movement, then raise hook until limit switch
stops hoist movement. Inspect chain for any
signs of twist and correct before continuing.
Note: On the 10-ton hoist, the above procedure is
repeated for each of the 3-ton bodies.
It is recommended that after installing new chain,
the first few lifts be limited to no more than 25% to
50% of rated load capacity. Inspect chain for twist
before placing hoist into routine service.