
Product Manual


9
9.0 Unpacking
Open shipping container and check for shipping
damage. Report any damage immediately to your
distributor and shipping agent. Do not discard any
shipping material until hoist is installed and running
properly.
9.1 Contents of shipping container
1 Electric chain hoist
1 Chain container with fasteners
1 Power supply cord
1 Pendant control cord
1 Operating instructions & parts manual
1 Product registration card
1 Test certificate
10.0 Installation
Support for the hoist may be hook, clevis pin,
trolley, or beam clamp. Whatever method of
suspension is chosen, the support components
must be rated equal to, or greater than the
capacity of the chain hoist. Supporting structures
(such as I-Beams) should be installed by properly
licensed professional installers.
If you are using the hoist with a trolley, refer to the
trolley manual for instructions on securing the
control cord and maintaining proper slack in the
cord during operation. Optional pendant cords for
use with a trolley system are shown in section
13.4.
Make sure the suspension system used is properly
grounded, in addition to the grounding of the hoist.
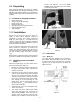
10.1 Installing power and control
cords
Attach the power supply cord and control cord to
the hoist as follows (see Figure 3):
1. Remove any protective caps from the plugs on
the power and control cords, and from the
sockets on the hoist.
2. Insert the 4-pin (4P) plug of the power supply
cord into the 4P socket on the hoist. Insert the
7P plug of the control cord into the 7P socket.
Orient the plugs properly; match the numbers
on the pins in each plug to those in the socket.
(The longest pin is the grounding pin, and
should insert into the socket hole with the
grounding symbol: ) Use sufficient force to
ensure good connection.
3. Tighten the two cover nuts. Hand-tighten only;
do not use a wrench.
4. The control cord has a cable loop to relieve
strain upon the power cord connection. On
1/4- to 2-ton models, secure this loop by
inserting it into the grooves of the clip, then
installing clip to bottom of hoist with the two
screws. See Figure 4. On 3- to 10-ton
models, secure the cable loop to the eyebolt
on the side of the hoist.
Figure 3
1/4T to 2T 3T to 10T
Figure 4
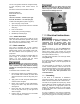
10.2 Lubrication
10.2.1 Gear oil
Your hoist has been shipped with oil included in
the gearbox. Before operating, verify the oil level
by removing the plug on the side of the hoist (see
Figure 5). The oil level should be just below the
edge of the hole.
Figure 5