
Product Manual


8
Unpacking
Open shipping container and check for shipping
damage. Report any damage immediately to your
distributor and shipping agent. Do not discard any
shipping material until the Chain Hoist is installed
and running properly.
Missing parts, if any, should be reported to your
distributor. Read this owner’s manual thoroughly
for assembly, maintenance and safety instructions.
Contents of the Shipping Container
1 Electric Chain Hoist
1 Chain Container with Bracket and fasteners
1 Power Cord
1 Pendant Cord
1 Top Hook Assembly
1 Owner's Manual
1 Warranty Card
Installation
Support for the hoist may be hook, clevis pin,
trolley, or beam clamp. Whatever method of
suspension is chosen, the support components
must be rated equal to, or greater than the
capacity of the chain hoist. Supporting structures
(such as I-Beams, etc.) should be installed by
properly licensed professional installers.
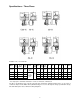
Installing Top Hook
1. Remove the two screws, lock washers and flat
washers (A, Figure 1), the hook-pin plates (B)
and the hook pins (C).
2. Place the top hook assembly (D) into position
between the body plates, and re-install pins,
hook-pin plates, screws and washers. Firmly
tighten the screws.
3. Place the hoist assembly into position on the
supporting structure.
If you are using the hoist with a trolley, refer to the
trolley manual for instructions on securing the
pendant cord and maintaining proper slack in the
cord during operation.
Installing Power and Pendant Cords
NOTE: If you need to convert the voltage
requirements of the hoist, it will be more
convenient to do that now before installing the
power cord or pendant cord. See “Voltage
Conversion” on page 9.
1. Attach the power cord and pendant cord to the
cable holder, as follows.
Figure 1
Figure 2
Figure 3
Power Cord
Assembly
Control Pendant
Assembly
Cable
Holder
Loop Attached to
Pendant Cord
Connector
Cap