
Use and Care Manual


20
Compound Rest Adjustment
Follow the same procedure as for the cross slide
adjustment.
Tailstock Adjustment
If the handle will not lock the tailstock securely,
use the following procedure:
1. Lower handle to the unlocked position.
2. Slide tailstock to an area that will allow you
to reach under the tailstock.
3. Tighten tailstock clamping nut 1/4 turn, and
re-test for proper locking. Repeat as
necessary.
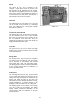
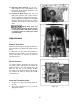
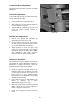
Half Nut Gib Adjustment
1. Remove the thread dial assembly by
unscrewing the screw (A, Fig. 28).
2. Loosen three hex nuts (B, Fig. 28) found on
the side of apron, and turn three set screws
(C, Fig.28) equally with a hex wrench.
3. Adjust properly for wear and play. Hold
socket set screw firmly with a hex wrench
and tighten hex nut to lock in place. Note:
Over adjustment will cause excessive
premature wear on gib and mating parts.
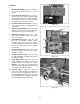
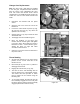
Headstock Alignment
The headstock has been aligned at the factory
and should not require adjustment. However, if
adjustment is deemed necessary, follow the
procedure below to align the headstock.
1. Using an engineer's precision level on the
bedways, make sure the lathe is level side
to side and front to back. If the lathe is not
level, correct to a level condition before
proceeding. Re-test alignment if any leveling
adjustments were made.
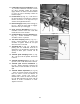
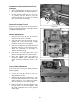
2. From steel bar stock of approximately two
inches in diameter, cut a piece
approximately eight inches long.
3. Place two inches of bar stock into chuck and
tighten chuck. Do not use the tailstock or
center to support the other end.
4. Set up and cut along five inches of the bar
stock.
Figure 28