
Product Manual
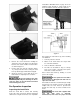
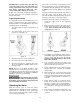

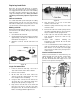
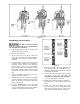
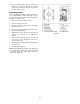
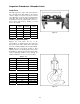
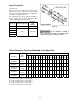

Figure 18
Dual/Multiple Fall Chain Hoists
The link on the load side end
must be a vertical link. If it is a horizontal link,
the chain will have a twist in it.
1. Lower hook until only 1 to 2 feet of slack chain
remains in the chain container.
2. Remove chain container.
3. On the slack side of the chain, remove the
chain stop, and remove the black spring(s).
(see Figure 16). Keep these handy for later re-
installing.
4. Using a C-link(s), connect the new chain to the
old chain. If the end link of the old chain is
horizontal, use two C-links. If the end link of
the old chain is vertical, use one C-link See
Figure 19. Using the correct number of C-links
will properly orient the chain, and ensure that
the first link on the load side end is a vertical
link.
5. Install the spring(s) and chain stop on the
opposite end of the new chain.
6. Support the load hook so that the load chain
can pass through the chain sheaves smoothly.
Figure 16 shows the load chain path for the
various sizes of hoist.
7. Press the DOWN button to move the chain
through the hoist. Keep tension on the chain
as you pull it through to the load side, until the
C-link(s) clears the hoist at the load side.
Figure 19
8. Place the first link of the new chain into the
load side end holder. Be sure that there is no
twisting of chain between last chain sprocket
and load side end holder.
9. Remove the chain stop bolt from the old chain
and install on the new chain. Do not
substitute any other bolt in this application.
Use a new cotter pin to secure bolt.
10. Install chain container following instructions in
this manual. Do not fill chain container by
hand.
11. Lower hook until limit switch stops hoist
movement, then raise hook until limit switch
stops hoist movement. Inspect chain for any
signs of twist and correct before continuing.