
Product Manual


9
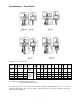
2. Open the connector caps on the two female
connectors (Figure 2) and two male plugs
(Figure 3).
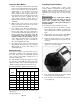
3. Check orientation of notches on the female
connectors and male plugs, and correctly
insert the 4p plug into the 4p female connector
on the left, insert the 7p plug into the 7p
female connector on the right with sufficient
force (see Figure 3).
4. Tighten the two cover nuts with fingers (see
Figure 4).
Figure 4
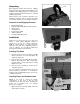
Electrical Instructions
Electrical connections must be
made by a qualified electrician in compliance
with all relevant codes. This machine must be
properly grounded to help prevent electrical
shock and possible fatal injury.
Grounding
In the event of a malfunction or breakdown,
grounding provides a path of least resistance for
electric current to reduce the risk of electric shock.
This machine’s power cord must be fitted with an
appropriate UL/CSA listed plug, or it can be “hard-
wired” directly to a control panel. If hard-wired,
make sure a disconnect is available for the
operator.
If a plug is installed, it must have an equipment-
grounding conductor and a grounding prong. The
plug must be plugged into a matching outlet that is
properly installed and grounded in accordance with
all local codes and ordinances.
Do not modify the plug – if it will not fit the outlet,
have the proper outlet installed by a qualified
electrician.
Improper connection of the equipment-grounding
conductor can result in a risk of electric shock. The
conductor with insulation having an outer surface
that is green with or without yellow stripes is the
equipment-grounding connector.
If repair or replacement of the electric cord or plug
is necessary, do not connect the equipment-
grounding conductor to a live terminal.
Check with a qualified electrician or service
personnel if the grounding instructions are not
completely understood, or if in doubt as to whether
the tool is properly grounded.
Repair or replace damaged or worn cord
immediately.
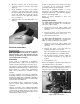
Voltage Conversion
The single phase model SS-1C is designed for
115 volt or 230 volt operation. It is pre-wired for
230 volt. To switch voltage:
1. Disconnect hoist from power supply, and
unplug the power cord and pendant cord from
the hoist.
2. Remove the motor cover and move the plug
from the 230Vsocket to the 115V socket.
3. Re-install the motor cover.
The three phase model SS-3C is designed for
230 volt or 460 volt operation. It is pre-wired for
460V. To change to 230V proceed as follows.
1. Disconnect hoist from power supply, and
unplug the power cord and pendant cord from
the hoist.
2. Remove the motor cover and make the
following exchanges on the SS-3C:
Move the plug XP1 from socket XS2 to XS1.
Move the plug XP2 from socket XS6 to XS5.
3. On the phase protector, slide the switch S1
from the 460 volt position to the 230 volt
position.
4. Re-install motor cover.
Refer to the diagrams at the back of this manual for
any clarification of these procedures.
NOTE: When connecting plug to socket, check that
the connector notch is fully engaged. To remove a
plug, press on the notch tail to disengage notch.
Figure 5
(single speed model shown)
Cover Nut