This .pdf document is bookmarked Operating Instructions and Parts Manual 7-inch Horizontal-Vertical Band Saw Model HVBS-7MW WALTER MEIER (Manufacturing) Inc. 427 New Sanford Road LaVergne, Tennessee 37086 Ph.: 800-274-6848 www.waltermeier.com Part No. M-414459 Revision H 01/2012 Copyright © 2012 Walter Meier (Manufacturing) Inc.
1.0 Warranty and Service Walter Meier (Manufacturing) Inc., warrants every product it sells. If one of our tools needs service or repair, one of our Authorized Service Centers located throughout the United States can give you quick service. In most cases, any of these Walter Meier Authorized Service Centers can authorize warranty repair, assist you in obtaining parts, or perform routine maintenance and major repair on your JET® tools.
2.0 Table of contents Section Page 1.0 Warranty and Service ....................................................................................................................... 2 2.0 Table of contents .............................................................................................................................. 3 3.0 Safety warnings ................................................................................................................................ 4 4.0 About this manual ....
reduce your exposure to these chemicals, work in a well-ventilated area and work with approved safety equipment, such as face or dust masks that are specifically designed to filter out microscopic particles. 3.0 Safety warnings 10. Do not operate this machine while tired or under the influence of drugs, alcohol or any medication. 1. Read and understand the entire owner's manual before attempting assembly or operation. 11.
23. Make your workshop child proof with padlocks, master switches or by removing starter keys. 30. Do not stand on the machine. Serious injury could occur if the machine tips over. 31. Never leave the machine running unattended. Turn the power off and do not leave the machine until it comes to a complete stop. 24. Give your work undivided attention. Looking around, carrying on a conversation and “horse-play” are careless acts that can result in serious injury. 32.
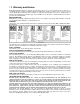
5.0 Specifications Model number ...........................................................................................................................HBS-7MW Stock number ................................................................................................................................ 414459 Capacity: Round at 90°....................................................................................................................... 7” (178mm) Round at 45°...................................
6.0 Setup and assembly 6.1 Shipping contents 1 2 4 4 2 1 1 1 1 Band saw Wheel axles Wheels Split pins Strain clamps Material stop bar Material stop Belt cover Vertical cutting plate Figure 1 Tools required for assembly: #2 cross point screwdriver Pliers 6.2 Unpacking and clean-up 1. Finish uncrating the saw. Inspect it for shipping damage. If any damage has occurred, contact your distributor. 2. Unbolt the saw from the skid and place it on a level surface. 3.
4. Fill tank to approximately 80% of capacity. 5. Place lid back onto tank, and place tank assembly back into base. 6. Replace return hose back into the hole in the tank lid. 6.6 Electrical connections Electrical connections must be made by a qualified electrician in compliance with all relevant codes. This machine must be properly grounded to help prevent electrical shock and possible fatal injury. Figure 3 1.
used to connect this plug to a 2-pole receptacle as shown in B if a properly grounded outlet is not available. The temporary adapter should be used only until a properly grounded outlet can be installed by a qualified electrician. This adapter is not permitted in Canada. The greencolored rigid ear, lug, and the like, extending from the adapter must be connected to a permanent ground such as a properly grounded outlet box. 3.
7.0 Adjustments 7.1 Hydraulic feed selector The hydraulic feed selector is used to control the blade feed rate and to lock the bow in vertical position. To increase feed rate, turn knob (A, Figure 9) counter-clockwise. To decrease feed rate, turn knob (A) clockwise. To turn off flow of hydraulic fluid, turn lever (B) as shown in Figure 9. To turn hydraulic cylinder on, raise lever (B) to the 12 o'clock position. Figure 10 7.3 Adjusting blade guides 1. Disconnect machine from power source. 2.
3. Set vise to desired angle, re-install nuts and bolts, and tighten the nut and bolt assemblies. 1. Install blade between the wheels, and insert blade between the bearings on the blade guides. 4. Adjust the movable vise parallel to the fixed vise by loosening bolt (A, Figure 13), adjusting to parallel, and tightening bolt. 2. Tension blade slightly to remove any sag in blade between blade wheels. 3. Turn blade tension knob (A, Figure 14) one and three quarter to two revolutions clockwise.
13. Run the saw and make sure blade is tracking properly (see section 7.9). This machine is designed and intended for use with blades that are 3/4” wide by 0.032” thick x 93” long. Use of blades with difference specifications may cause inferior performance. 7.7 Adjusting blade square to table 1. Disconnect machine from power source. 2. Place a machinist's square on the table and against the blade, as shown in Figure 16. 1. Disconnect machine from power source. 2.
Figure 17 7.9 Adjusting blade tracking Figure 18 Blade tracking adjustment requires running the saw with the back cover open. This adjustment must be completed by qualified persons only. 7.10 Adjusting blade guide bearings 1. Disconnect machine from power source. 2. Raise bow to vertical position and lock in place by turning off hydraulic cylinder valve. Note: Before making any tracking adjustments, try a new blade. Warped blades will not track. 3.
7.12 Adjusting automatic shutoff The saw should stop after the cut has been completed: 1. If the saw completes the cut and continues to run, adjust the trip bracket (A, Figure 22) down. 2. If the saw shuts off before the cut is complete, adjust the trip bracket (A, Figure 22) up. 3. If the saw stops cutting but continues to run, adjust the stop bolt (B, Figure 22). The saw is properly adjusted when the saw shuts off just after the blade has finished the cut. Figure 20 7.
10. Keep machine lubricated. See section 9.1, Lubrication. 4. Hold a container under the lower right corner of the gear box with one hand while slowly raising the saw bow with the other. 9.0 Maintenance 5. Place the saw bow in horizontal position again. Wipe out remaining oil with a rag. Disconnect machine from power source before making any repair or adjustment. Failure to do this may result in serious personal injury. 6. Fill the gear box with approximately 3/4 pint of 90 weight gear oil. 1.
10.0 Replacement Parts Replacement parts are listed on the following pages. To order parts or reach our service department, call 1-800-274-6848 Monday through Friday (see our website for business hours, www.waltermeier.com). Having the Model Number and Serial Number of your machine available when you call will allow us to serve you quickly and accurately.
10.1.
10.1.
10.1.3 HVBS-7MW Bed and Bow Assemblies – Parts List Index No Part No Description Size Qty 1............... HVBS7MW-1 ...........Coolant Pan .......................................................................................... 1 2............... HVBS7MW-2 ...........Base Leg (left) ....................................................................................... 1 3............... HVBS7MW-3 ...........Base Leg (right) ............................................................................
Index No Part No Description Size Qty 46 ............. HVBS7MW-46 .........Stop Rod ............................................................................................... 1 47 ............. TS-0561031 .............Hex Nut ..............................................................1/2" ............................ 2 48 ............. TS-0680061 .............Flat Washer ........................................................1/2" ............................ 4 49 ............. TS-026702 .......
Index No Part No Description Size Qty ................. HVBS7MW-91A-2 ....Center Shaft (inside)(S/N: 80910747 and higher) ................................... 2 ................. HVBS7MW-91-3 ......C-Ring (not shown)................................................................................ 4 92 ............. TS-0561031 .............Hex Nut ..............................................................3/8”............................. 4 93 ............. TS-081F021 .............
Index No Part No Description Size Qty 144 ........... HVBS7MW-144........Bearing Bushing .................................................................................... 1 145 ........... HVBS7MW-145........Flat Washer ........................................................3/8”............................. 4 146 ........... HVBS7MW-146........Cross Screw .......................................................1/8”x1/4" ..................... 2 147 ........... HVBS7MW-147........Flat Washer ..........
10.2.1 HVBS-7MW Cylinder Assembly – Exploded View 10.2.2 HVBS-7MW Cylinder Assembly – Parts List Index No Part No Description Size Qty 13N .......... HVBS17MW-13N ........... Cylinder Complete Assembly (S/N: 01028161 and higher) ............... 1 ................. HVBS17MW-13N-1 ........ Dust Cover ...................................................................................... 1 ................. HVBS17MW-13N-2 ........ C-Ring .....................................................................
11.