
Full Product Manual


10
5. When the blade has completed about 1/3 of the
cut, increase the feed rate. Watch the chip
formation until cutting is at its most efficient rate
and allow the saw to complete the cut (see
Evaluating Blade Efficiency). The blade is now
considered ready for regular service.
Work Set-up
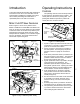
Setting Head Angle
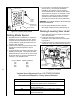
1. Move locking lever to the left to unlock swivel-head
(refer to Fgure 7).
2. Move swivel-head to left until pointer is set on
desired angle (refer to Figure 8).
3. Move locking lever right to lock worktable.
Locking Lever
(Move right to loosen)
Angle Scale
Work Table
Pointer
Move table left to set angle
Figure 7: Quick-Acting Swivel-Head Lock
Figure 8: Locking Work Table
Work Table
Move table to selected angle
Securing Workpiece
1. Set work table to desired angle. Lock in place
with locking handle.
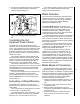
2. Place work piece against fixed jaw (refer to Figure
9).
3. Loosen hex post to free moveable jaw. Position
the moveable jaw so it is parallel to and in contact
with the work piece.
4. Using the clamping hand wheel on the worktable,
tighten the moveable jaw against the work piece.
Then tighten the hex post on the moveable jaw.
Figure 9: Securing the Workpiece
Vise Jaw
(Fixed)
Hex
Post
Vise Jaw
(Moveable)
Work Table
Adjusting the Vise for Angle
Cuts
(see figure 9)
1. Loosen the angle locking screw and the pivot
screw on the left vise jaw.
2. Turn the locking handle on the round, angle-setting
block counterclockwise to unlock the block. Slide
the block until the pointer on the block is aligned
with desired angle (see figure 9). Tighten the
locking handle to set the angle.
3. Set the workpiece in the vise. Put the front end of
the workpiece against the corner of the right vise
jaw. Put the rear end of the workpiece against the
angle-setting block.
4. Turn clamping hand wheel clockwise until the left
vise jaw is parallel with the workpiece. Tighten the
pivot screw and angle locking screw on the left
vise jaw. Clamp the workpiece in position.
5. After completing the cut, turn the clamping hand
wheel counterclockwise and slide the left jaw
away from the workpiece.
Move left
to lock