
Use and Care Manual


21
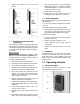
6. Tighten lock handle (A) to secure motor
position.
Figure 7-22
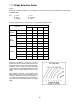
7.17 Drive belt replacement and
tensioning
The drive belt and pulleys are properly adjusted by
the manufacturer. However, belt tension should be
occasionally checked when the band saw is new, as
a new belt may stretch slightly during the breaking-
in process.
Disconnect machine from
power source before making any adjustments.
If belt becomes worn, cracked, frayed or glazed, it
should be replaced as follows:
1. Disconnect machine from power source.
2. Open upper and lower doors and remove blade.
3. Loosen motor lock handle (A, Figure 7-21).
4. Raise motor lift handle (B) and retighten lock
handle (A) to hold motor in raised position.
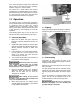
5. Open lower wheel door. Remove bolt and
washers, and remove wheel. If lower wheel
does not come off easily you may need to use
a pulley puller to remove it.
6. Remove old belt from around motor pulley, and
then from around lower wheel pulley.
7. Install new belt, making sure it seats properly in
pulley grooves. Note: See sect. 7.16 for speed
positioning.
8. Check pulley alignment. Refer to sect. 7.18,
then return here to step 9.
9. Reinstall lower wheel, bolt and washers, and
tighten.
10. Loosen motor lock handle (A, Figure 7-21) and
allow motor to lower. Check tension by pushing
with moderate pressure on the belt halfway
between the pulleys. An adequately tensioned
belt will deflect about 1/2”. If tension isn’t strong
enough, push down on motor.
11. Tighten motor lock handle (A).
12. Install blade, and verify blade tension and
tracking before operating (sect 7.7 and 7.9).
7.18 Pulley alignment
Pulley alignment is done in conjunction with poly V-
belt replacement.
If you are just beginning the alignment, start with
sect. 7.17.
If you were directed here, proceed as follows:
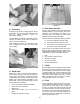
1. Place a straight edge against wheel pulley and
motor pulley. If straight edge does not sit flush
against both pulleys, alignment is necessary.
If alignment is necessary:
2. Loosen two set screws on motor (lower) pulley
with 4mm hex wrench.
3. Adjust motor pulley by sliding in or out.
4. Confirm alignment of poly V-belt using the
straight edge.
5. Retighten the two set screws on the motor
pulley.
7.19 Brushes
An adjustable brush is located in the lower wheel
housing. It should remain in constant contact with
blade and wheel to prevent buildup of gum and
debris. Loosen screw and adjust as needed, then
retighten screw.
8.0 Operating controls
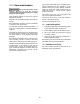
8.1 Start/stop switch
Press the green on button (A, Figure 8-1) to start.
Press the red stop button (B) to stop.
Figure 8-1 – Start/Stop Switch