
Use and Care Manual


9
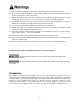
Installing Handwheels
1. Remove protective tape from shaft, and
remove screw and washer.
2. Press handwheel (A, Fig. 4) onto shaft,
aligning the keyway with the key. If
necessary, use a hammer with a block
of wood to tap the handwheel
completely onto the shaft.
3. Re-install screw and washer (B, Fig. 4).
4. Mount handle (C, Fig. 4) onto
handwheel.
Assembling Knife-Setting Gauge
(JWJ-8CS only)
Place the two bases (A, Fig. 5) onto each
end of the bar (B, Fig. 5). Snap the four E-
rings (C, Fig. 4) into the grooves on the bar
as shown, one E-ring on each side of a
base.
Installing V-Belts
1. Disconnect the machine from the
power source, unplug.
2. Remove the lock knob (A, Fig. 6) and
belt guard (B, Fig. 6).
3. Place v-belts onto cutterhead pulley
grooves and through opening in stand.
4. Pull v-belts down and place onto motor
pulley (Fig. 7). If necessary, loosen the
mounting screws (A, Fig. 7) and slightly
lift motor. Re-tighten the screws when
belt is placed.
5. Check to make sure that motor pulley
and cutterhead pulley are vertically
aligned and the v-belt does not contact
the sides of the opening in the base. If
the pulleys are not aligned, loosen the
screws (A, Fig. 7) on the motor base
and slide the motor until the belt is
aligned. Re-tighten screws.
6. The v-belt is properly tensioned when
finger pressure on the belt half way
between the two pulleys causes 1/2"
deflection. If the belt is too loose,
loosen the lower screws (B, Fig. 7) on
the mounting plate and push down on
the plate. When belt tension is correct,
re-tighten screws.
7. After two hours of operation, check belt
tension again. Re-tension if necessary.
8. Re-install belt guard and lock knob.
Figure 4
Figure 5
Figure 6
Figure 7