
Use and Care Manual

13
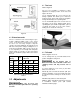
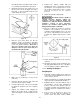
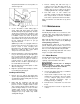
9.4 Index pin
Refer to Figure 16.
Indexing is used to create evenly spaced features
in a work piece, while keeping the lathe spindle
locked; for example, when cutting flutes on a
spindle blank with a hand-held router, while the
spindle blank is secured between lathe centers.
Your lathe provides 24 indexing positions. These
are identified by inscribed numbers on the spindle
pulley (H, Figure 15)
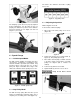
Figure 16
1. Rotate spindle until index pin (J) aligns with
desired hole.
2. Push index pin into hole and rotate knurled
head (K) to engage threads and secure in
position.
3. Perform operation.
4. Rotate knurled head counterclockwise until pin
releases. Move pulley to next desired hole,
and repeat. NOTE: A 3mm hex key can be
inserted and turned in the hole of the knurled
head, to help tighten or loosen the index pin.
Disengage index pin before
starting lathe.
IMPORTANT: Do not use index pin to lock spindle,
which will cause unnecessary wear to the pin. Use
knockout rod in hole of spindle collar for this
purpose.
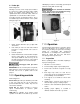
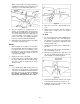
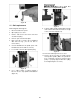
10.0 Operating controls
Refer to Figure 17.
On/off switch (A): Pull up to start lathe, push down
to stop. The safety key (A
1
) can be removed to
prevent unauthorized use of lathe. Key must be
reinserted to start lathe.
Speed dial (B): Rotate clockwise to increase
speed, counterclockwise to decrease. [JWL-
1015VS only]
LED light (C): Displays green during normal
operation of the lathe. If the lathe stops, and the
LED displays red due to overloading, push and pull
switch to restart. [JWL-1015VS only]
Do not start lathe at maximum
speed. Start at lowest speed within that range
and gradually increase to full speed.
Figure 17
11.0 Operation
The information which follows is general in nature
and is not intended to be a complete course in
wood turning. Nothing can replace the knowledge
gained by conversation with experienced
woodturners, or consulting books or trade articles.
Above all, simple trial and error will aid in
developing proficiency in the craft.
11.1 Inspection
Before operating the lathe, check that everything is
in proper working order:
1. Machine is on a level surface.
2. Check bearings; adjust only if endplay exists.
3. Check belt; it should be snug but not overly
tight.
4. Bed ways; keep clean, use steel wool to
remove any rust spots, and apply paste wax to
prevent buildup of rust and finishes.
5. Tool support; use a mill file to remove nicks
and dings.
6. Spindle tapers; should be clean and free of
dust and chips for proper seating of tapers.
7. Tailstock; clean and lubricate quill and locking
device.
8. Lighting; proper lighting is essential to
eliminate shadows and reduce eye strain.